
How to Free-Motion Applique!
My favorite tips for beginner-friendly free-motion applique! Buckle up and get ready to make some SILLY clothes!

ap·pli·qué
verb (be appliquéd)
decorate (a garment or larger piece of fabric) with pieces of fabric to form pictures or patterns:
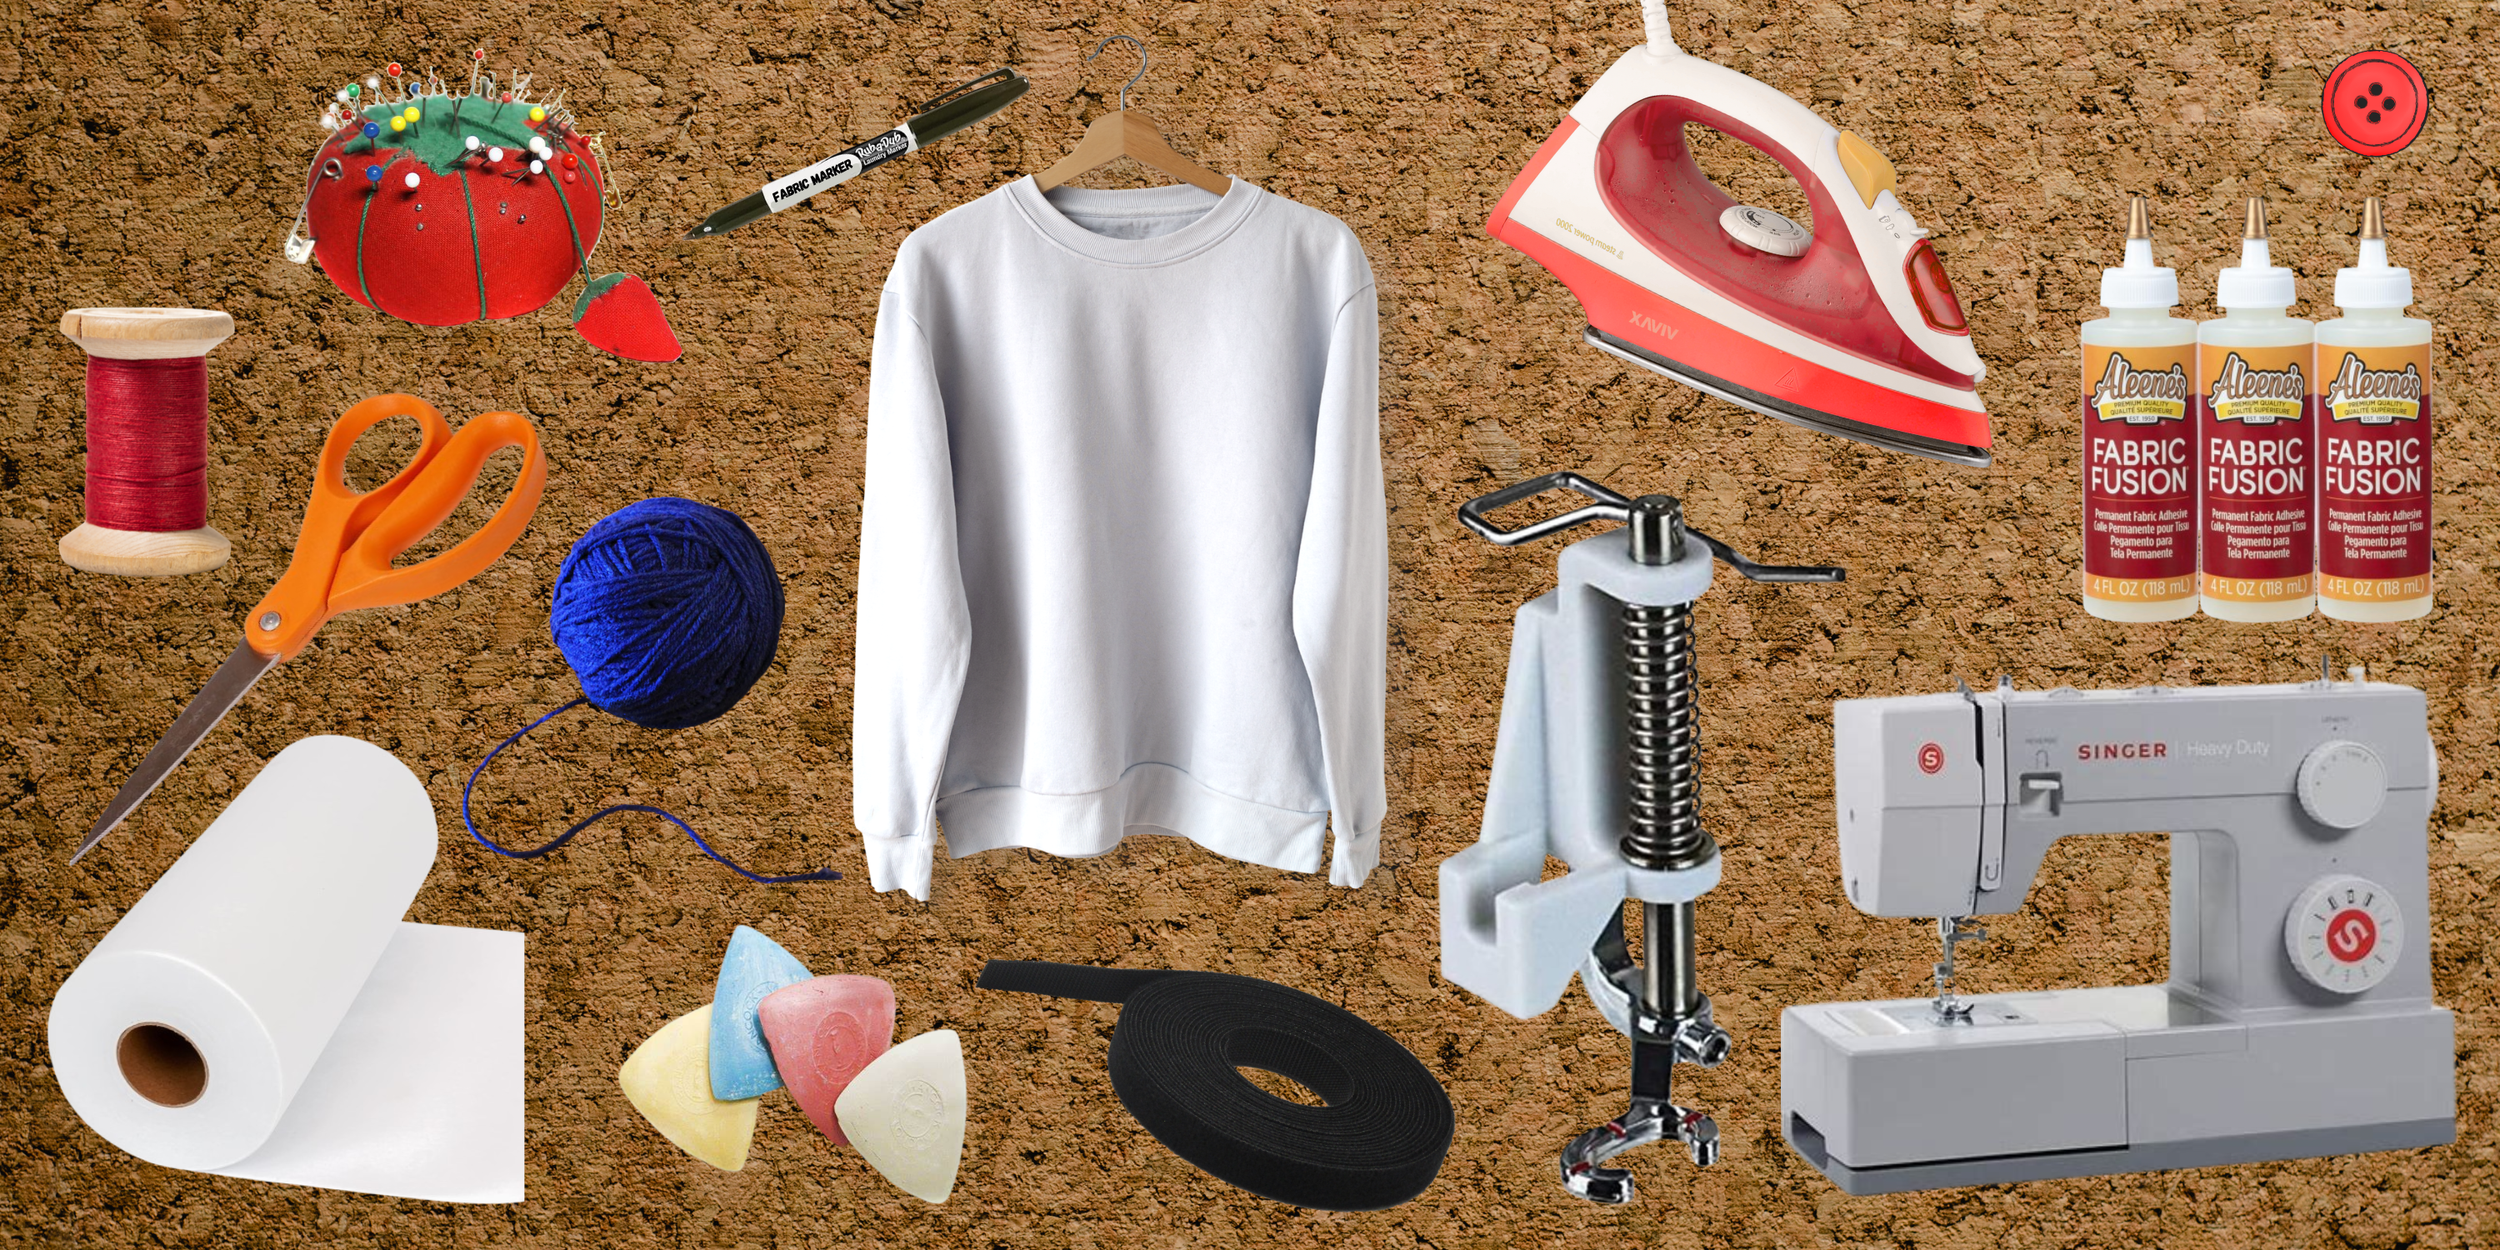
You’ll need:
1. A regular sewing machine! I use the Singer Heavy Duty ones!
I recommend making sure your machine is compatible with a free-motion presser
foot, to make your life 100x easier!
Typically, most modern machines capable of lowering the feed dogs, covering the feed dogs, or doing a 0-length stitch is a good sign! Zig zag stitches are also vital!
Vintage machines are a little trickier!
Try checking google for a foot that fits your make/model. Keep in mind, sometimes the feet are interchangeably called a “Darning Foot” or a “Quilting Foot”
2. Free Motion Presser Foot! This tiny tool is truly a game changer. It allows you to freely move the fabric in any direction, instead of the typical forward.
The foot allows for tight turns, small designs, drawing, embroidery, and even sewing in small spaces like sleeves and pant legs!
3. Stabilizer is a very important tool, but people always ask if it’s really needed!
Stabilizers do as the name says, they stabilize the fabric, to prevent shifting/warping/eating/snagging/pulling/ you name it.
They are best for thinner, and stretchy fabrics, as well as more complicated applique patches! (More on that later)
-Tear Away Stabilizer = My favorite style overall, but I may be biased
-Water Soluble Stabilizer = Dissolves away in water, great for more see-through designs and fabrics,
-Cut Away Stabilizer = More permanent, and usually bulkier. I find this is used the most with embroidery machines.
-Double Side Iron On… stuff? = I don’t think it counts as stabilizer, but it’s a great way to hold smaller pieces in place. Still requires sewing, as it’s not 100% permanent in the wash. Do not iron onto fabrics that melt under the iron.
4. Different colors of Thread. I was asked a few times about types of thread, and I’ll be honest I just use regular sewing thread for everything. Sometimes I use overlock thread for my applique cause its cheaper, but don’t use it for regular sewing cause its more fragile. (I’ve never tried embroidery thread, so you do you)
5. Regular Sewing notions like scissors, pins, etc.
6. Fabric glue or similar. I personally love a permanent washable fabric glue, but you could use a temporary basting spray for larger areas, etc. Make sure all glue is dry before sewing.
7. Thrifted Garments to upcycle! I’ll know if it’s not thrifted and I’ll haunt you.
8. Fabric for applique: I prefer a range of fabrics like fleece/felt, cotton sheets, recycled sweatshirts/t-shirts, tablecloths, flannel… nothing’s off the table.
OPTIONAL depending on design, etc.
9. Yarn and ribbon. (Peep the yarn I utilized for the crayon jacket above)
10. Buttons or snap closures. For 3D details, or interactive elements!
11. Grommets, and grommet tools like a hammer, etc. I’ve used these for my roller skate design, and to create spinning interactive details!
12. Hook and loop tape, (aka v-e-l-c-r-o) for interactive removable elements! Like my hat and shoe changing characters.
Installing the Foot
Remove the original foot completely, usually with a flat screw driver/ tool included with the machine. I usually use a spare metal bobbin, don’t judge me.
Attach the foot, making sure the metal bar that faces towards you on the top, is resting above the horizontal metal bar on the arm of the machine.
This will ensure the spring gets pulled up with each stitch, which allows you to move the fabric in any direction.
I have been sent a few stories of people who removed the bar or accidentally had it positioned under the arm, and it made it VERY difficult to maneuver the fabric around freely.
The tension settings definitely depend on your machine, the fabric, thread, etc. Just play around with the tension as you get started. (Using different colored bobbin and top thread is handy for checking this.)
It might be a personal problem of mine, but sometimes I have to turn my tension REALLY low in order for it to look even. You’ll get the hang of it!
If you can see the bobbin thread above, the top tension is too tight, you are using the wrong thread, or you may have threaded the bobbin wrong. (Trust me I do it wrong way too often)

Getting Started!
-For more intricate applique designs, I recommend building them onto a sheet of tear away stabilizer first!
It’s a great way to limit the amount of thread visible on the inside of the garment, and it’s just easier to move and sew.

Denim Fabric
-For denim, or other sturdy fabrics, you can also try glueing the fabric onto the piece directly, and skip the stabilizer, like the Cassie Jean Jacket I made!
(Make sure the glue is 100% dry before sewing! A little goes a long way, it can get bulky.)
-What fabric do you use? It depends on the design!
For smaller pieces/details, I recommend non-fray fabric like felt and fleece!
Larger details work best with thinner materials like cotton sheets, to reduce bulk, but fleece can also work well.
I don’t recommend using felt for large pieces of applique, because it can tear open over time in the wash.
-Stitches I like to use include: straight stitch, zig zag, and dotted zig-zag.
Straight stitch aka raw edge applique works great for non-fray fabrics! You are more than welcome to use raw edge applique on fray fabrics, just keep in mind: as they fray, they have a higher chance of pulling off the garment.
Zig-Zag Stitch is my favorite for fray fabrics, I typically use a medium width zigzag, and move the fabric very slow, or back and forth, so it completely overlaps and covers the edge. This prevents fraying and allows for a very secure hold even after washing.
Dotted Zig-Zag Stitch is great for sewing over yarn, like on the crayon jacket, or to create a more random stitch on the edges of appliques.

I highly recommend utilizing stitches within the centers of appliques themselves! They will be visible, but it’s a great way to ensure longevity and reduce chances of appliques warping and tugging off.
Think of it like the all over stitching on quilts that help hold them together. You can get creative! Mimic fur details on animals, feathers and scales on birds and fish, squiggly doodles, blades of grass, you name it!

Sewing with Tear-Away Stabilizer
-When using tear-away stabilizer, I typically sandwich it between the garment and the applique!
-If you sew a patch onto a separate piece of stabilizer, I recommend cutting away any excess chunks that aren’t being used, to reduce bulk.
Then I like to leave the stabilizer on the outside portion, until after I sew it to the garment, and then peel off. But you can do what you like! I just found it prevents stretching on the outer edges of the already delicate applique.
If it doesn’t want to tear off easily, don’t keep tugging. Otherwise it will pull the stitches.
If the stabilizer isn’t easy to peel off, you may not be stitching over the edges enough. Each time the needle punctures the stabilizer, aka the edge of the applique, it helps “score” it, making it easier to remove.
-Sometimes I have large, less detailed appliques, that I don’t want to build onto stabilizer first. If sewing onto a garment that should need stabilizer, (aka sweatshirts, or thinner materials) I’ll glue the applique onto it first, leaving a 1/2 gap from the edge. That way I can tuck some stabilizer scraps under the edge. Then just sew the edges down securely, and peel off when done.
Otherwise you may run into stretching, eating, or warping problems.

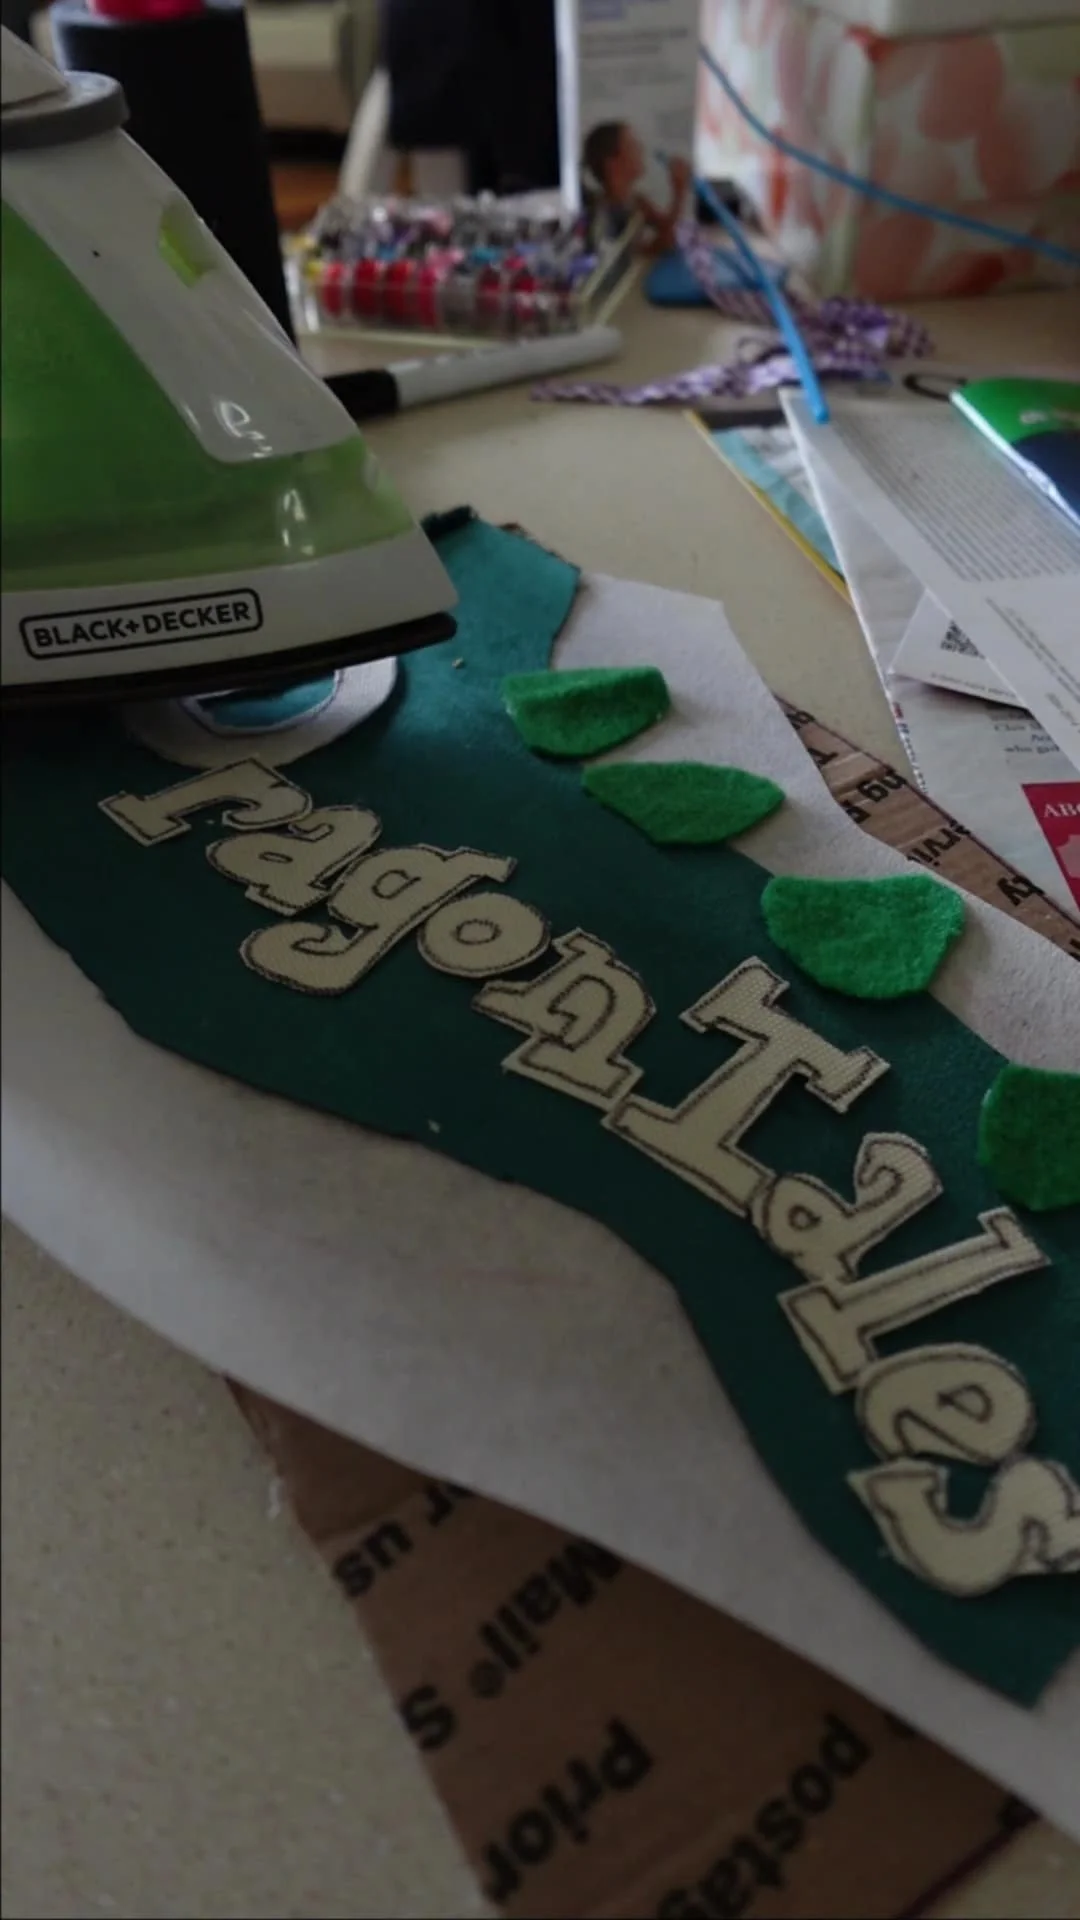
Iron-On Stabilizer
Doubled sided iron-on is a great tool for smaller pieces especially with unusual or detailed shapes!
I typically utilize it for my lettering. Like on this Dragon Tales logo!
Cut it in large sections, and iron onto the fabric you want to cut out. I like the use marker to sketch out the shape I want to cut, on the peel away plastic part. You’ll want to draw the flipped/mirror version.
Then carefully peel off the backing and iron it onto what you want!
Do not use on fabrics that may melt, especially if the iron is on a hotter setting. Do not steam. (Fleece, felt, plastic/polyester materials usually melt depending on heat)
The iron on is not normally permanent, especially in the wash. It should be mainly used as a temporary hold in place until sewing.


Pocket Appliques

A great way to level up your appliques is to make them functional! I love replacing the stabilizer with a sturdy fabric, to make the inside liner of the pocket,
Close off the edges if needed, usually I use a gathered zig-zag stitch.
Then just sew the outer edges down leaving the open space for the pocket!
I recommend securing the sides of the opening well, because there can be a lot of stress on those outer points. (See pics for details)


Tricky Spaces
One of my BIGGEST applique questions is, “How do I sew onto pant legs and sleeves without sewing both the front and back sides together? “
The free motion foot is very important to allow you to maneuver within those tight spaces!
Check to see if your machine has a cover that can slide out (see pic) which will also equally make your life easier,
Then shove the leg/sleeve through this piece, so that the back part you don’t want to sew, is underneath. Sometimes I have to sew the top half by shove the pants in from the waist, and then do the bottom half through the bottom opening of the leg, if I don’t have enough room.
The whole leg or sleeve won’t be 100% flat and neat, it’s going to be scrunched up and difficult, but way better than seam ripping and re-sewing (in my opinion).
Make sure you lay the immediate area you’re sewing down, ensuring there are no additional layers of the garment hiding under there.
I’ve accidentally sewn legs together because I didn’t double check what was around the needle.

Possible Problems
A few problems I’ve dealt with in the past, include birds nests, broken thread/stitches, skipped stitches, you name it!
-I noticed some particular materials cause skipped stitches for myself. Notably that iconic 70s polyester material. It’s an itchy sort of polyester that’s hard to describe. You may not have my problem, but I figured it’s good to share!
- A recent problem I think I sort of solved, are skipped stitches with fleece on fabric instead of stabilizer. I switched to my wider, free motion foot, and it doesn’t have that same problem. But overall, I prefer the smaller open toe style foot. Again, you may never run into this problem, but keep in mind, sometimes it may be the foot.
-Bird’s nests on my end are usually caused by lint buildup, or not properly pulling the bobbin thread through when beginning my stitch.
-I’ve also been a dingus, and accidentally loaded the bobbin facing the wrong way, etc. This led to wacky tension and stitch issues. When you pull the thread of a top-load bobbin, it should turn in a counter clockwise direction. Normally… please check your machine. I wanted to share, because again it was a mistake I made for months without realizing it.
Good Luck!
If you still have questions, comments, or want to share pictures of your creations, DM me!
@riskthrift on Instagram


