
How to make adjustable Pants
A slower guide to making your own silly pants! With 3 possible waist closure options.
I recommend reading this on a computer, but you do you!
”Please let me know if you have questions or need me to adjust this tutorial!” xoxo brit

Thank you for all your support and kindness!!!!
You’ll need:

The main tools are:
-A sewing machine, that can either do a zigzag/overcast stitch, or an additional overlocker machine.
-Scissors, pins, thread, + measuring tape
Optional: depending on design
-Elastic
-Fabric marker
-Ribbon, drawstring threader tool, and lighter
-Grommet tools (hammer, grommets, hold puncher)
-Belt buckle
For the pattern:
-A pair of pants that fit you
-A large piece of cardboard or paper to trace the pattern. (cardboard is more durable, so you can get more uses out of it)
-Marker or pencil to trace pattern
Step One: Making your Pattern

Find a pair of pants that fit you!
(Your pants are shown in blue marker, the pattern is shown in pink)
If they are form fitting jeans, add ~3 inches (7.5 cm) the side of the pattern with the fold. This will allow for stretch/fitting over your hips!
If your pants have an elastic waist, try stretching and tracing them!
For straight/wide leg pants, don’t taper the sides in towards the bottom. (This also reduces fabric waste)
Make sure to add .5 - 1” (1.25-2.5 cm) of seam allowance to the edges!
Lower the crotch down, and to the side by a few inches. This will allow for a looser, comfier fit.

My favorite pattern was traced from a vintage jumpsuit, onto cardboard, which I have re-used countless times!
You can adjust these measurements to fit your body, if you don’t have pants on hand!
(measurements in the picture are in inches, centimeters are translated below)
If you need different fabric for the front and back of a leg, add seam allowance to the side with the fold, and sew to another piece of fabric.
Top section (13in/33cm) = 1/4 of waist (I recommend making this measurement larger than your hips)
Rise (18in/45.75cm) = Crotch to waist. I recommend a lower+wider than normal crotch, for a loose fit, and to account for difference in front and back body measurements
Inseam (23.5in/59.5cm) = Crotch to bottom hem. Lengthen this measurement for longer pants.
Width (24in/61cm) = Width of leg, and 1/4 of hips, if you keep the pants straight down.
Length (37.5in/95.25cm) Waist to bottom hem.
if the fabric is cut exactly at these numbers, not adding seam allowance, it will result in pants with the following measurements:
Total waist: 48” max opening
Rise: ~17.5” (drop crotch)
Inseam: ~22.5-22”
Hips: 80+ (free)
Length: ~36.5-36”
Step Two: Cutting your Fabric

If you want a liner, or a reverse side, cut 4 total panels. (This is what the fabric would look like opened, and not folded in half.)
Each panel makes up one leg.
*Make sure to cut and sew a test pair of pants with fabric you don’t care about first!
————————————
If you don’t want the extra inside fabric, or your fabric is thick (like a towel) cut 2 panels instead.
To make up for the additional fabric needed for the waist, I recommend adding a few more inches to the top of the pattern.
For example, if you want a drawstring or elastic waist, add ~ 2-3 inches (5-7.5 cm) on top so you can fold the fabric down.
Step Three: Sewing the pants

Fold each panel in half, inside-out.
Sew from the crotch down, with a straight stitch.
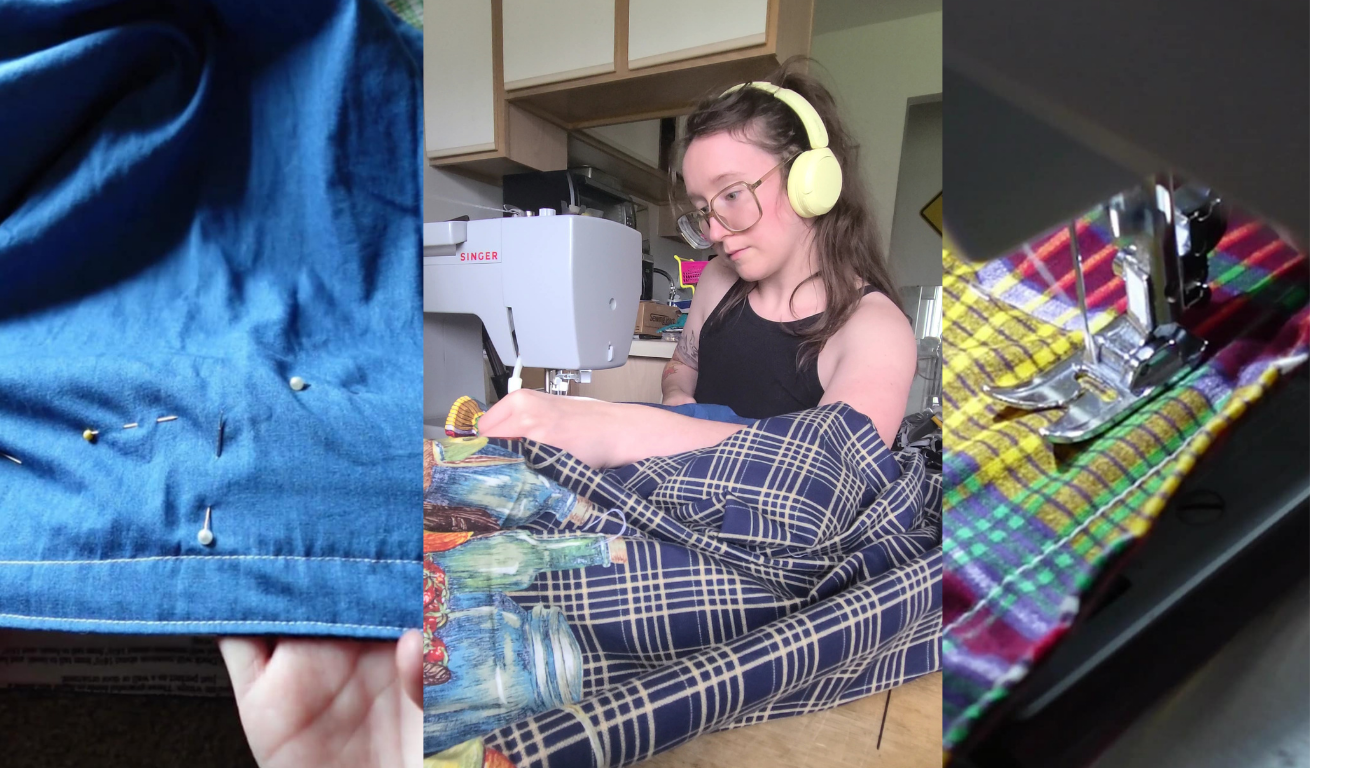
Go over raw edges with an overcast stitch, or an overlocker, to prevent fraying.
Press the seams down and sew with a straight stitch.
Repeat these steps for the other individual panels.

Image: overcast stitching and sewing the seam down

Once both legs for the outside is complete, turn one right-side-out. (the right side of the fabric is pictured in pink)
Tuck it into the inside-out one, lining up the crotch seams.
Double check that the right sides of the fabric are facing each other.
(Right-sides of fabric means the outside, or the correct side of the fabric.)
Pin and sew along the curve (orange dotted line)
I like to go over this 2 times with a straight stitch to make sure it’s strong.
Overlock the edges, press and sew the seams down again.
Repeat these steps for the inside liner.

Image: The crotch seams are lined up, and then sewn.

Once both the liner and outside pants are sewn, turn one right-side out, and tuck it into the inside-out one.
(Right side of the fabric is shown in pink highlighter)
Right sides of fabric should be facing each other.
Line up the top waist, pin and sew. (Orange dotted line)
Overlock the edges once again.

Turn the pants right-side out.
This may be a little tricky. Pull the pants out from inside.
Turn the entire piece right side out.
Tuck the liner into the pants.
The wrong side of the fabric should now be hidden, with right sides of fabric visible outside, and inside.

Sew the top of the waistline
One straight stitch directly under the top, and another stitch 1 inch (2.5 cm) down from the top.
Then it’s time to choose your waist style!
Elastic, drawstring, or belt loops.

Image: sewing the top of the waist down, right at the top, and 1” down from the top. (This creates a nice ruffle/paper bag effect.)
Step Four: Waist Options
Elastic Waist:
-Comfiest waist
-Less adjustability
-Most difficult to sew (in my opinion)
-Washing machine friendly (possible dry-rot)
-Best for reversible wear
Drawstring:
-More adjustability (can tighten as much as needed)
-Less comfy while wearing, (tight, no stretch)
-Easier to sew
-Not washing machine friendly
-Not recommended for reversible wear
Belt Loops + Belt:
-Adjustable, but limited to belt
-Can swap out belts
-Takes the longest to sew, even longer if it’s reversible
-Belt loops may be a little bulky depending on your fabric type
Elastic Waist

Reversible Elastic Waist Pants
Measure the elastic.
It should stretch to a max of the waist opening. Pictured, the elastic is folded in half.
For example, if the waist is 40 inches (~100cm) the entire strip of elastic should stretch to a max of ~ 40 inches or slightly more. .

Want a thicker strip of elastic?
Cut 2 identical strips and join the edges with a zig-zag stitch.
Fold the edges together to join it into a circle.
Either overlap the elastic, (cut additional seam allowance in this case)
Or use a piece of fabric, to sew them together for less bulk.
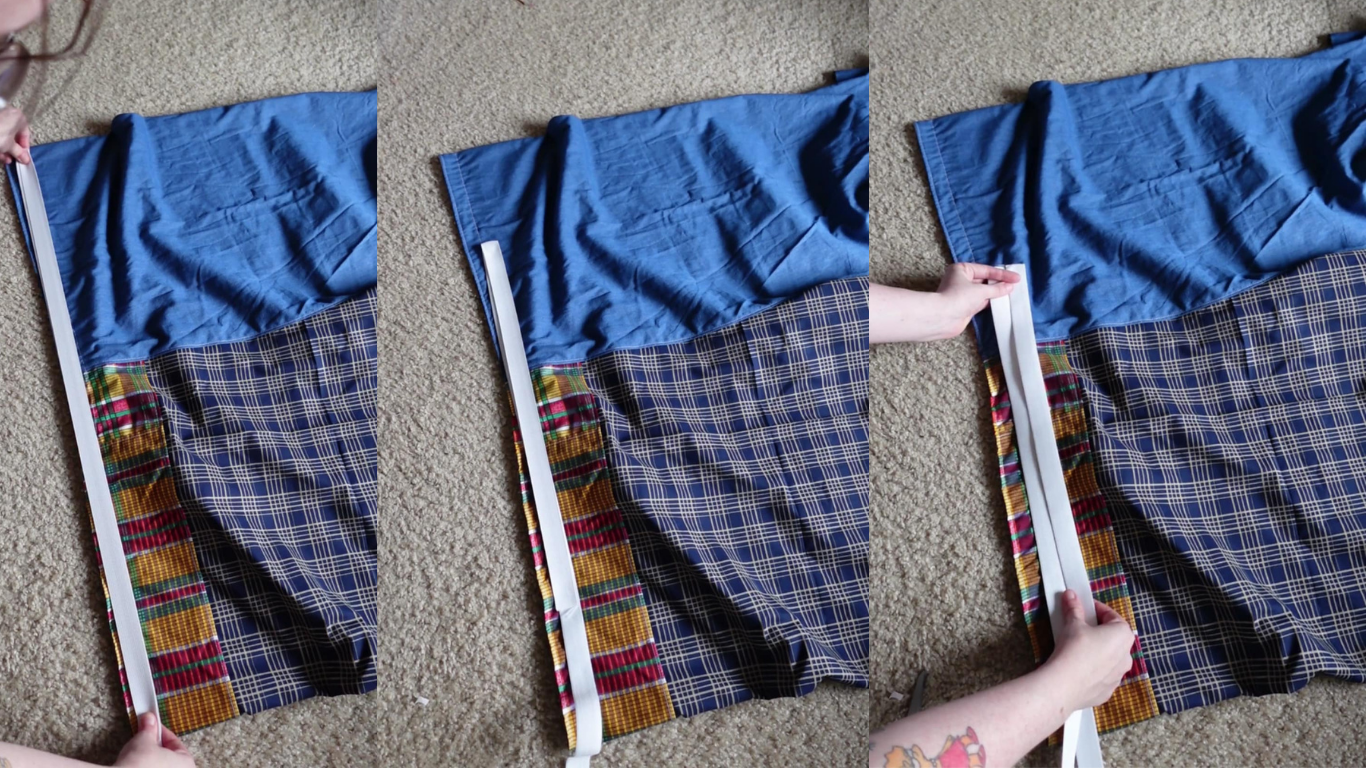
Run the elastic between the 2 layers of fabric, up through the legs, to the top of the waist. It should be hidden between the liner and outside fabric,
Stretch the waist, and pin until the elastic is even around.
Stretch the fabric and sew with a straight stitch to secure the elastic to the waist. I sewed 3 lines of stitches (top middle and bottom of elastic)

Image: finished elastic waist front and back.
Drawstring Waist

Image: Drawstring waist pants with inside liner -not reversible

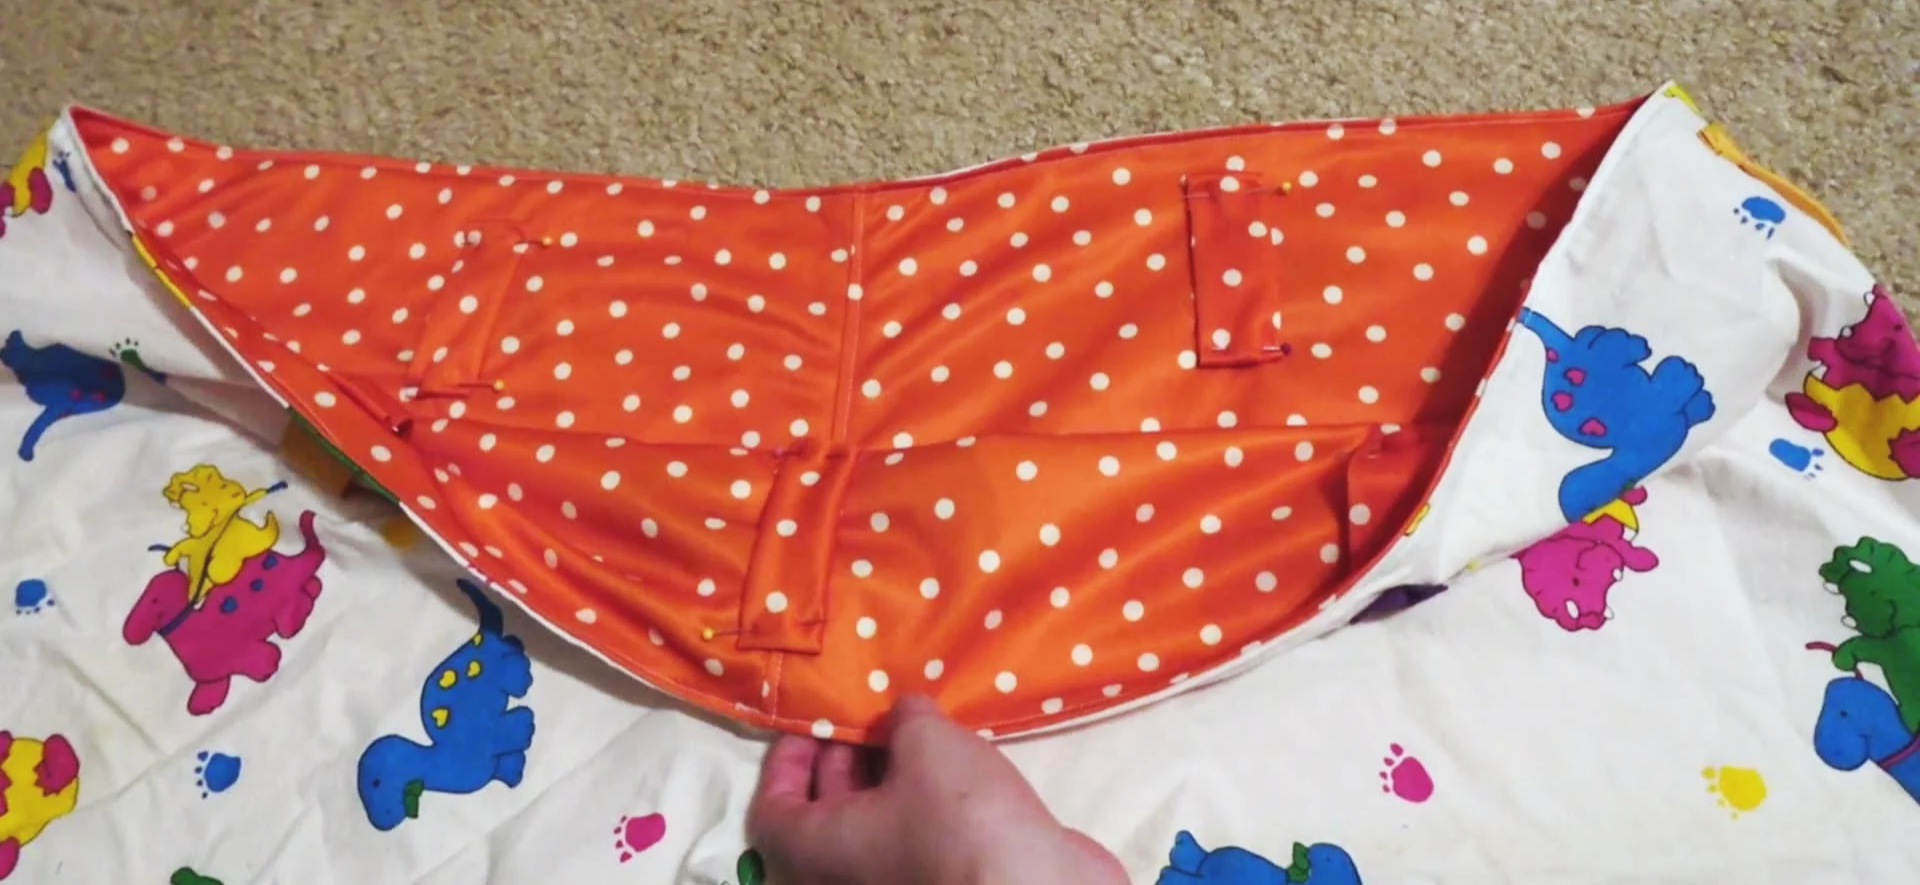
Sew buttonholes, or add 2 grommet holes to the front of the fabric ONLY.
You should be able to access the area between the liner and the outside fabric through the bottom of the legs.
Sew an additional stitch just under the holes to create a tunnel for the ribbon.
Use a drawstring threader tool to run the ribbon through the waist tunnel.
Use a lighter to melt the ends of the ribbon to prevent fraying.
Belt Loops + Belt

Image: Shorts with belt loops+belt. Reversible on the inside not pictured.

I cut 7 belt loops at 4.75”x3” (12x7.5 cm) for each side (aka 14 total, 7 outside, 7 inside)
If you only have one wearable side, cut ~7, or more/less depending on preference!
Feel free to adjust the size of the loops for something larger/smaller as well!
Fold each piece of fabric inside out, in half the long way. Sew the edge with a straight stitch.

Turn all the loops right side out, iron flat with the seam in the middle.
Fold the top and bottom edges inward towards the side with the seam.

Pin the loops to the top of the waist. I did mine as shown. With 2 on the front, off to each side. 1 centered on the back, and the other 4 on each side evenly.
Because mine was reversible, I also pinned the other loops on the inside directly behind the loops on the front.
Sew the top and bottom of the loops. For added securement, I sewed 2 lines on the top and 2 lines on the bottom. You could do a zigzag stitch instead (like on a pair of pants)
I only recommend doing this reversible belt loop design, on thinner/normal fabrics as it can get bulky to sew and wear.

If you want to sew your own belt, the measurements depend on a few factors…
a) The length should be at LEAST 3 inches (7.5cm) longer than the max waist, or longer depending on your preference.
b) The width should be determined by your buckle and/or the loops. For me, my buckle bar was 2 inches (5cm) wide, so I cut the fabric for the belt at 4 inches (10cm) wide to account for seam allowance/folding the edges inside.
If you want different fabric front and back (for a reversible design) cut 2 panels like the picture shown.
If you only need 1 color, cut a piece of fabric ~8-7.5” wide instead of 4” (or whatever your preference)

(For my belts, I’ll normally sew the entire edge of the rectangle, right sides of fabric together, leaving a 2 inch gap near the middle, and then use a turner tool to pull it all right side out and sew it flat. )
Otherwise you can follow the drawing as shown, below.
With fabric right sides together, sew the orange dotted line show. AKA Start near the edge of a corner, go around the entire rectangle and stop after going around the last corner,
this leaves a large enough gap to turn right side out by hand.
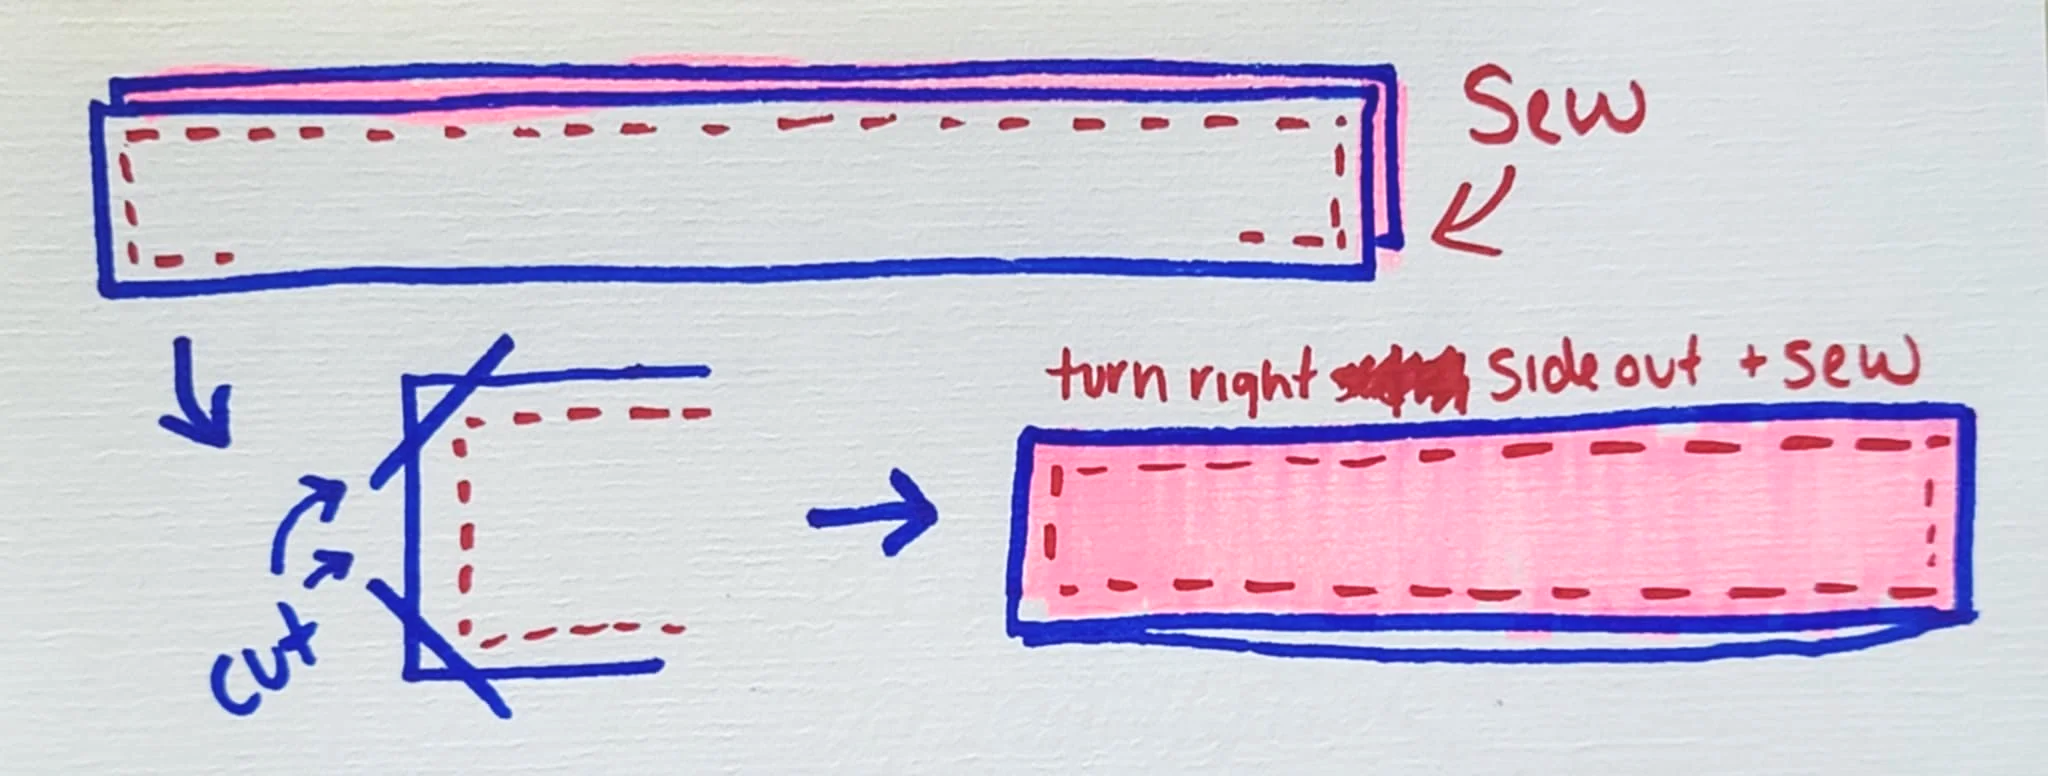
Cut the corners off to reduce bulk.
Turn right side out
Sewn the gap and the rest of the edges flat.

Wrap one end around the middle bar of the buckle.
Sew the end to the belt with a straight stitch, or an X stitch.
Step Five: Finishing Touches
All you need to do is hem the bottom of the pants!
I will normally hem each layer individually, just in case the liner or outside is ever so slightly different in length, it won’t create a weird bubble somewhere.
You can sew them together if you desire.
I’ll typically just fold the edge in 2 times, so the raw edge isn’t visible.
If the fabric is thicker, you could use bias tape on the edge instead of folding.

Final Thoughts

Let me know what you think about the tutorial!
Should I add anything? Clarify?
What other tutorials would you like to see?
If you have made it this far, you are the honky-tonk badonky-donk!
I just want to say THANK YOU!
I know it’s not the same as a ready to purchase and cut pattern, but I hope it gives you enough tools to build your own pattern and make your own design choices!
Now go to the thrift store and grab some silly fabrics to upcycle!
xoxo Brit