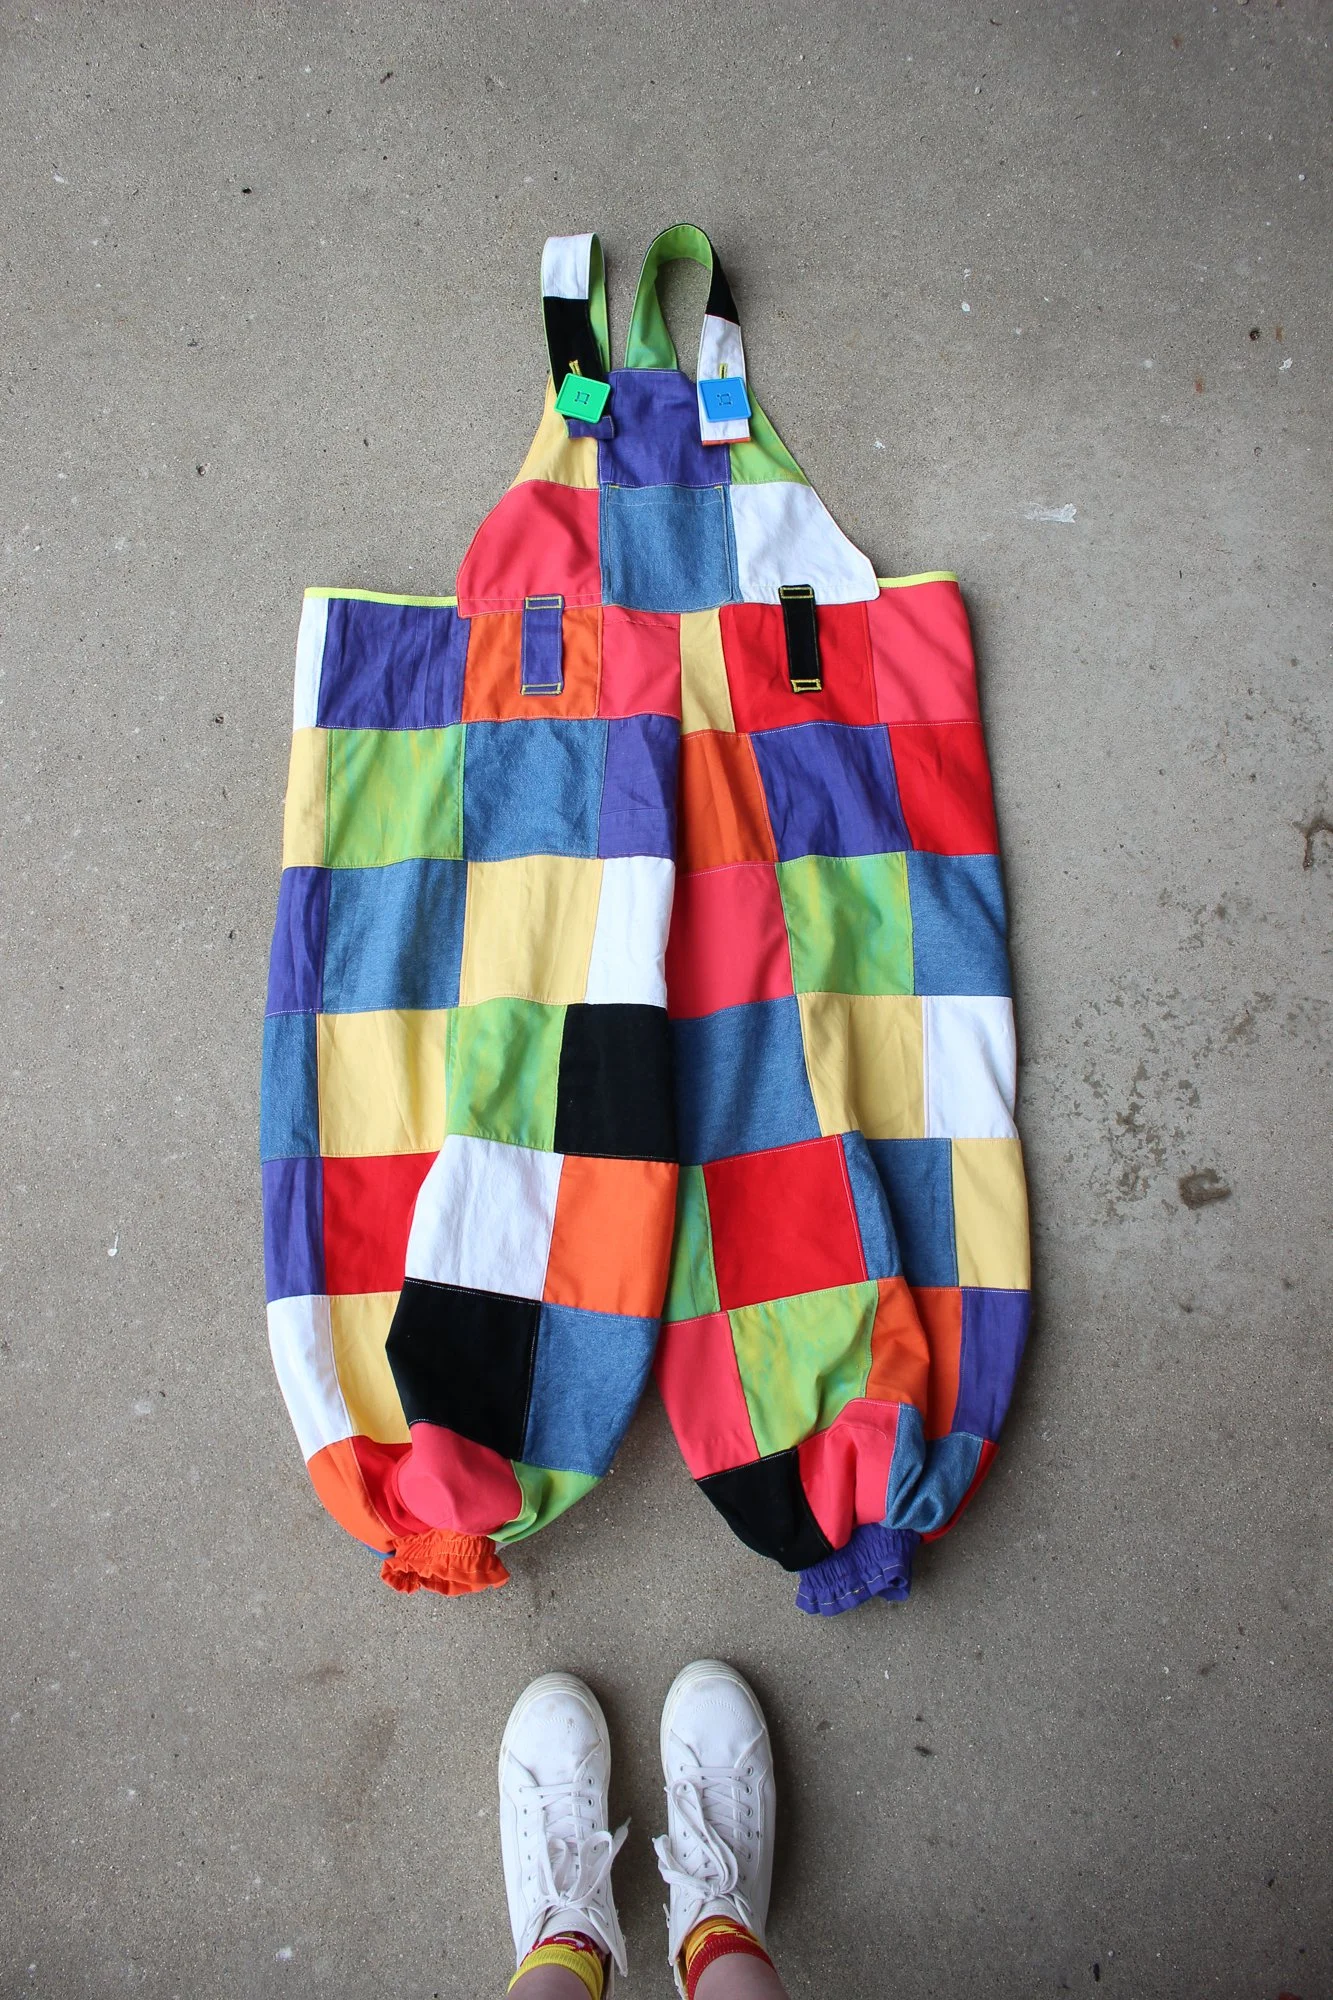
How to Make Patchwork Overalls!
A step-by-step guide to patchwork and overall construction.
I recommend viewing this on a computer.
NOTE: I have a video version posted on my Instagram for you to follow along too!
Updated 3/18
You’ll Need
Sewing Machine: Capable of Regular and Zig-zag or Overcast stitch.
OPTIONAL Serger/Overlocker: This finishes your edges nicer than an overcast stitch. Not required, just helpful.
Fabric: Non-Stretchy fabrics like cotton or linen are best! Try going to the thrift store and recycling bed sheets, curtains, tablecloths, or clothes.
In this tutorial, I used: Tablecloth (Red), Scrub Pants (Orange), Elastic Trousers (Yellow), Comforter Cover (Green), Comforter Cover (Blue), Elastic Trousers (Purple), Micro Cordurouy Fabric Scraps (Black), Tablecloth (White)
Measuring Tape
Thread
Scissors and optional, a rotary cutter
Pins
Washable Marker: Optional, but makes measuring and cutting squares easier
Elastic
2 Large Buttons
Iron
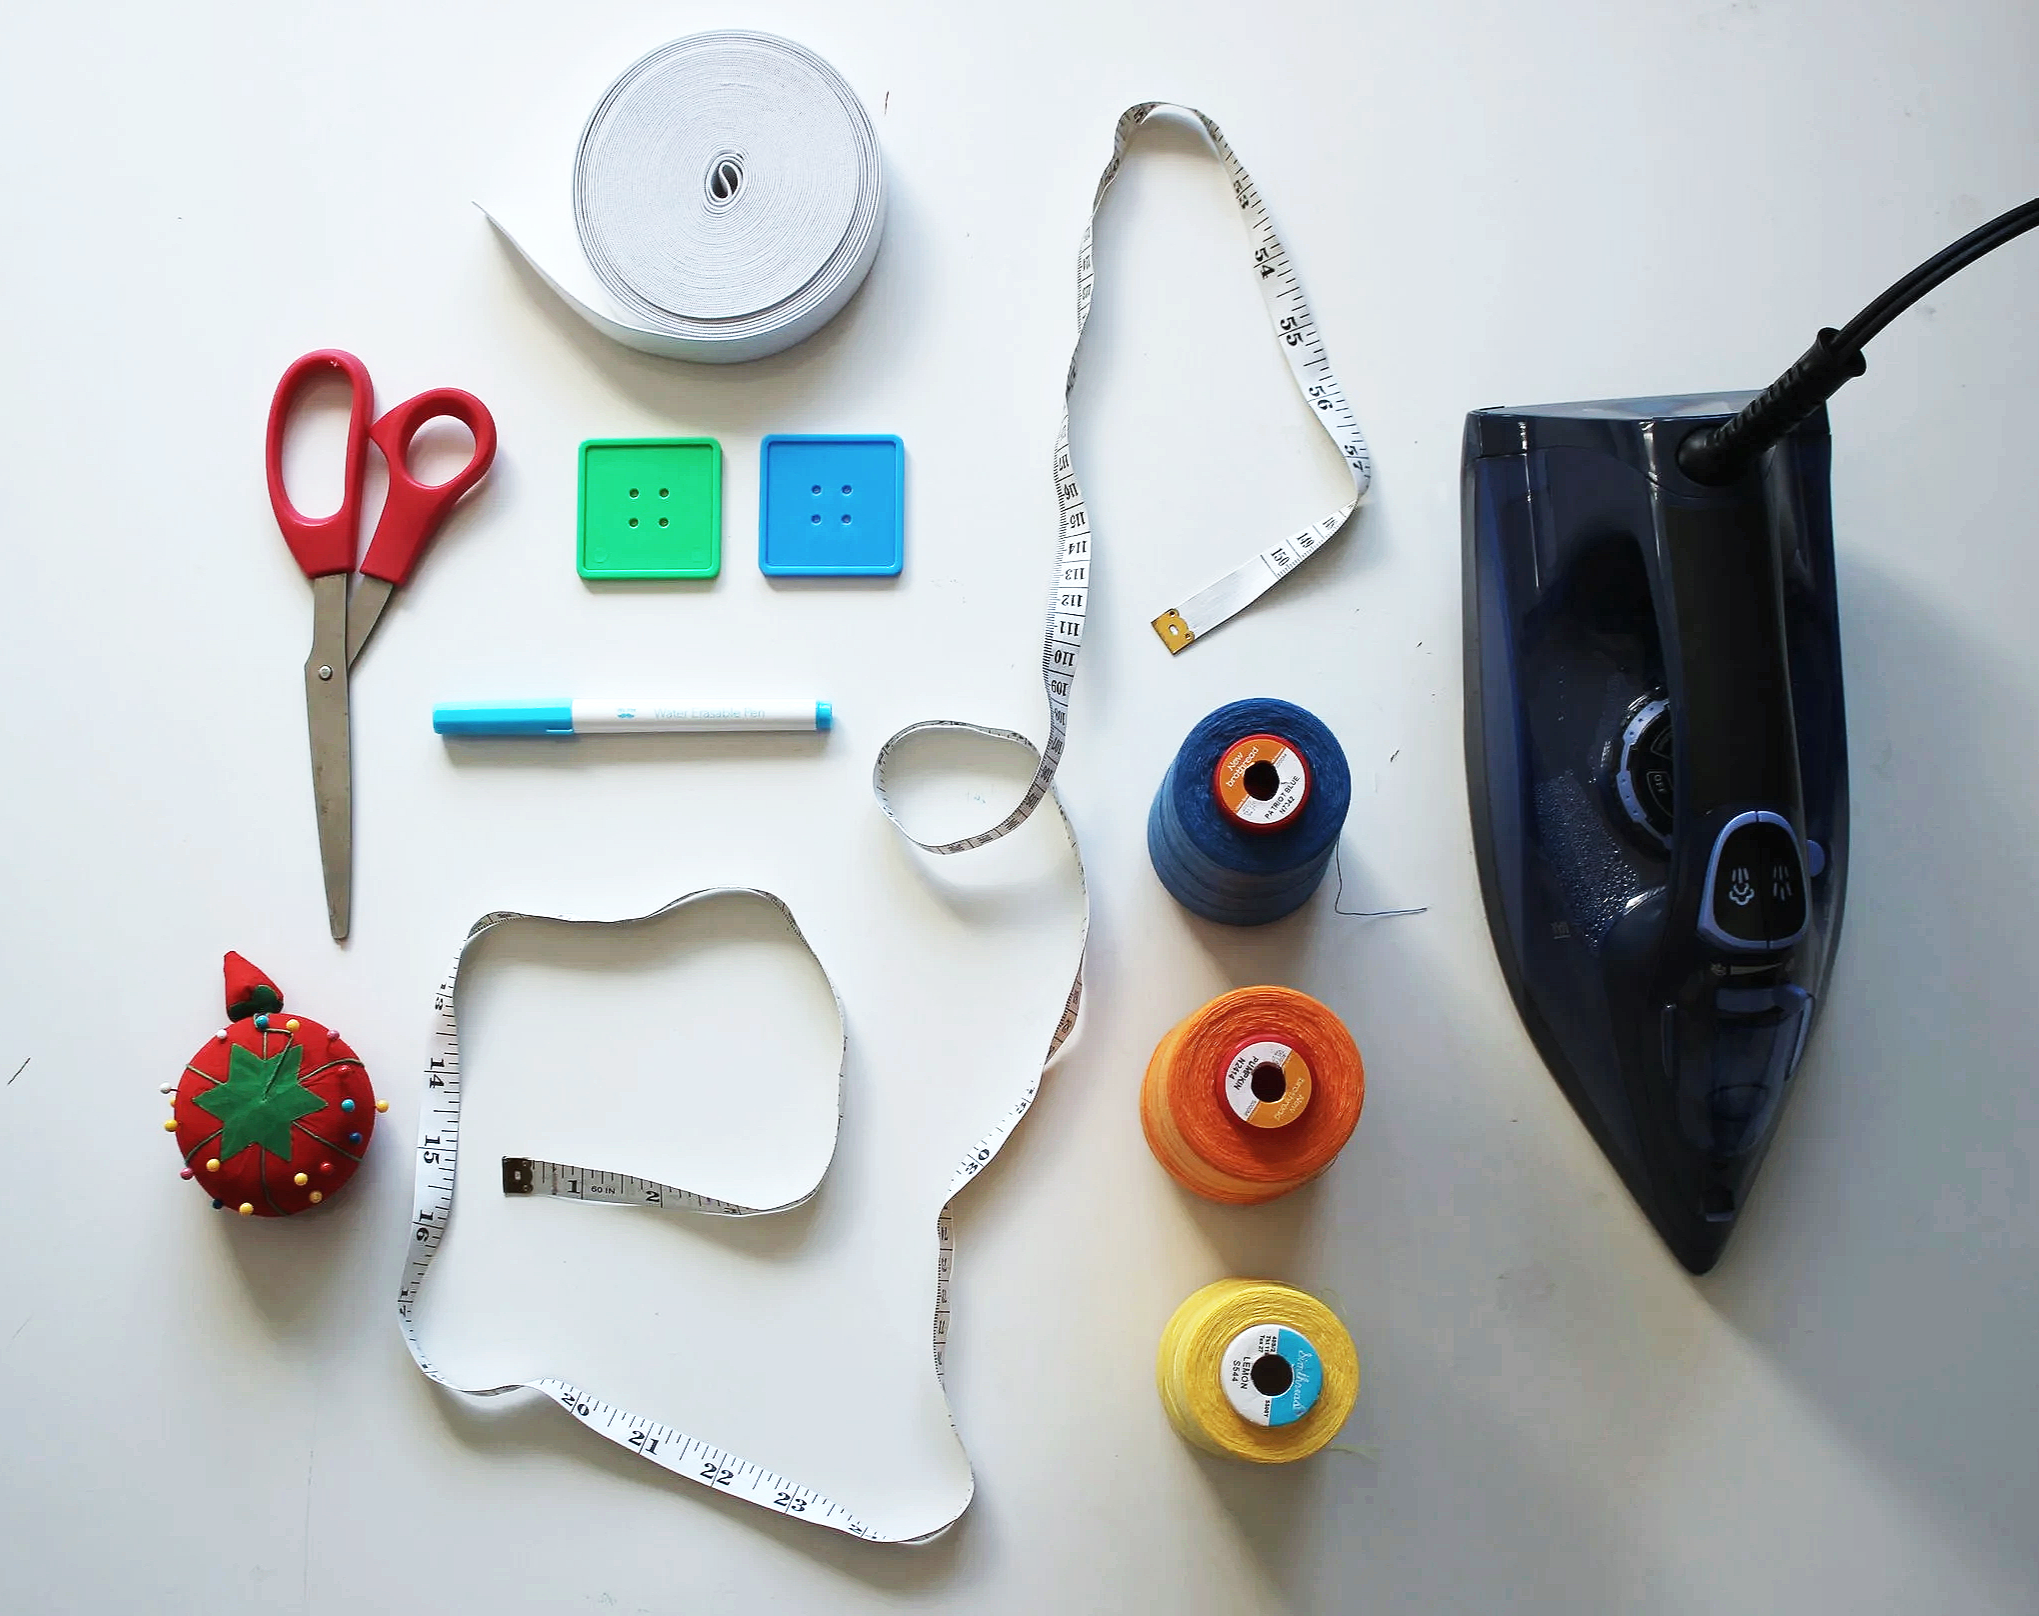
Image: recommended tools
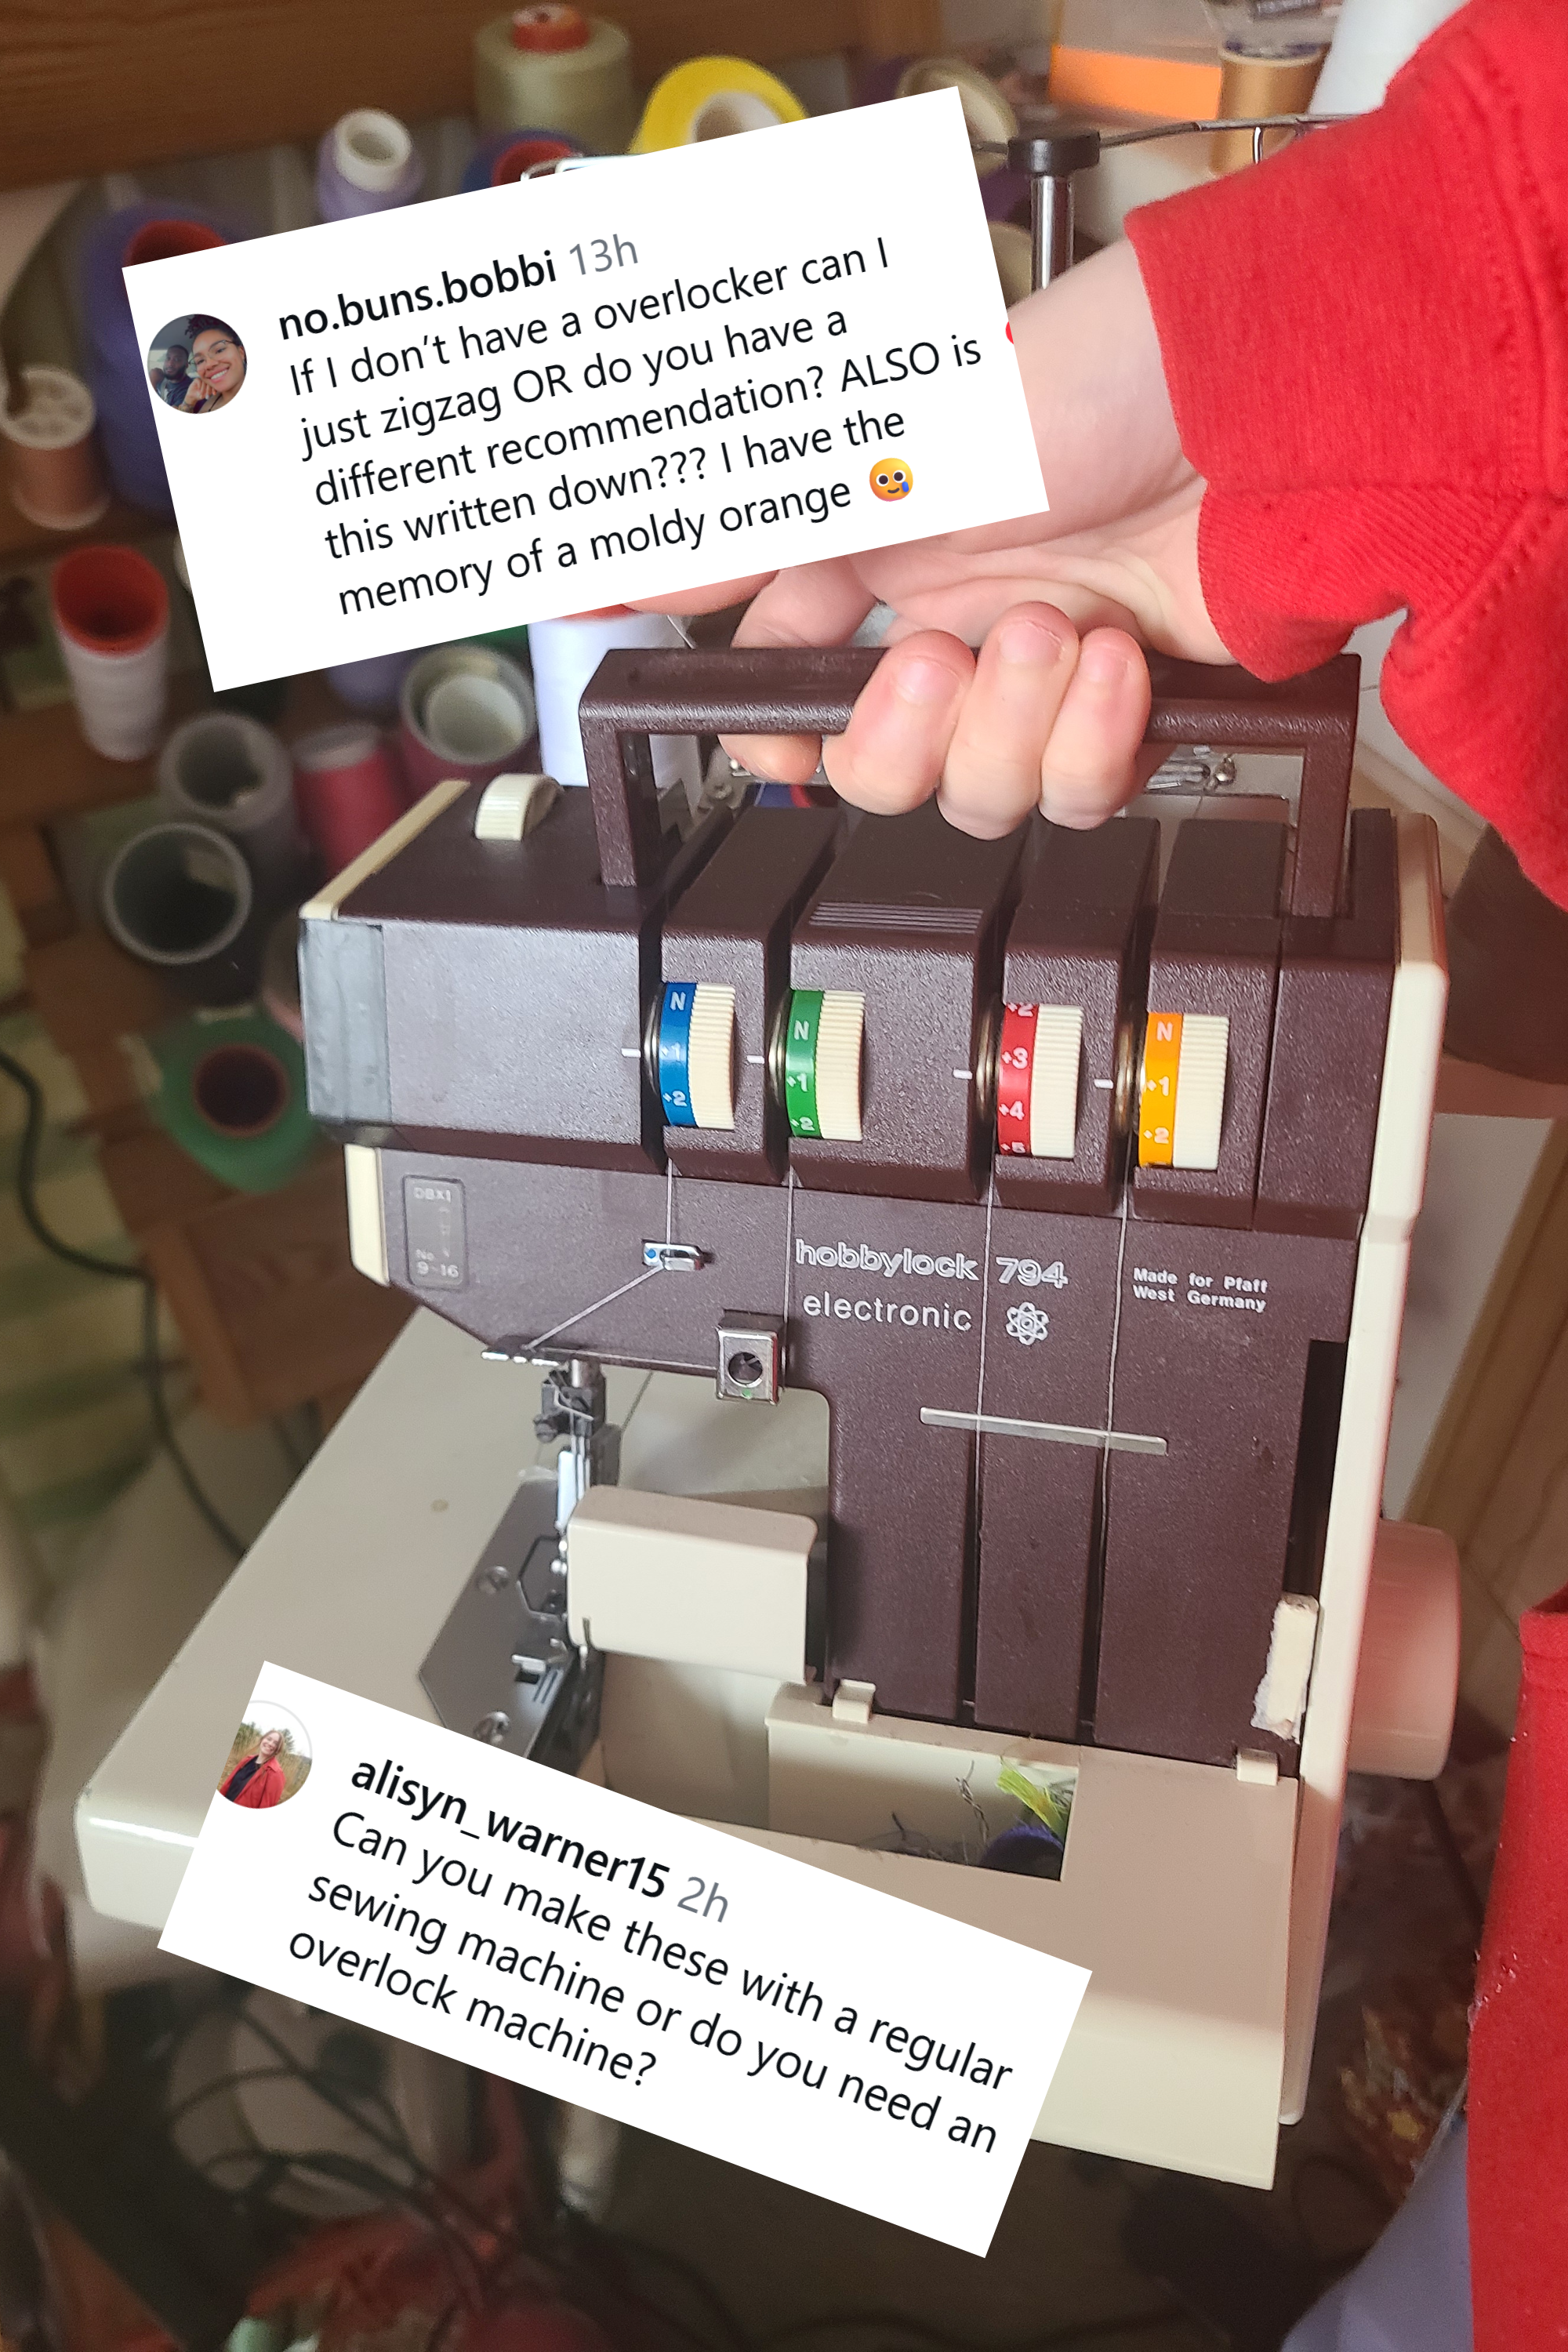
Overlocker versus Overcast Stitch
You don’t NEED a serger/overlocker machine, its just super convenient!
For a cheaper option, just use an overcast stitch on your regular sewing machine.
This is better than a regular zigzag stitch, cause it sews the visible part of the seam down once it’s open.
Zig zag stitches can make the thread visible once you press the seam.
Overview
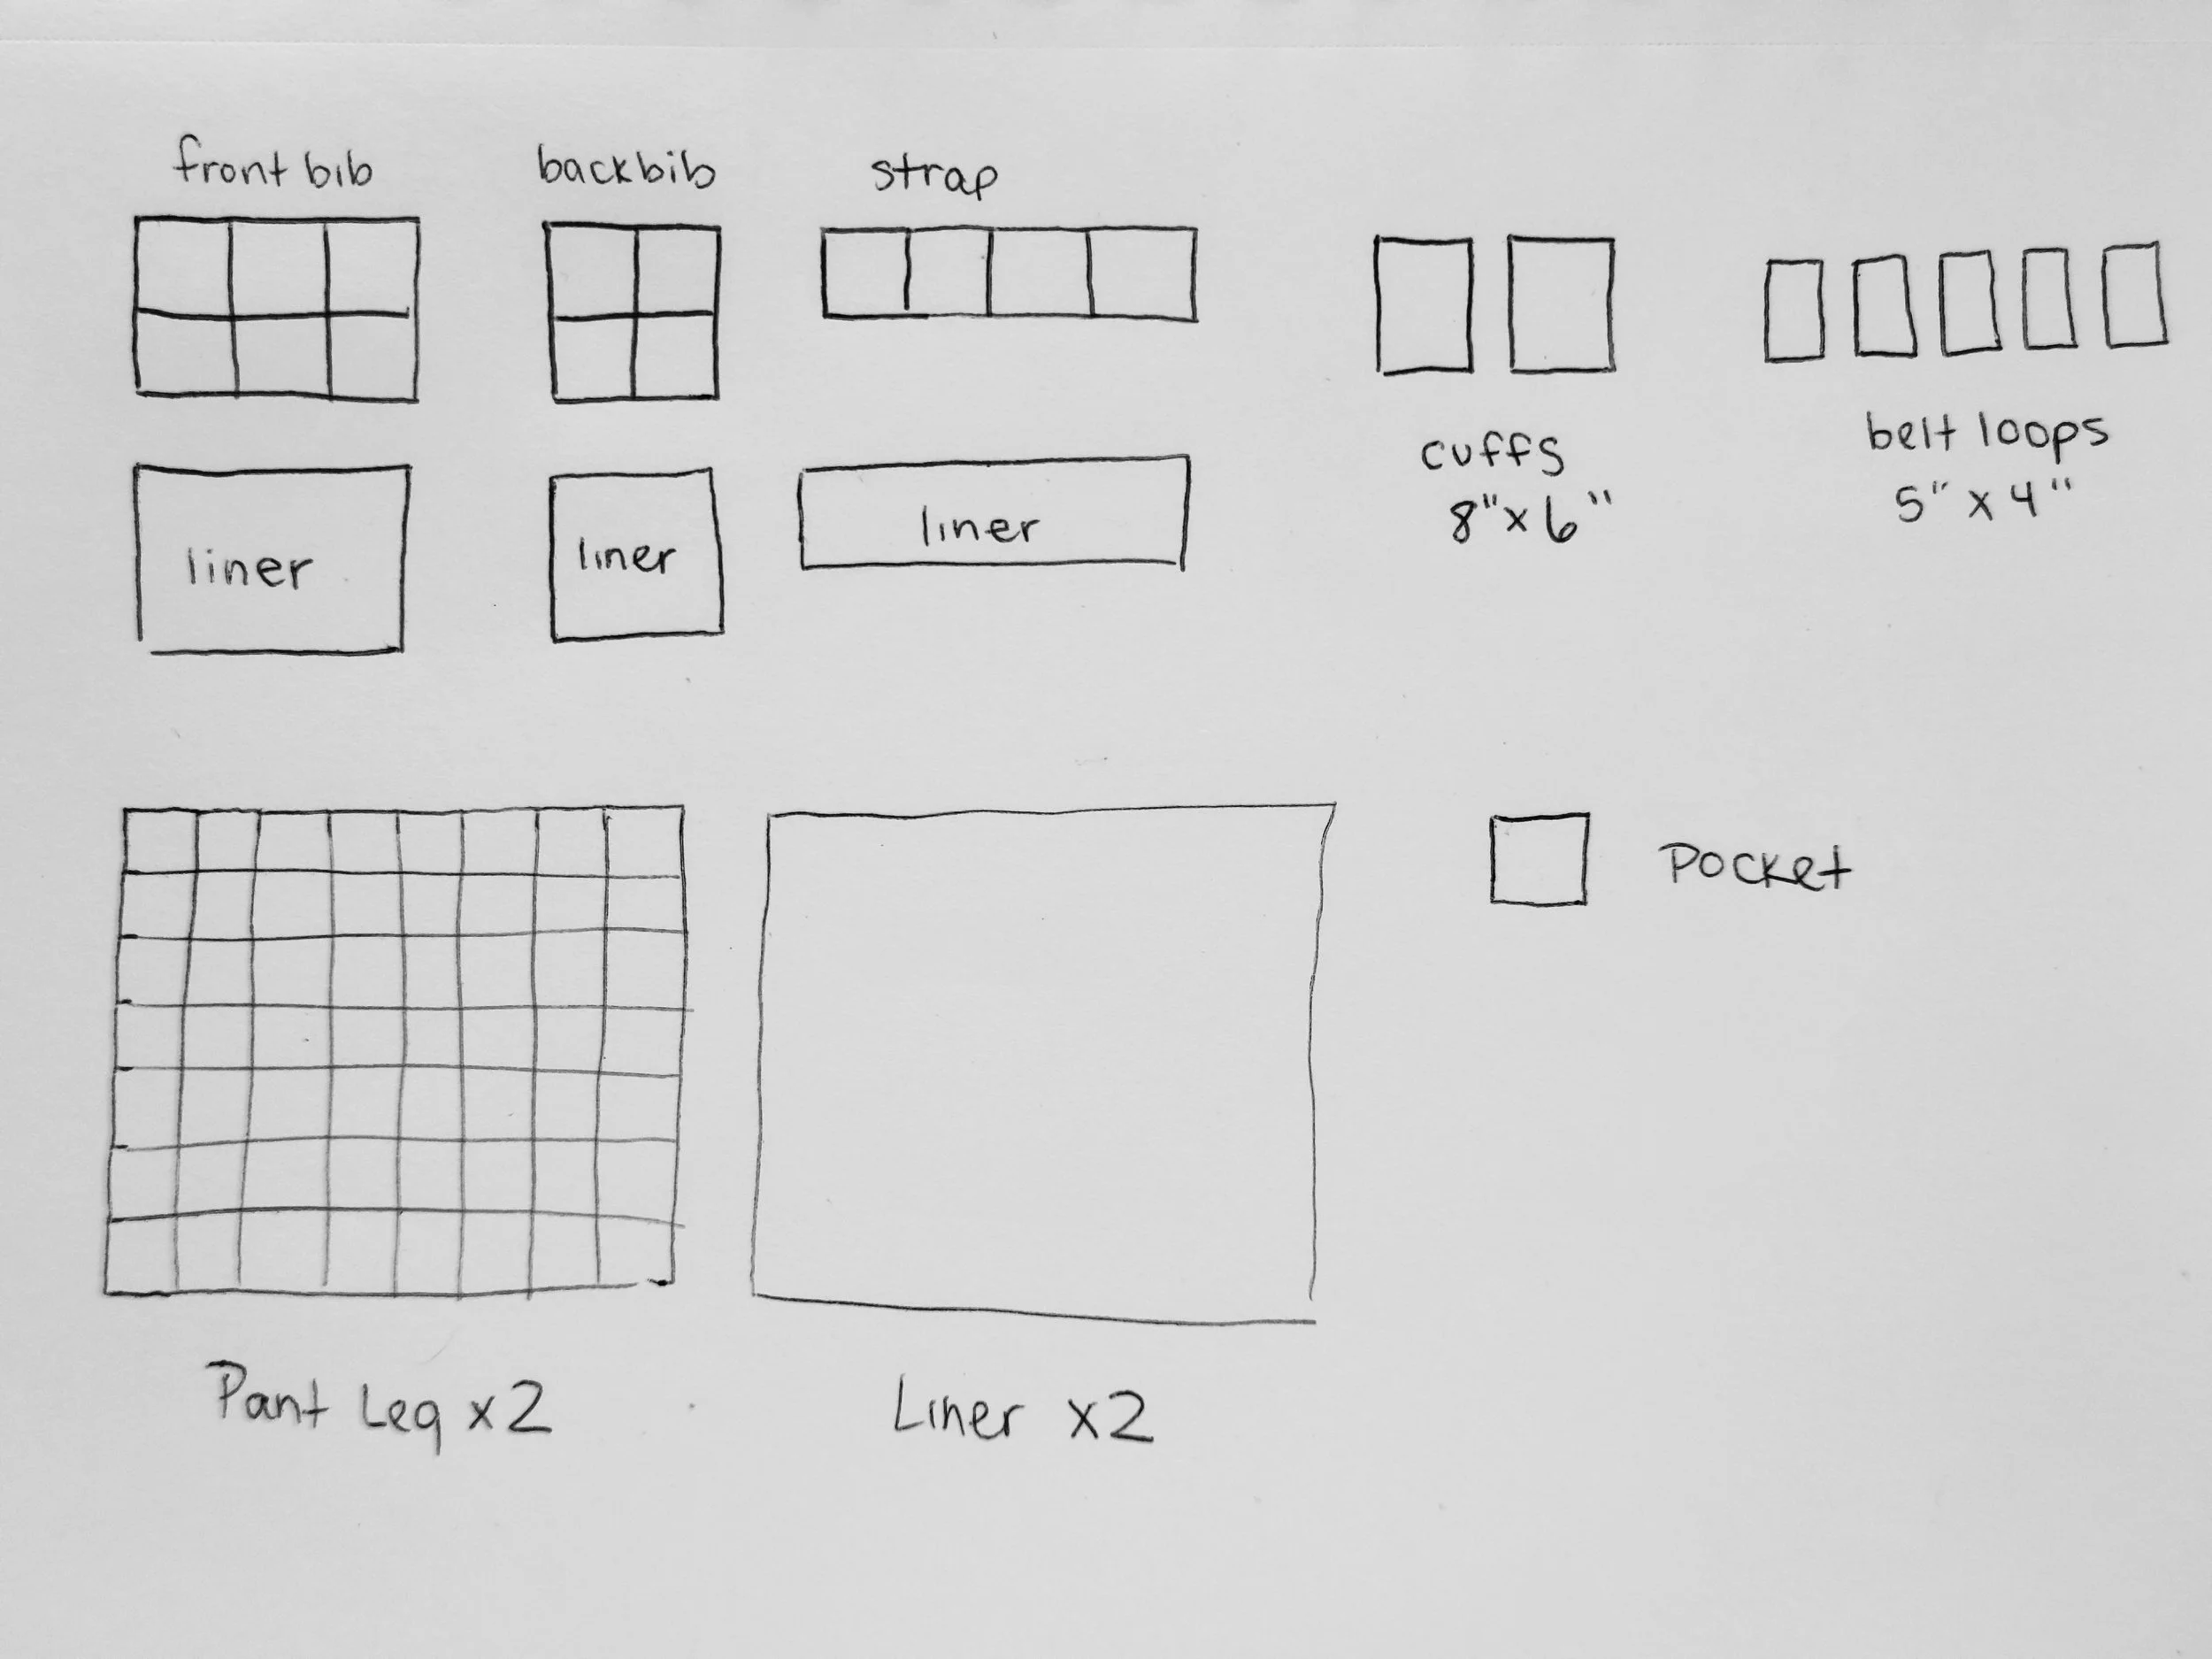
This is a quick overview of the fabric panels you’ll be creating and assembling.
Don’t be overwhelmed! I just wanted a quick spot for reference once you start sewing.
For a better pants’ tutorial that goes over pattern making, and pant assembly with various adjusting options, check out this one:
https://www.riskthrift.com/tips-tricks/how-to-make-adjustable-pants
~ 127 total 6”x6” (15.24cm) squares. This entirely depends on your preference and size.
For my overalls: check below for final measurements of these.
Mine were very baggy and loose on me, and could be worn a lot larger.
Pant Leg Panels (2 total): 8 squares wide by 7 squares high
Front Bib: 3×2
Back Bib: 2×2
Straps: 1×4 (will be cut in half to make 2 later on)
Front Pocket: 1 Square
Other fabric needed:
Cuffs (make 2): Fabric cut at 8”x6” (20.32cm x 15.24cm)
Belt Loops (Make 5, or more/less depending on preference): 5”x4” (12.7cm x 10.16cm)
In addition: you’ll need extra fabric for the inside liner.
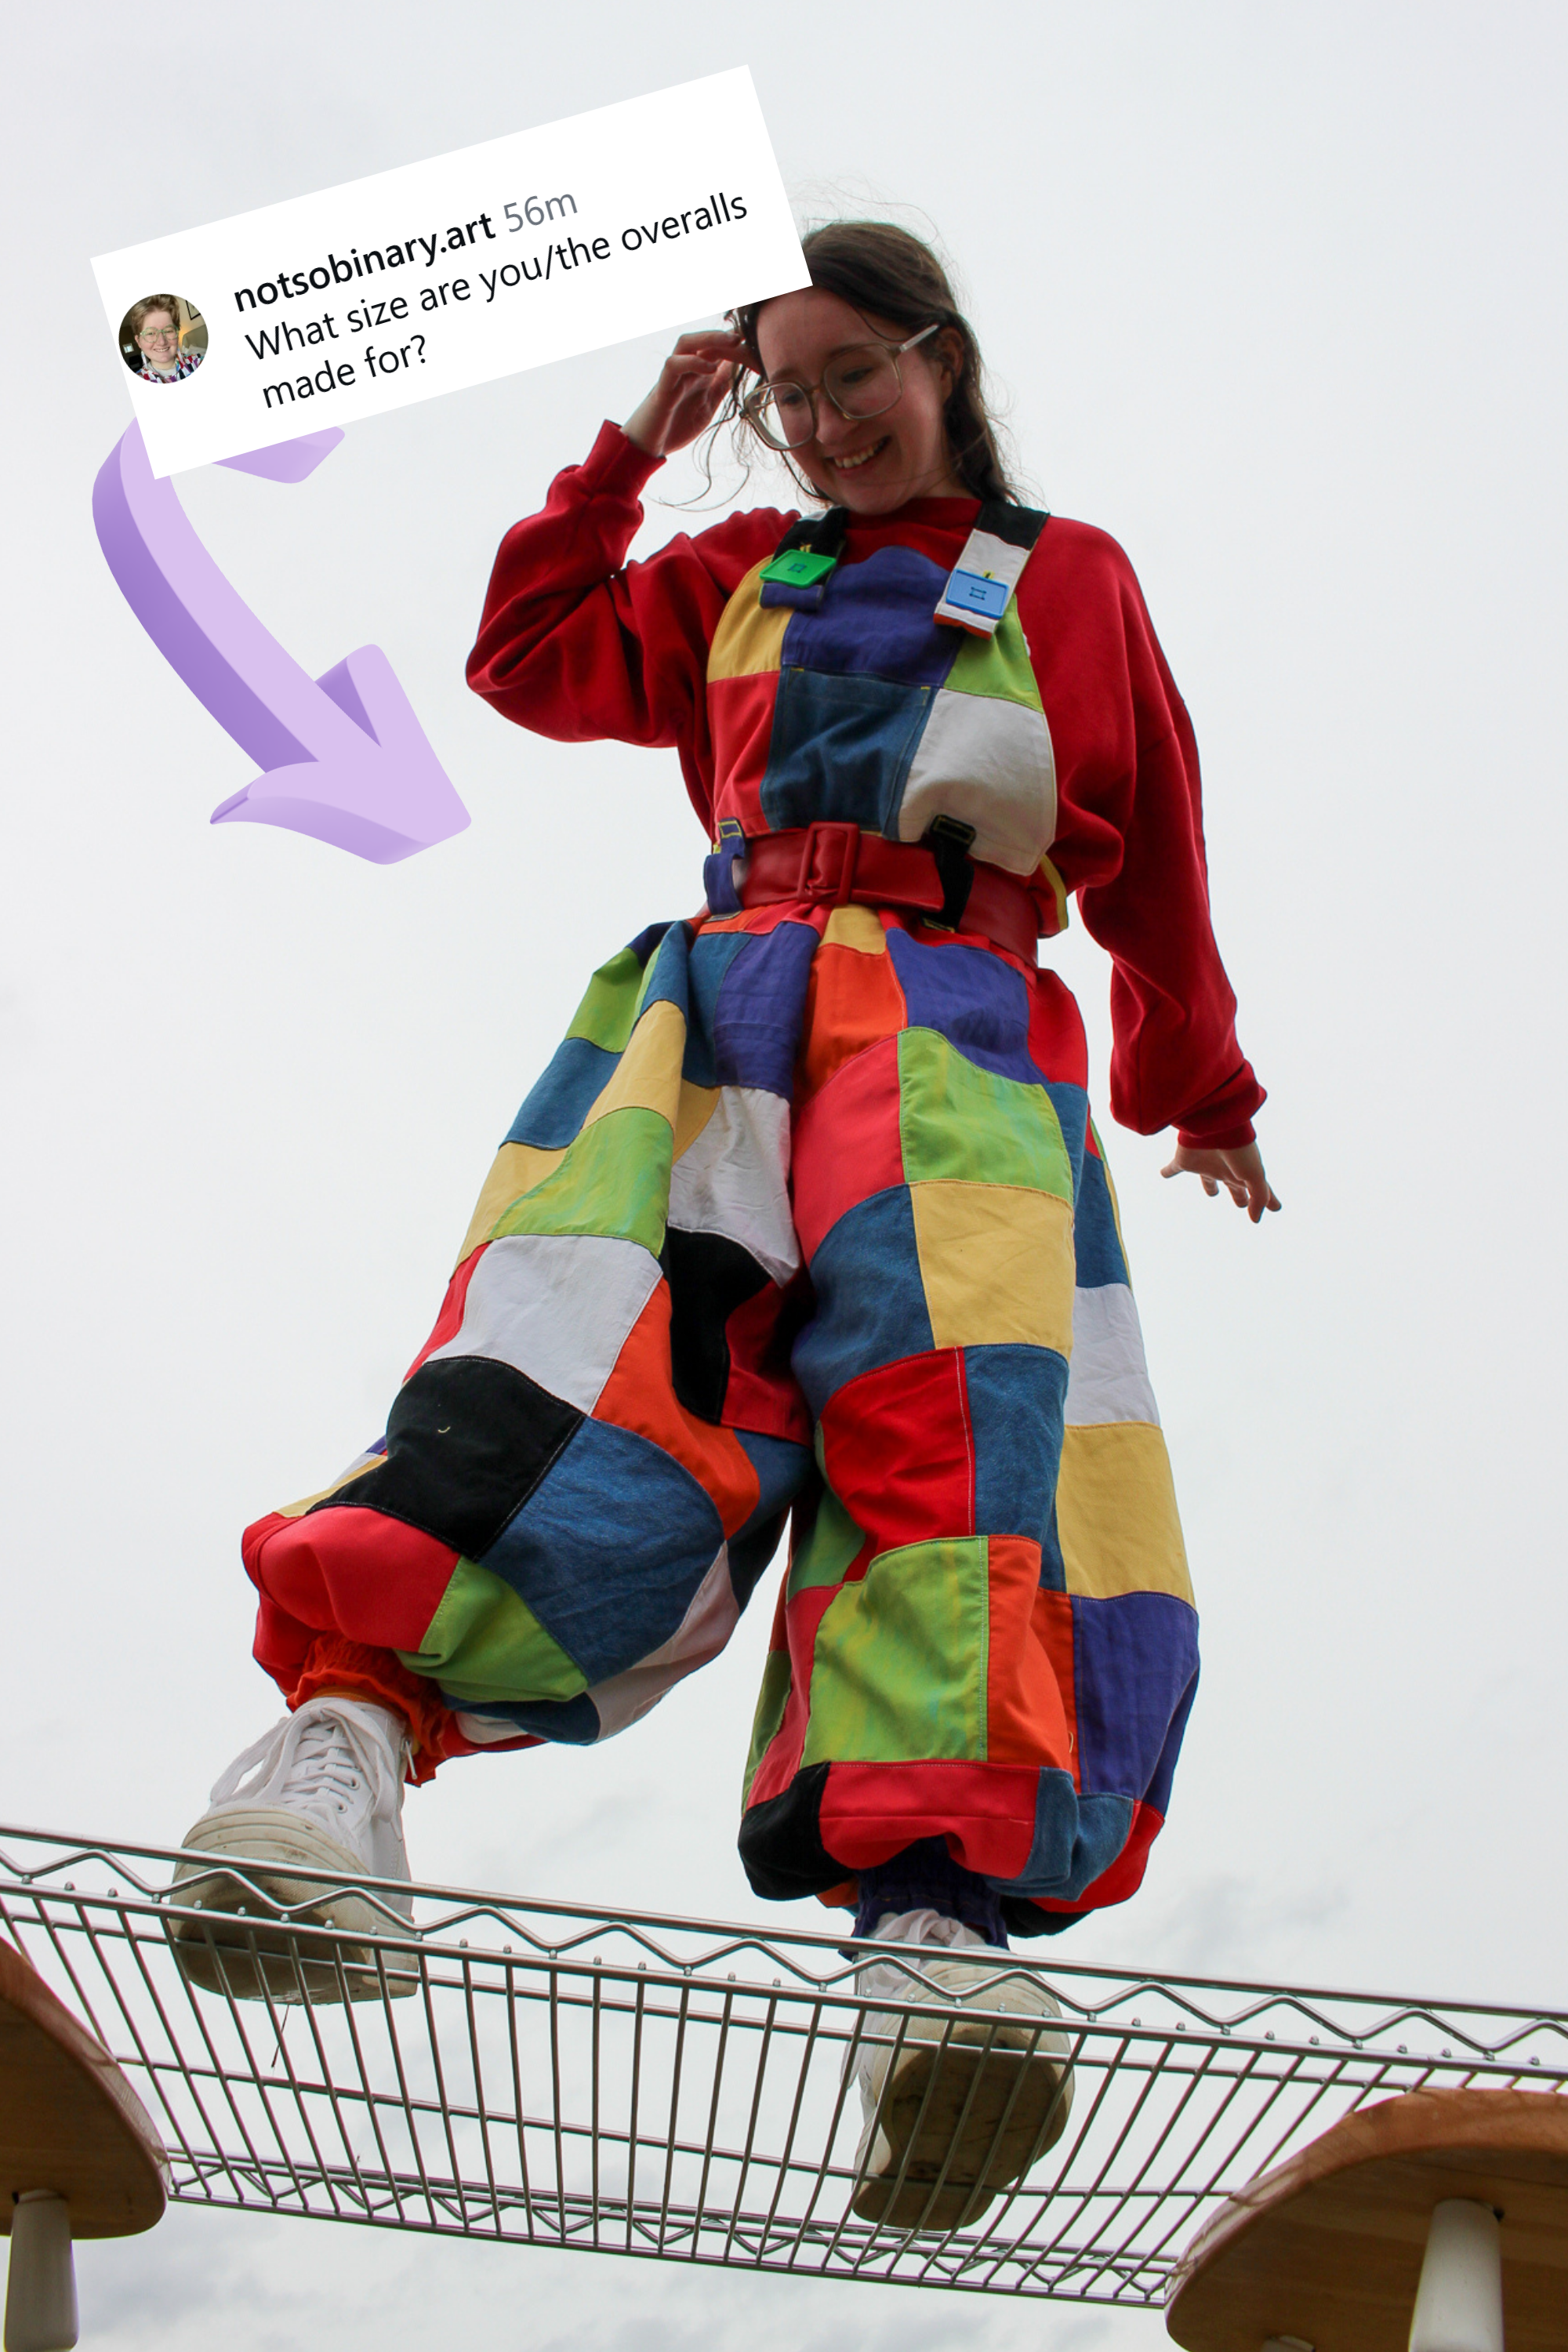
Model: Small/Medium. Bust: 34”, Waist: 28”, Hip: 39”, Height: 5’2”
Measurements for My Overalls
Waist: 54” (137.16cm) opening max, best if worn at 44” (111cm) or smaller for cinching.
Hip: 60” (152cm)
Rise: 16” (40.6)
Length waist down: 38” (96.5cm)
Crotch to shoulder: 34” (86.36cm) shortest, 37” (93.98cm) longest
Model: Small/medium.
Waist: 28” (71cm)
Bust 34” (86.36cm)
Hip: 39” (99cm)
Height: 5’2” (1.57meters)
I recommend using this as a comparison for your own pattern!
You may need to make yours smaller/larger, shorter/longer.
Making a Pattern
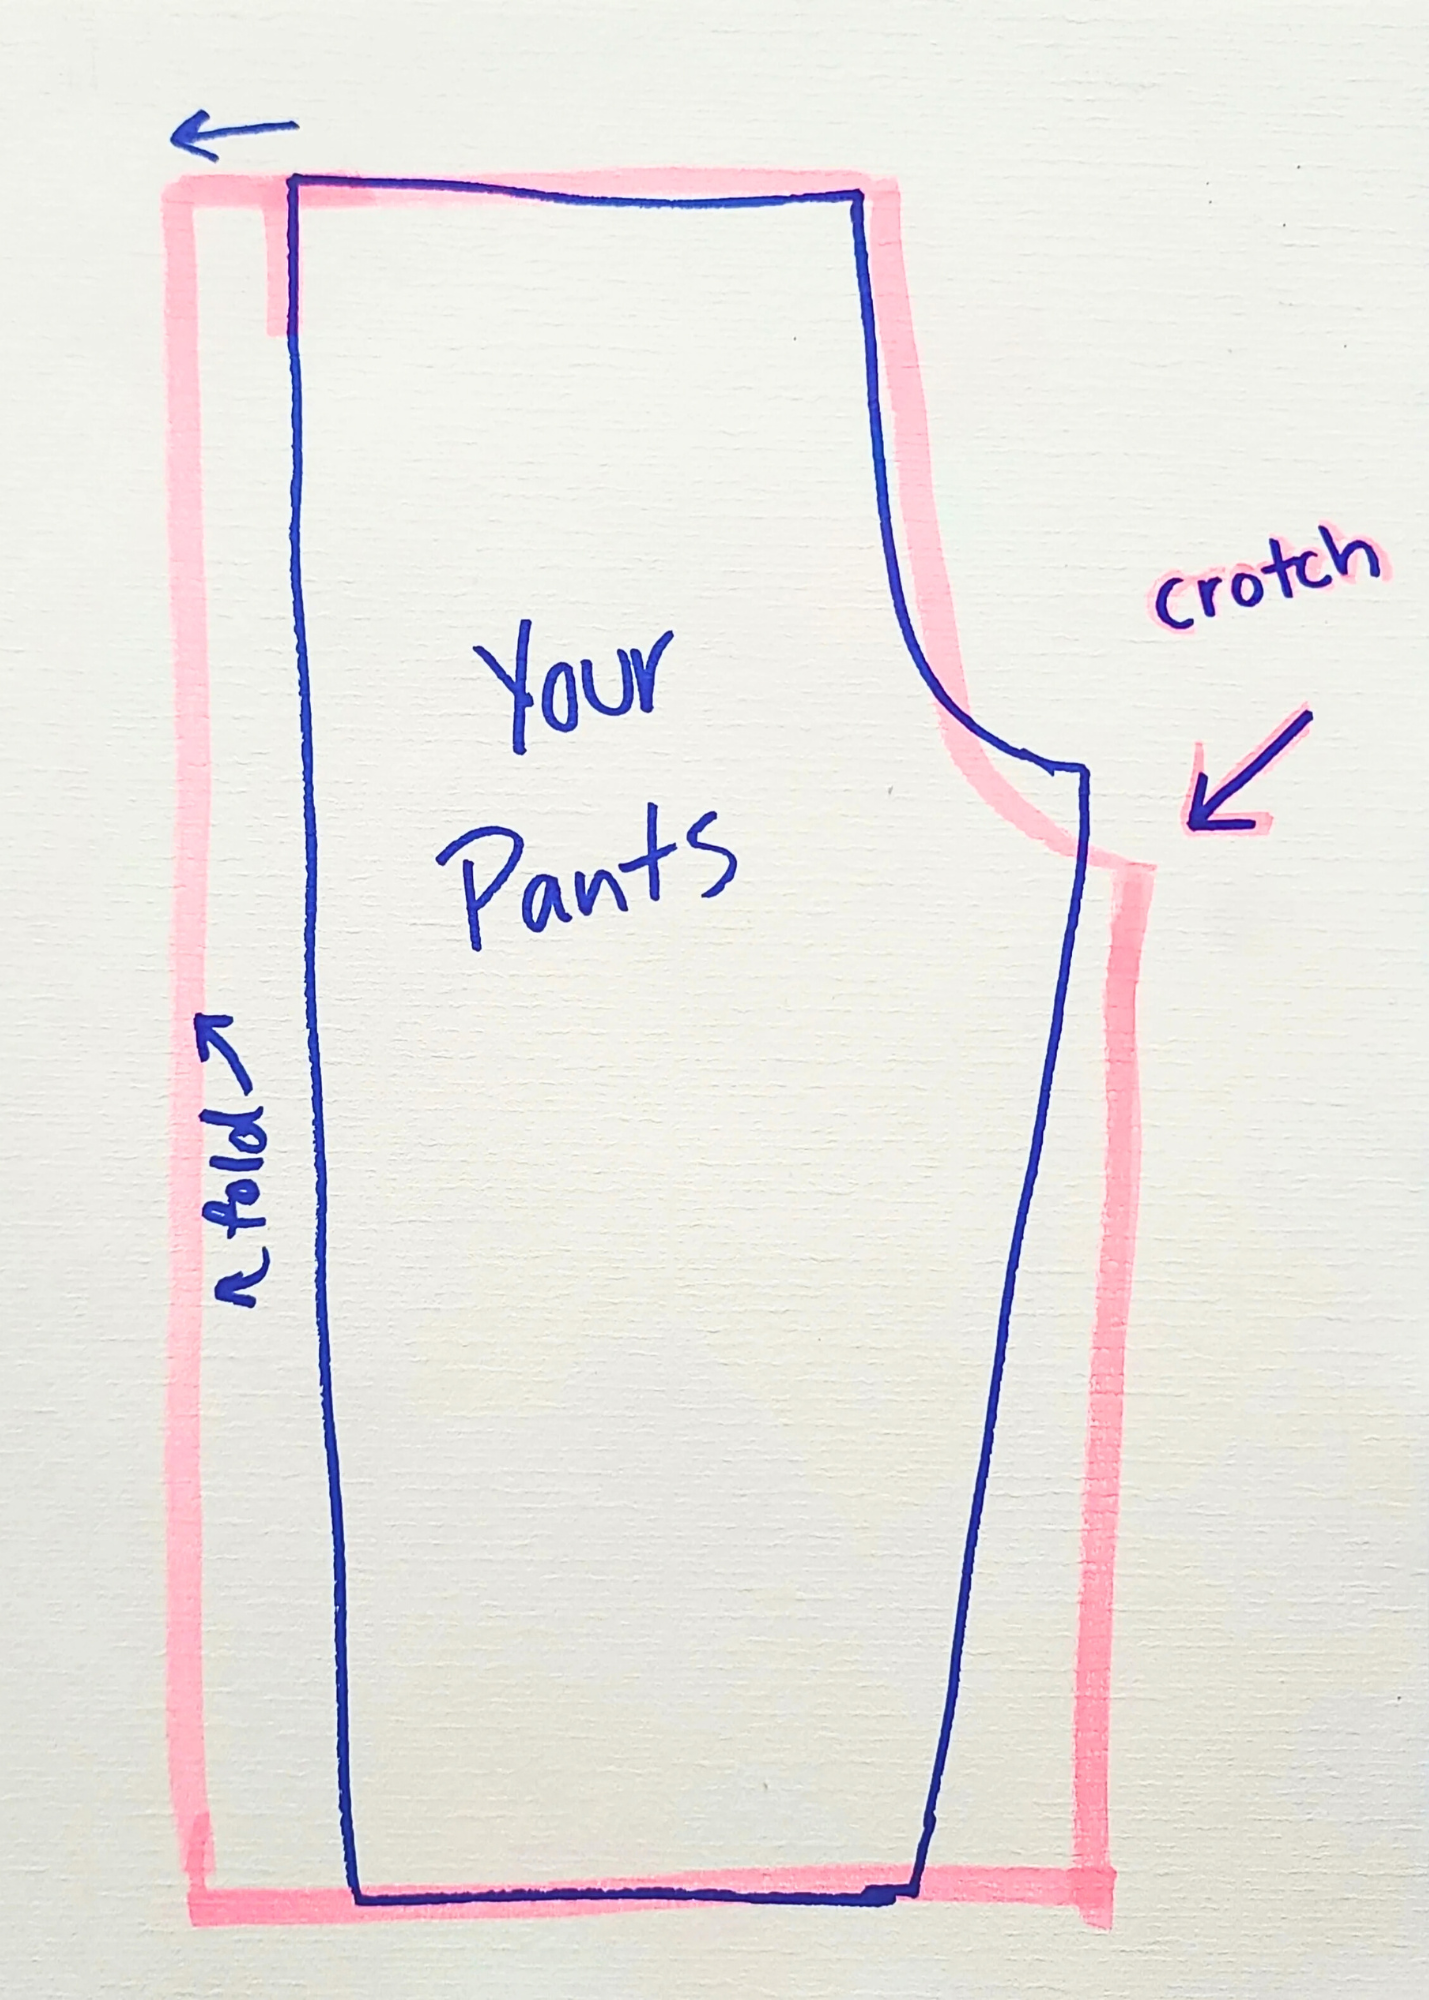
Find a pair of pants that fit you!
(Your pants are shown in blue marker, the pattern is shown in pink)
If they are form fitting jeans, add ~3 inches (7.5 cm) or more to the side of the pattern with the fold. This will allow for stretch/fitting over your hips!
THE BAGGIER YOU WANT THE PANTS, THE LARGER YOU NEED TO MAKE THIS PATTERN.
If your pants have an elastic waist, try stretching and tracing them!
Don’t taper the sides in towards the bottom, just go straight down.
Make sure to add .5 - 1” (1.25-2.5 cm) of seam allowance to the edges!
Lower the crotch down, and to the side by a few inches. This will allow for a looser, comfier fit.
However wide this pattern is doubled, is how wide your pant panels should be.
For example, the pant pattern I used was ~24” (60.96cm) wide flat. Times that by 2, to get 48 total inches (121.92cm)
This is because you will be folding it in half.
I rounded down to 8 6” (15.24cm) squares wide. Which would have been 48” (121.92cm), but accounting for seam allowance made it a little less. You can round up if you prefer.
My favorite pattern was traced from a vintage jumpsuit, onto cardboard, which I have re-used countless times!
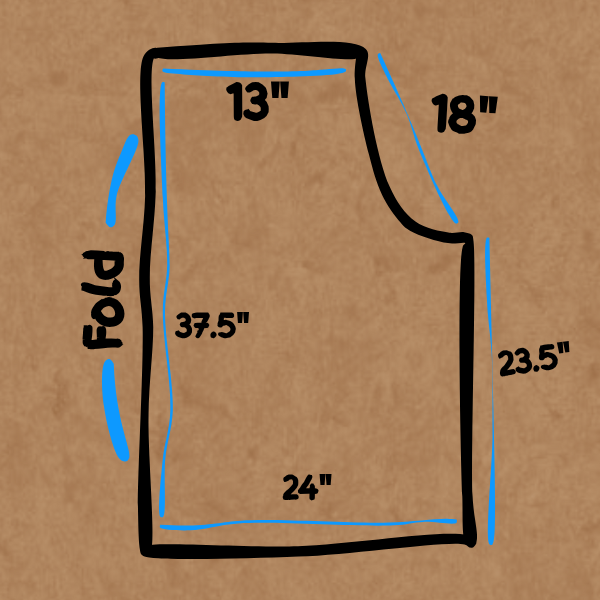
You can adjust these measurements to fit your body, if you don’t have pants on hand.
(measurements in the picture are in inches, centimeters are translated below)
If you need different fabric for the front and back of a leg, add seam allowance to the side with the fold, and sew to another piece of fabric.
Top section (13in/33cm) = 1/4 of waist (I recommend making this measurement larger than your hips)
Rise (18in/45.75cm) = Crotch to waist. I recommend a lower+wider than normal crotch, for a loose fit, and to account for difference in front and back body measurements
Inseam (23.5in/59.5cm) = Crotch to bottom hem. Lengthen this measurement for longer pants.
Width (24in/61cm) = Width of leg, and 1/4 of hips, if you keep the pants straight down.
Length (37.5in/95.25cm) Waist to bottom hem.
if the fabric is cut exactly at these numbers, not adding seam allowance, it will result in pants with the following measurements:
Total waist: 48”(121.92cm) max opening
Rise: ~17.5” (44.45cm) (drop crotch)
Inseam (not including cuffs) ~22.5-22” (57.15cm-55.88cm)
Hips: 80”+ (203.2cm) (free)
Length: ~36.5-36” (92.71cm-91.44cm)
Fabric
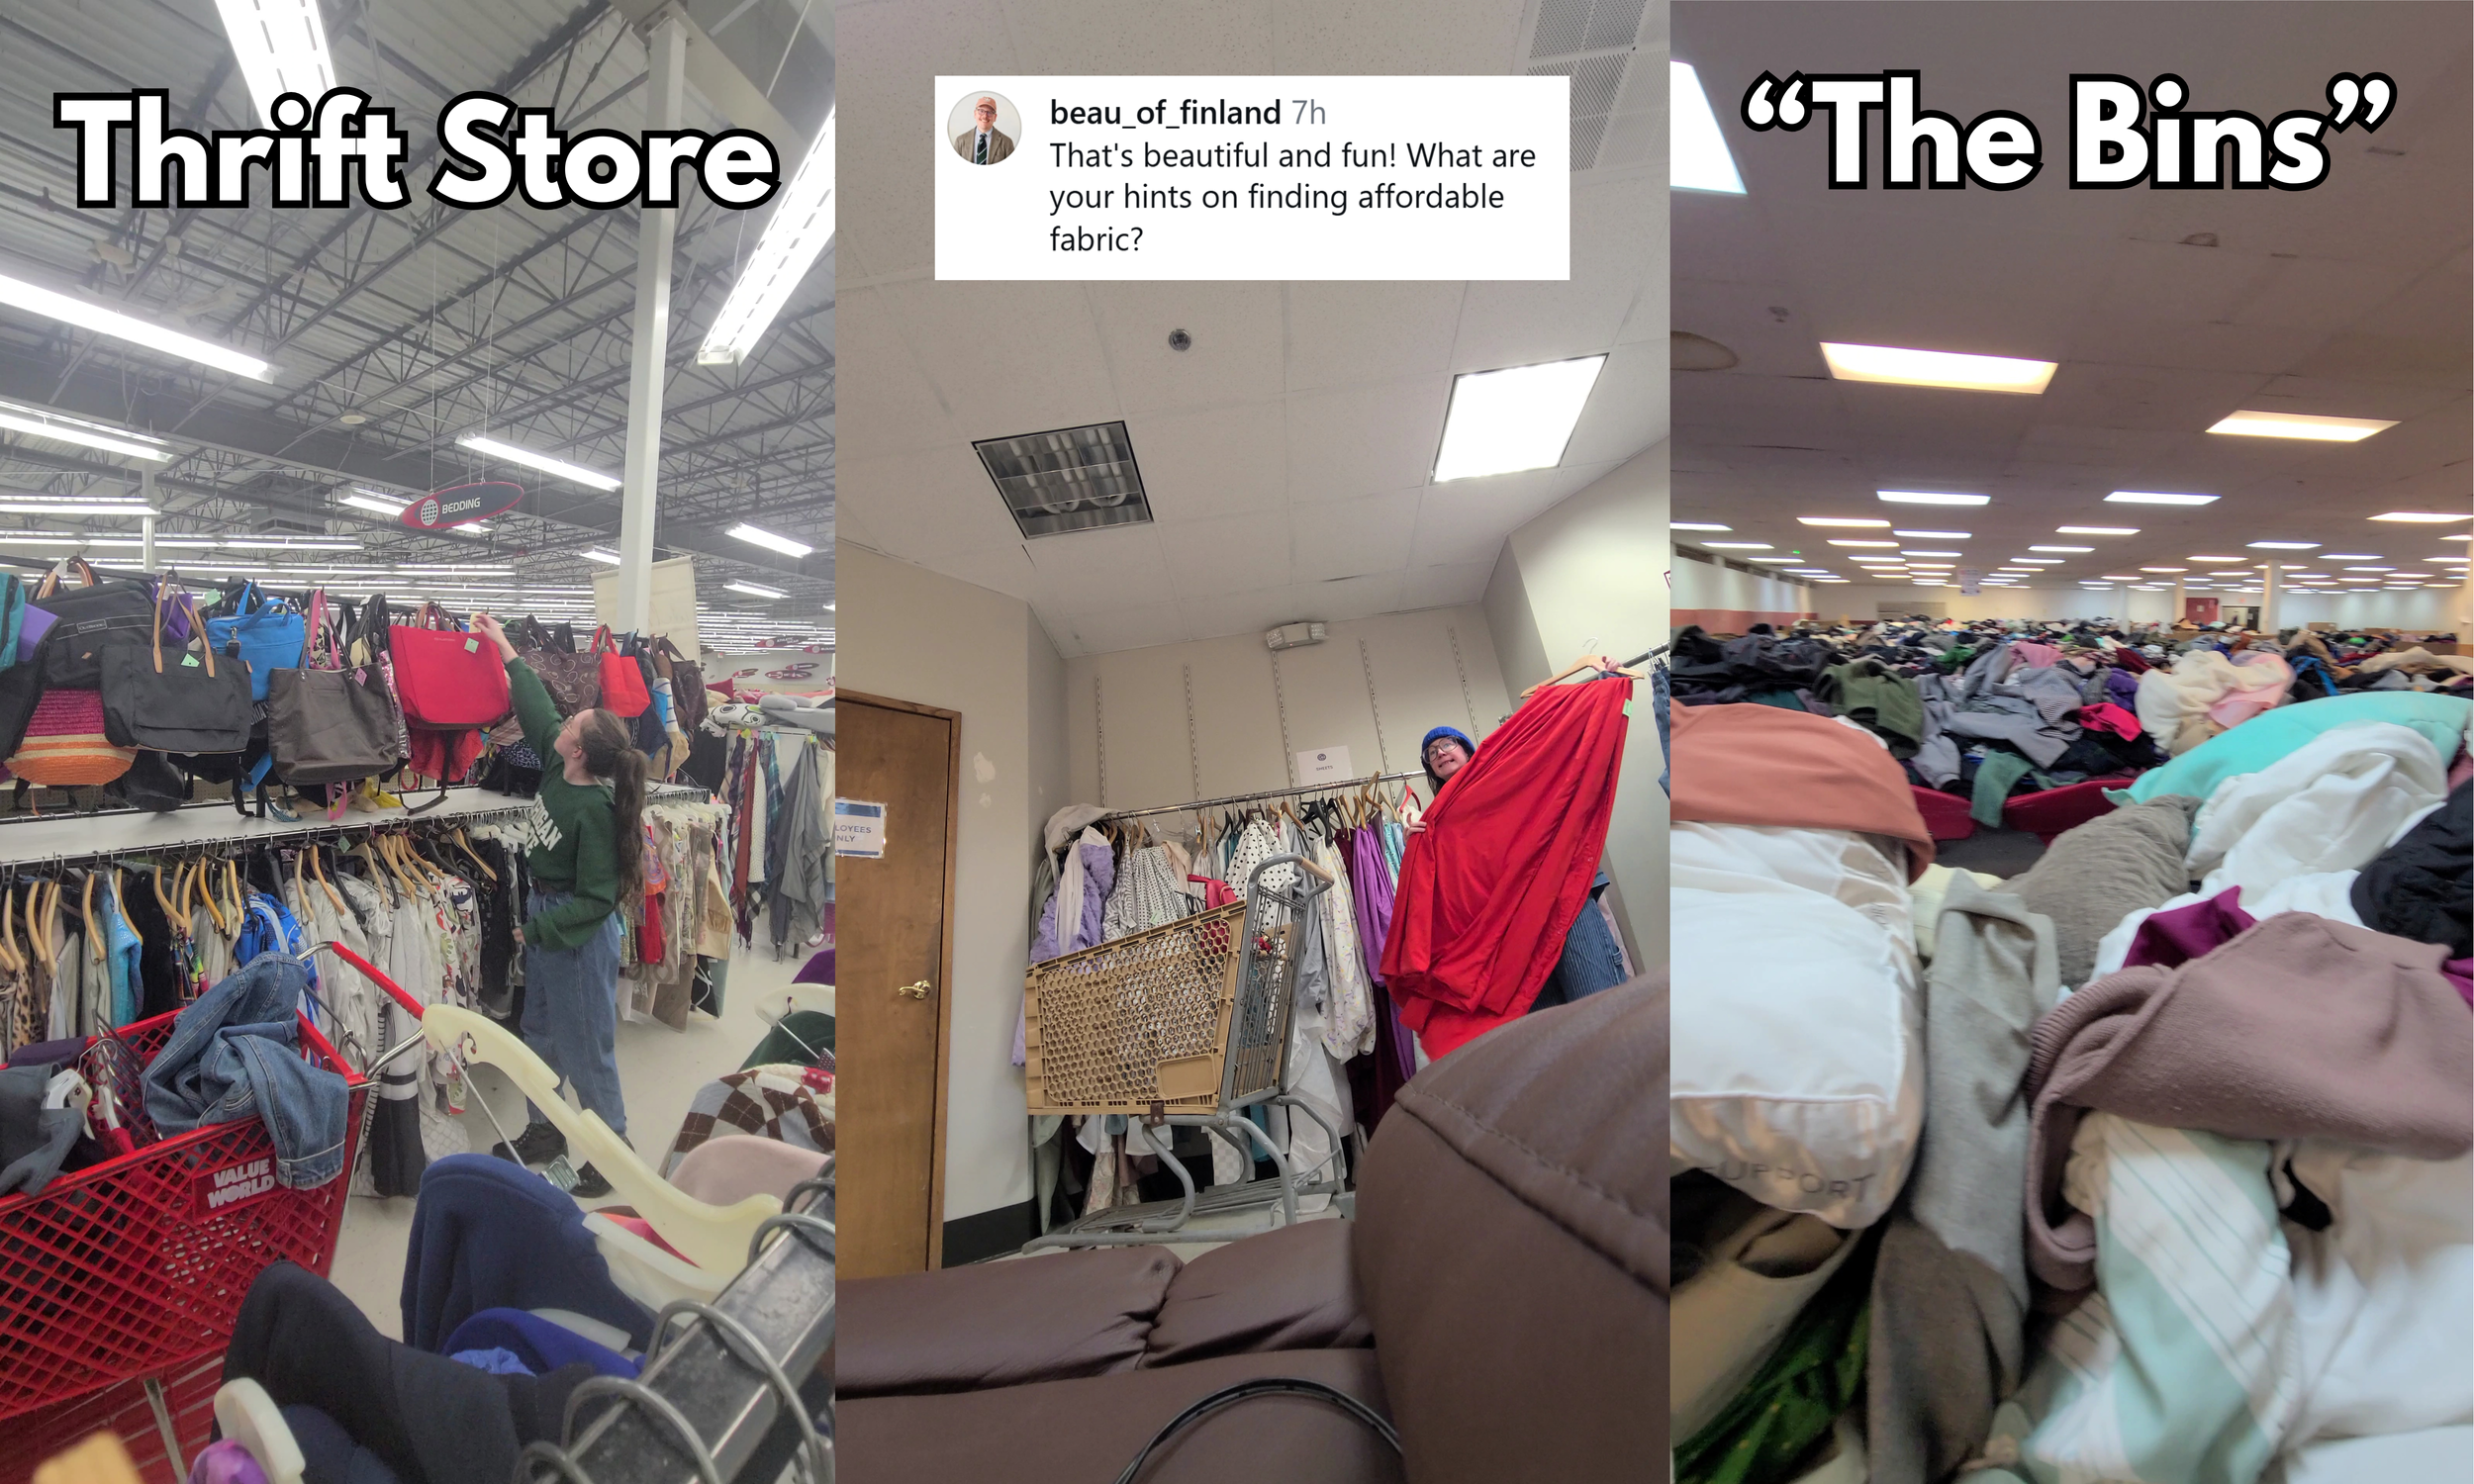
Try thrfiting your fabric for a more sustainable/cheaper option!
You don’t need to buy new fabric and spend a bunch of money!
Get creative, go to the thrift, ask your family, check out garage sales and estate sales!
I recommend Cotton or Linen blends, NOT STRETCHY.
In this tutorial, I used: Tablecloth (Red), Scrub Pants (Orange), Elastic Trousers (Yellow), Comforter Cover (Green), Comforter Cover (Blue), Elastic Trousers (Purple), Micro Cordurouy Fabric Scraps (Black), Tablecloth (White)
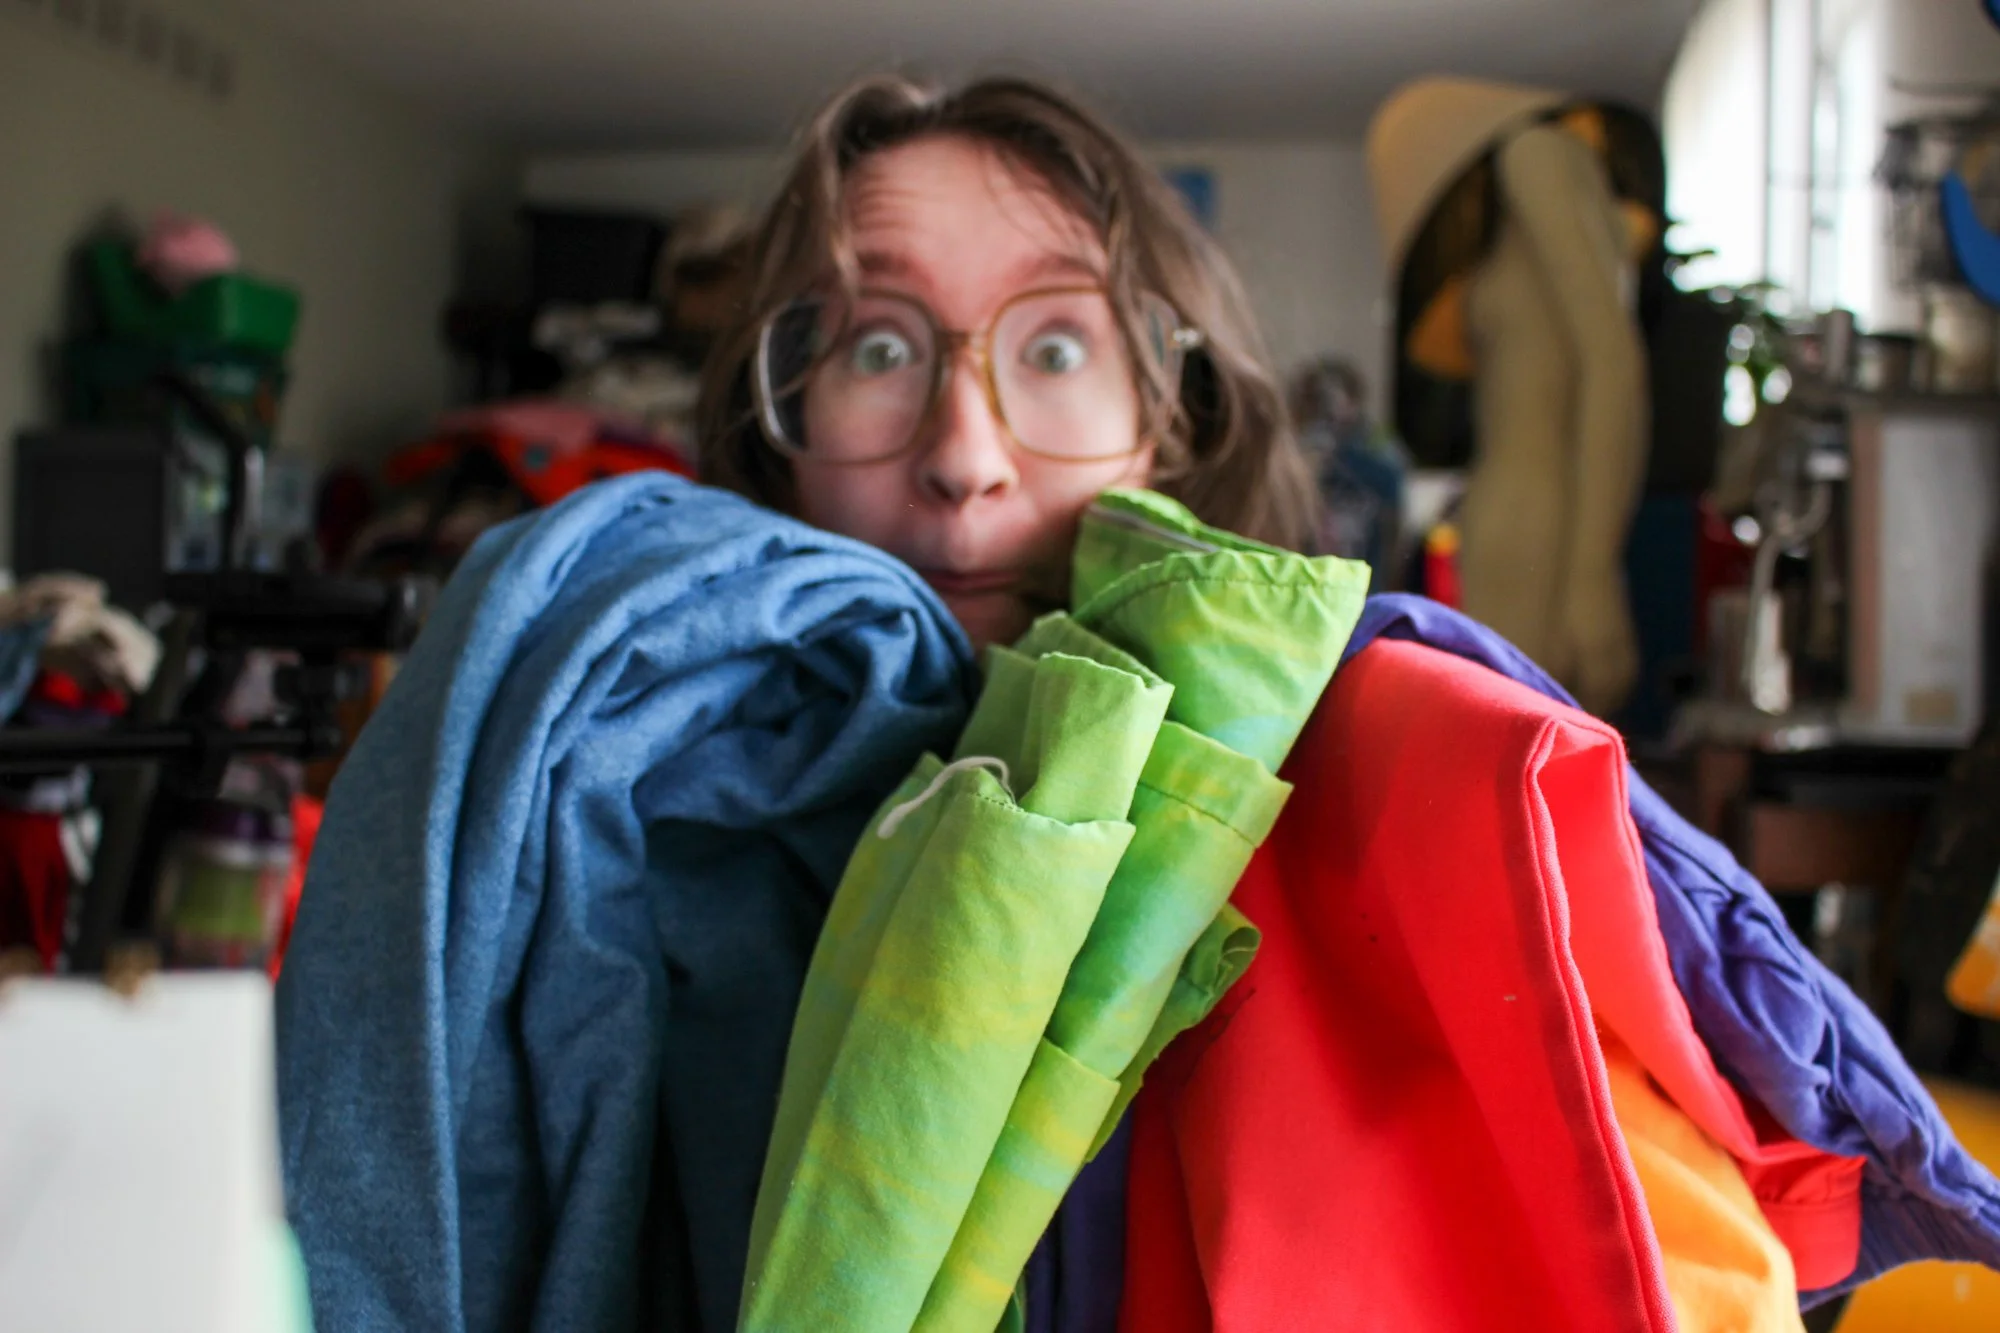
Image: Fabric stash
Patchwork
You’ll need to cut out a bunch of squares.
I chose these colors to look like Elmer the elephant. You can choose whatever variety you want!
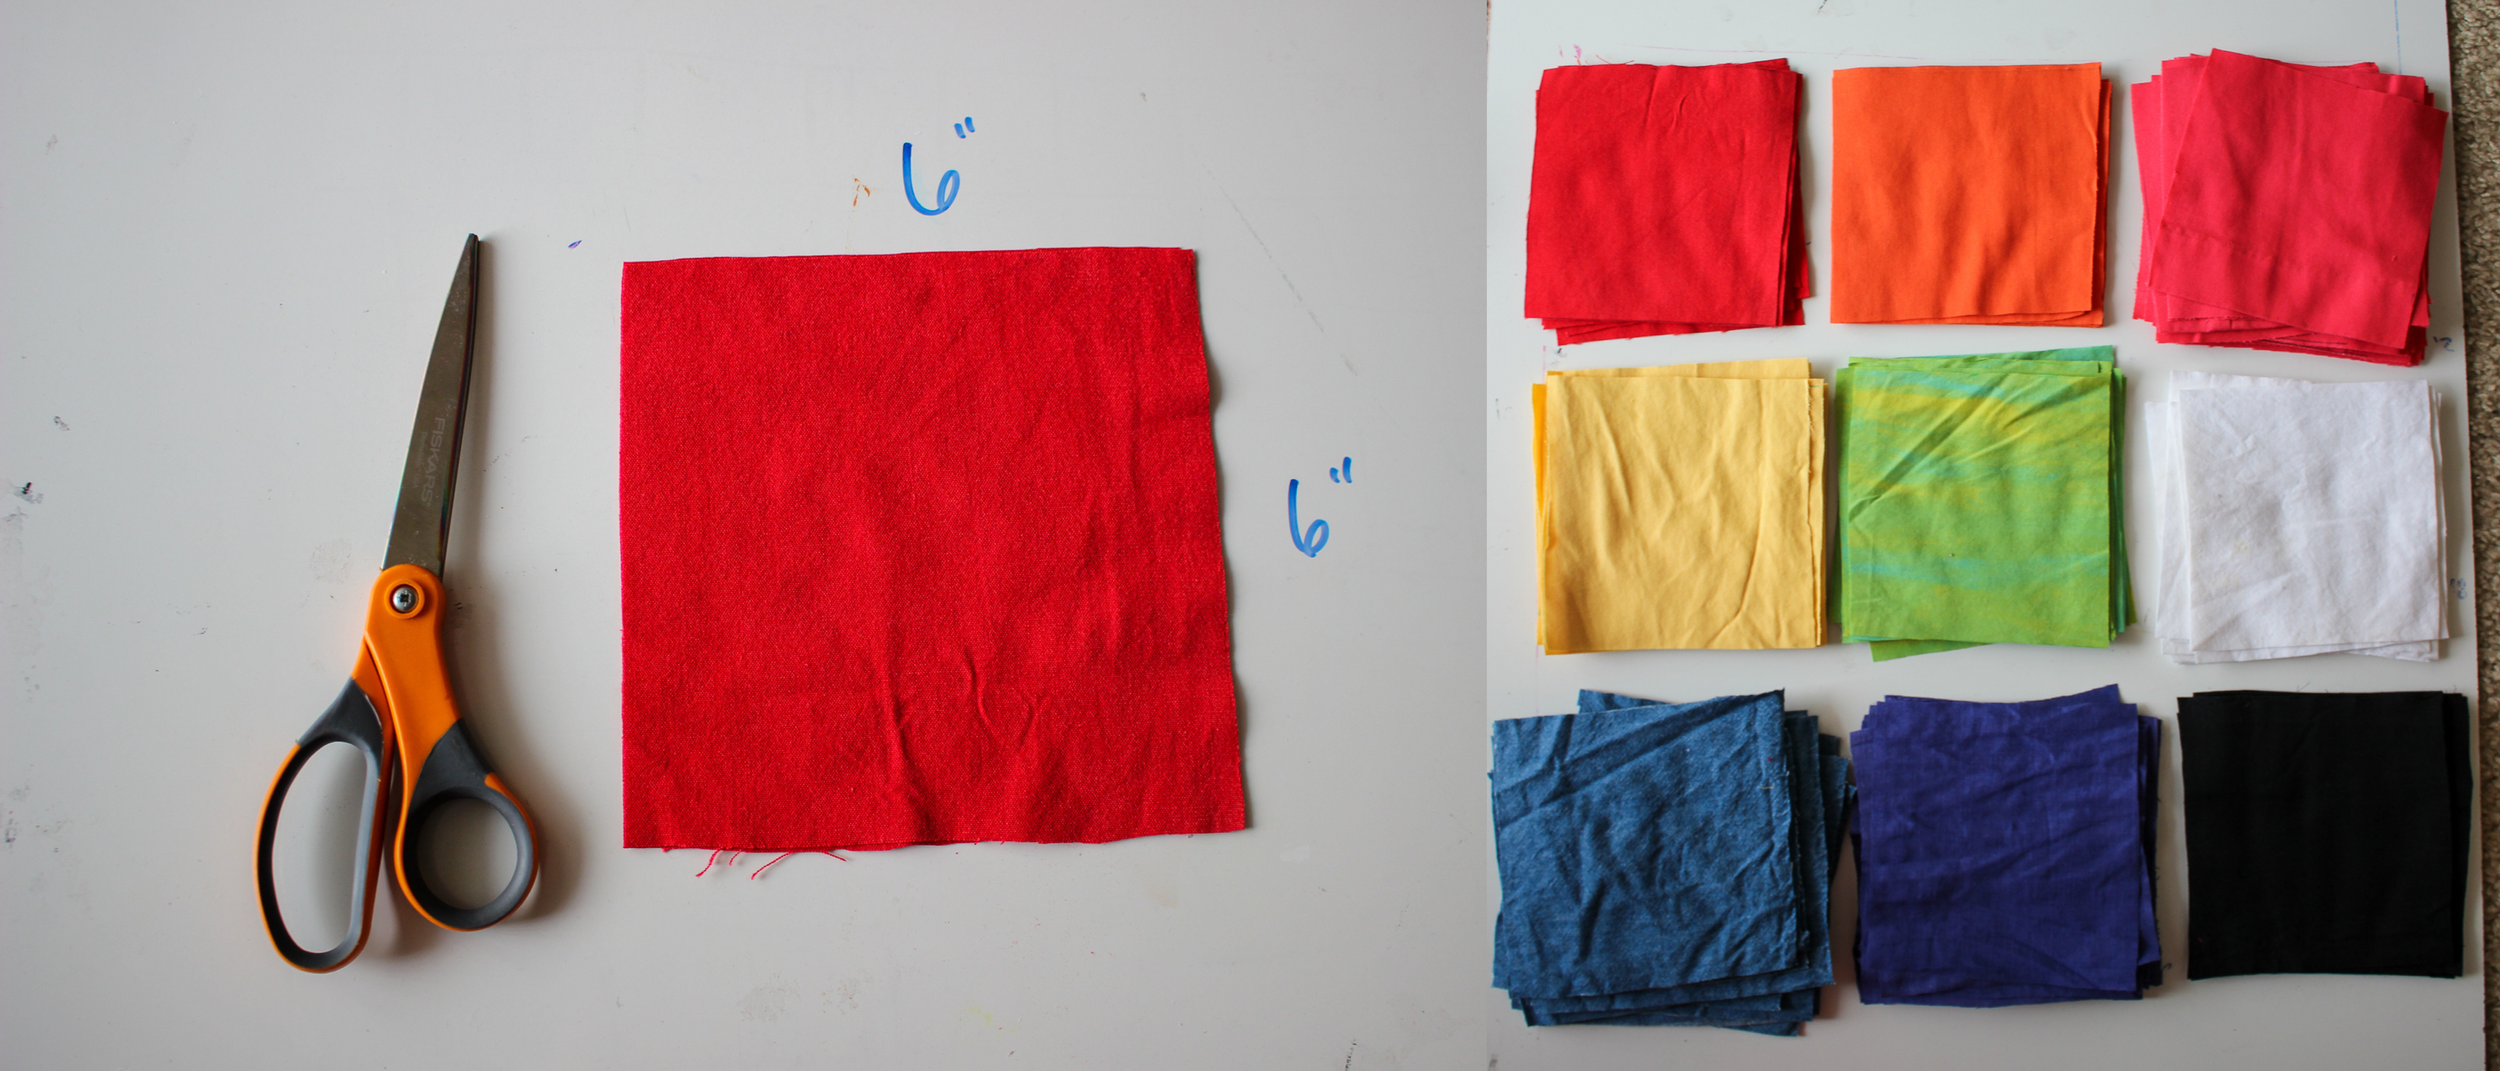
Image: cutting 127 squares
My squares were 6” x 6” (15.24cm)
I cut ~ 127 squares for the patchwork. (Not including fabric for belt loops and cuffs)
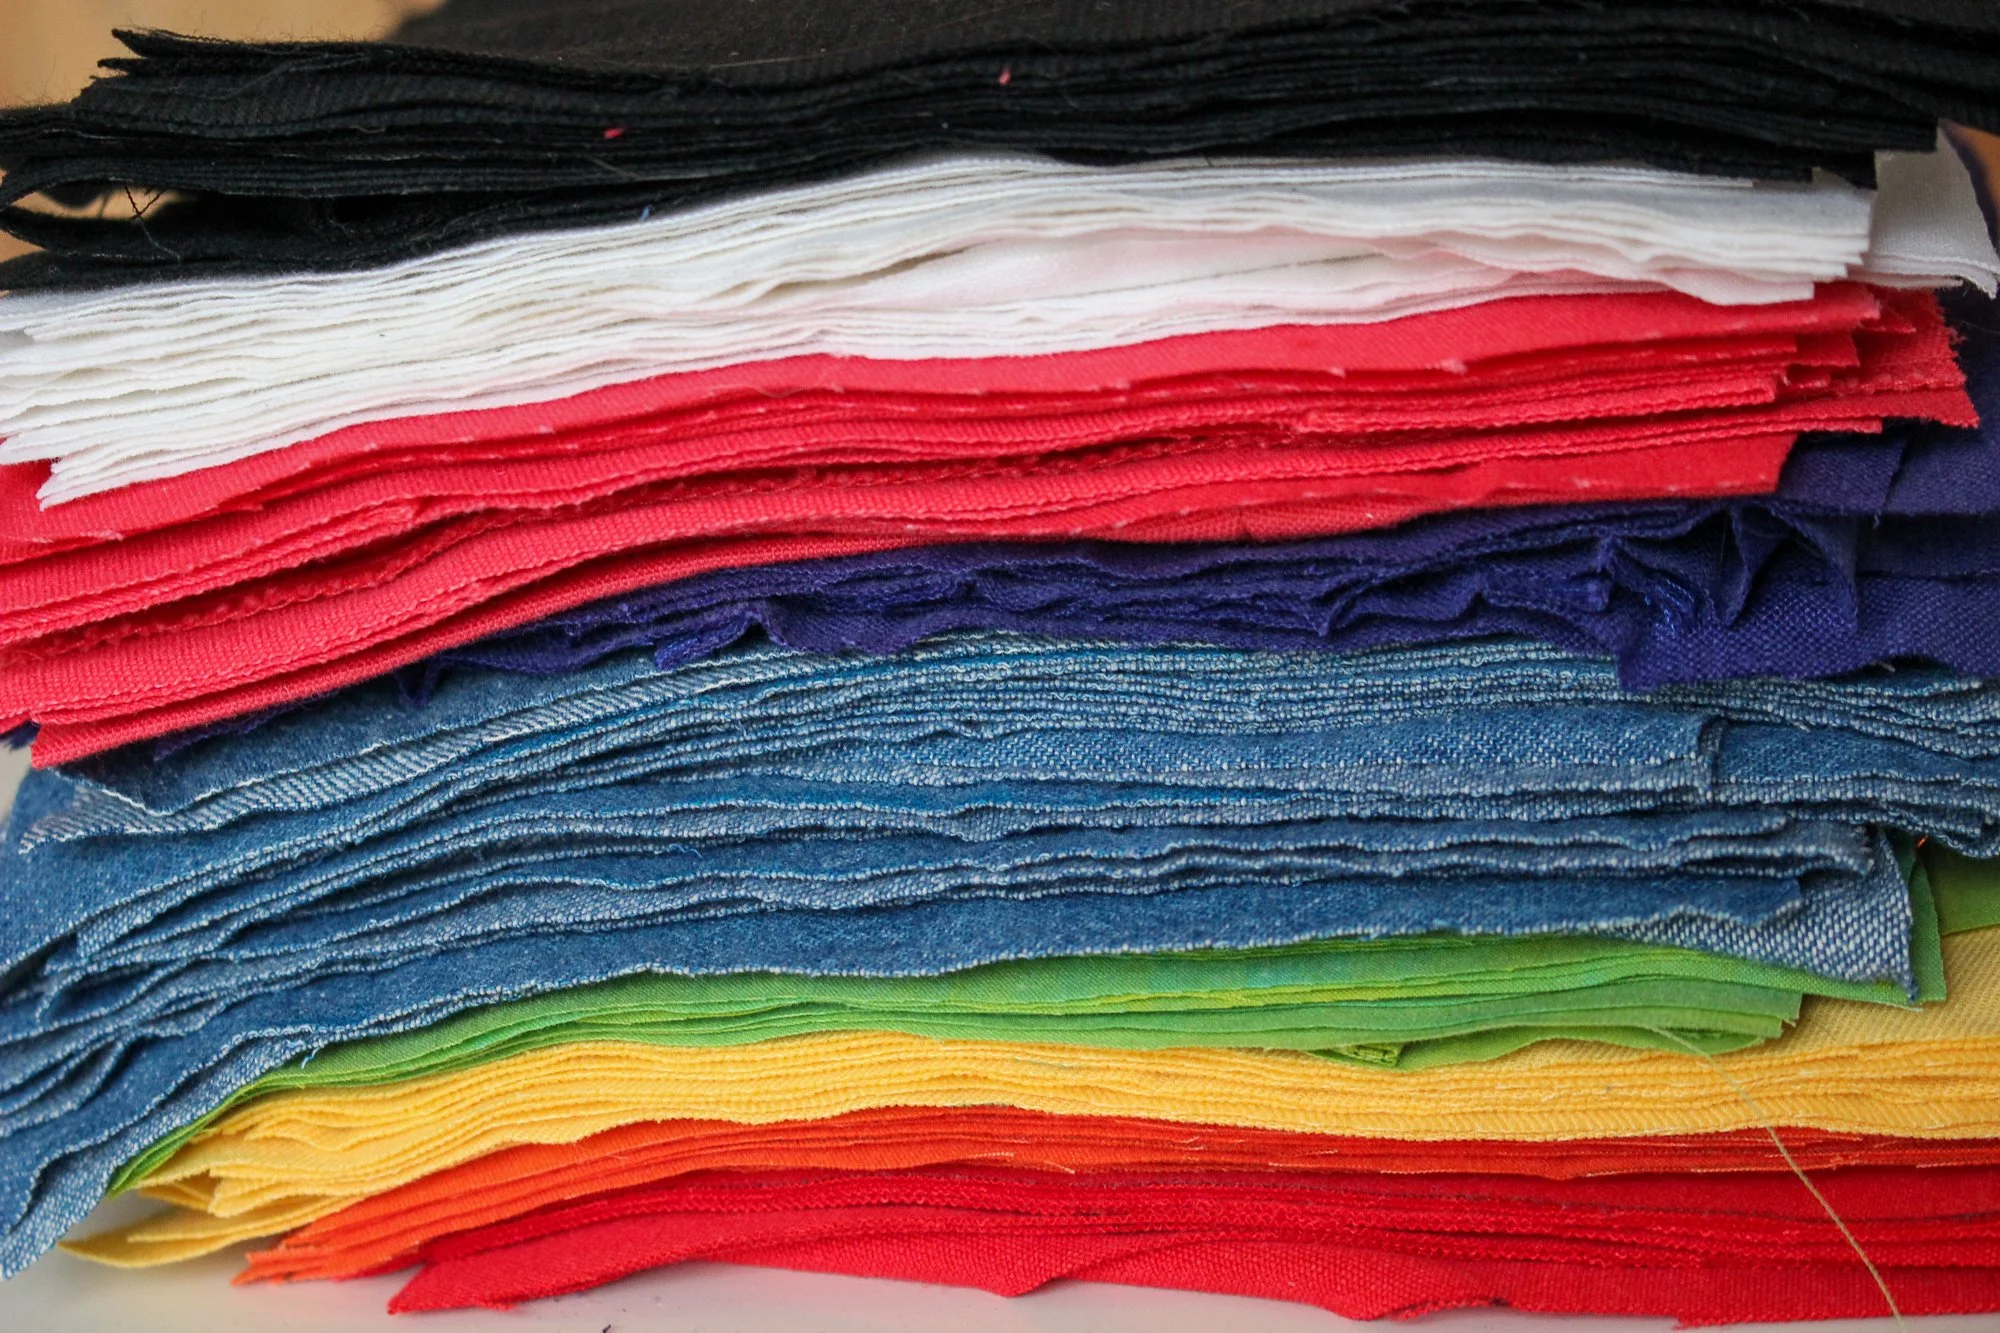
Image: Pile of cut squares
To make the patchwork,
Put two squares right sides together.
Right sides together refers to placing the outside/ main side of the fabrics together so they face each other.
So only the “wrong sides” of the fabric would be visible.
Not all fabrics have a right or wrong side.
Sew along one edge with an overcast stitch or overlocker. Grab 2 more squares, and repeat this process. Save thread by immediatlely feeding in a new set after you finish the first set. Don’t pull and cut your thread between each piece.
The result will be one long continuous line.
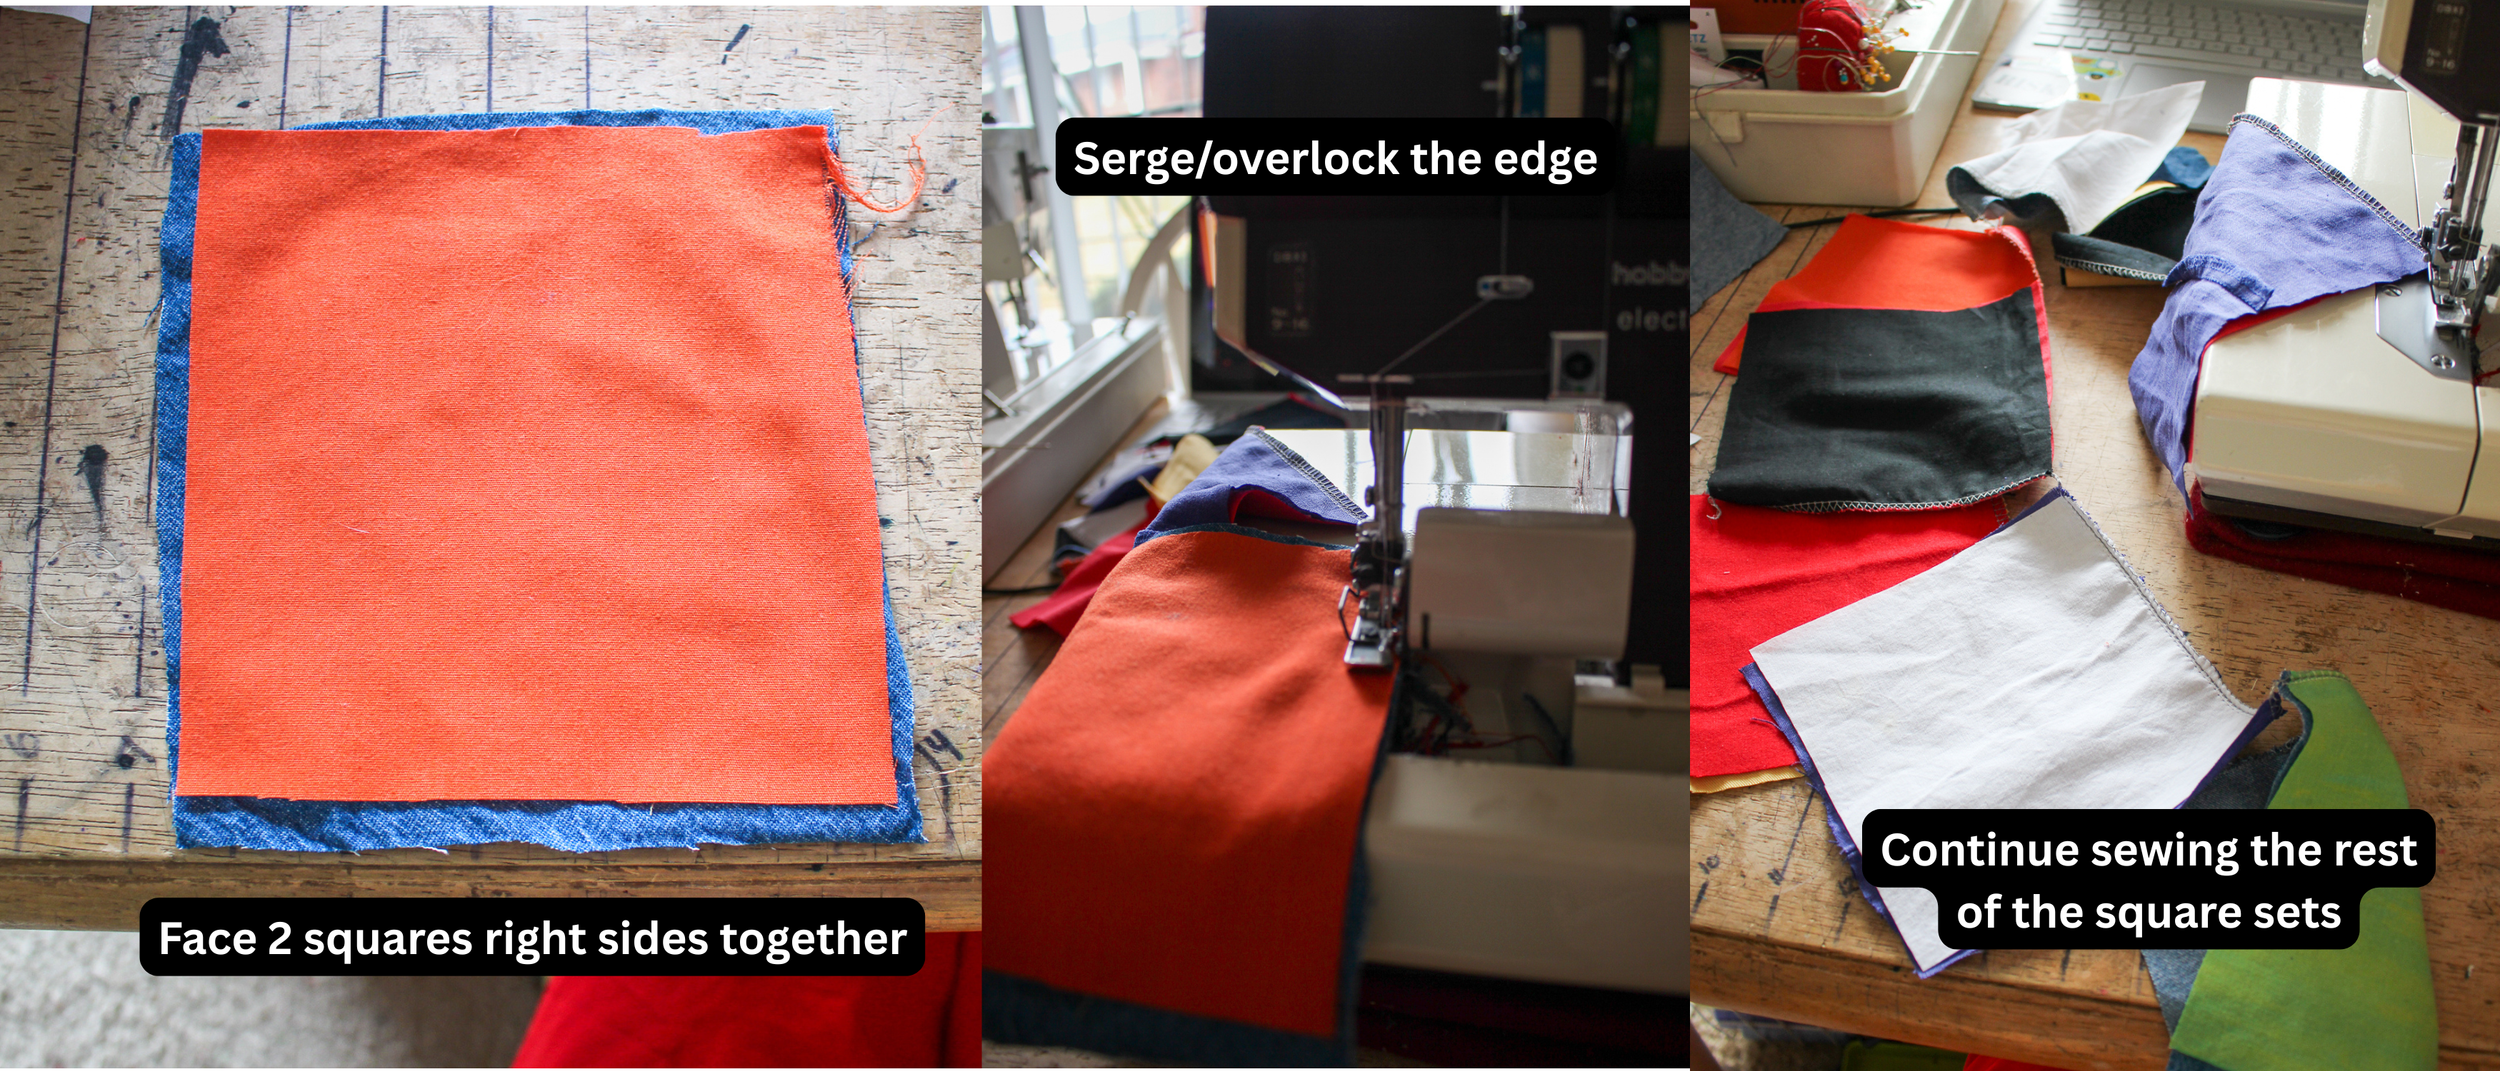
Image: Serging/overlocking squares together
Sew all the sets together, leaving the last square alone for the front pocket.
Cut the thread to separate the sets. Iron the seams flat. Sew down the seams with a straight stitch.
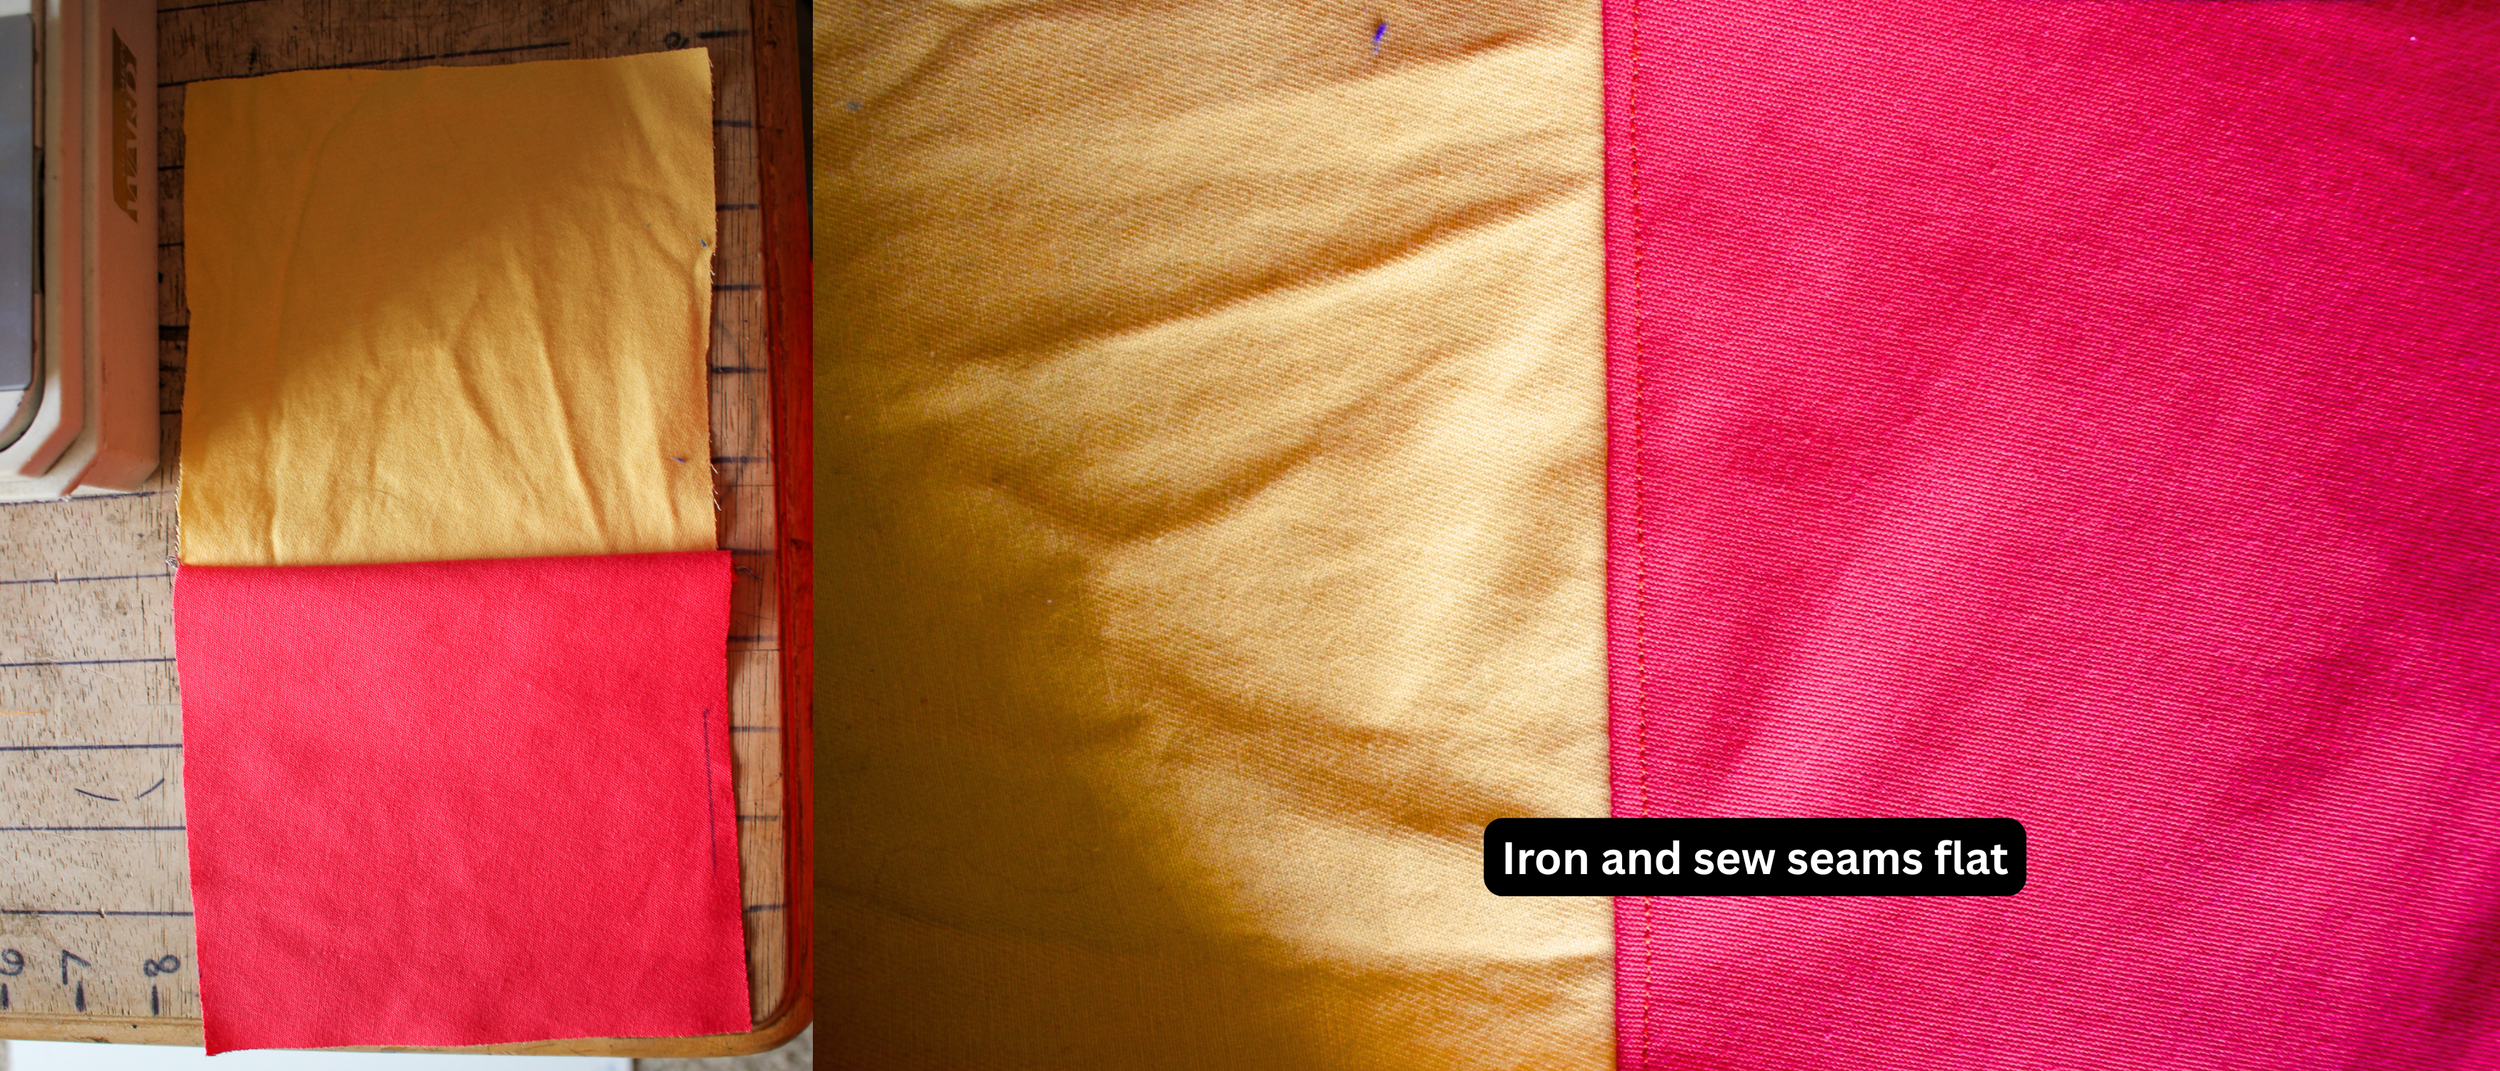
Image: Iron and sew seams flat
Set aside 7 of those sets for later. (These will make up the front/back bibs, and strap)
For the rest of the squares, start joining them together again, this time 2 and 2. You can press and sew down the seams after this step if you want, or wait until later.
Then one last time, join them again 4 and 4. Make sure all the seams are pressed and sewn down. This is going to be a common thing.
The result should be 14 total strips of 8 squares each.
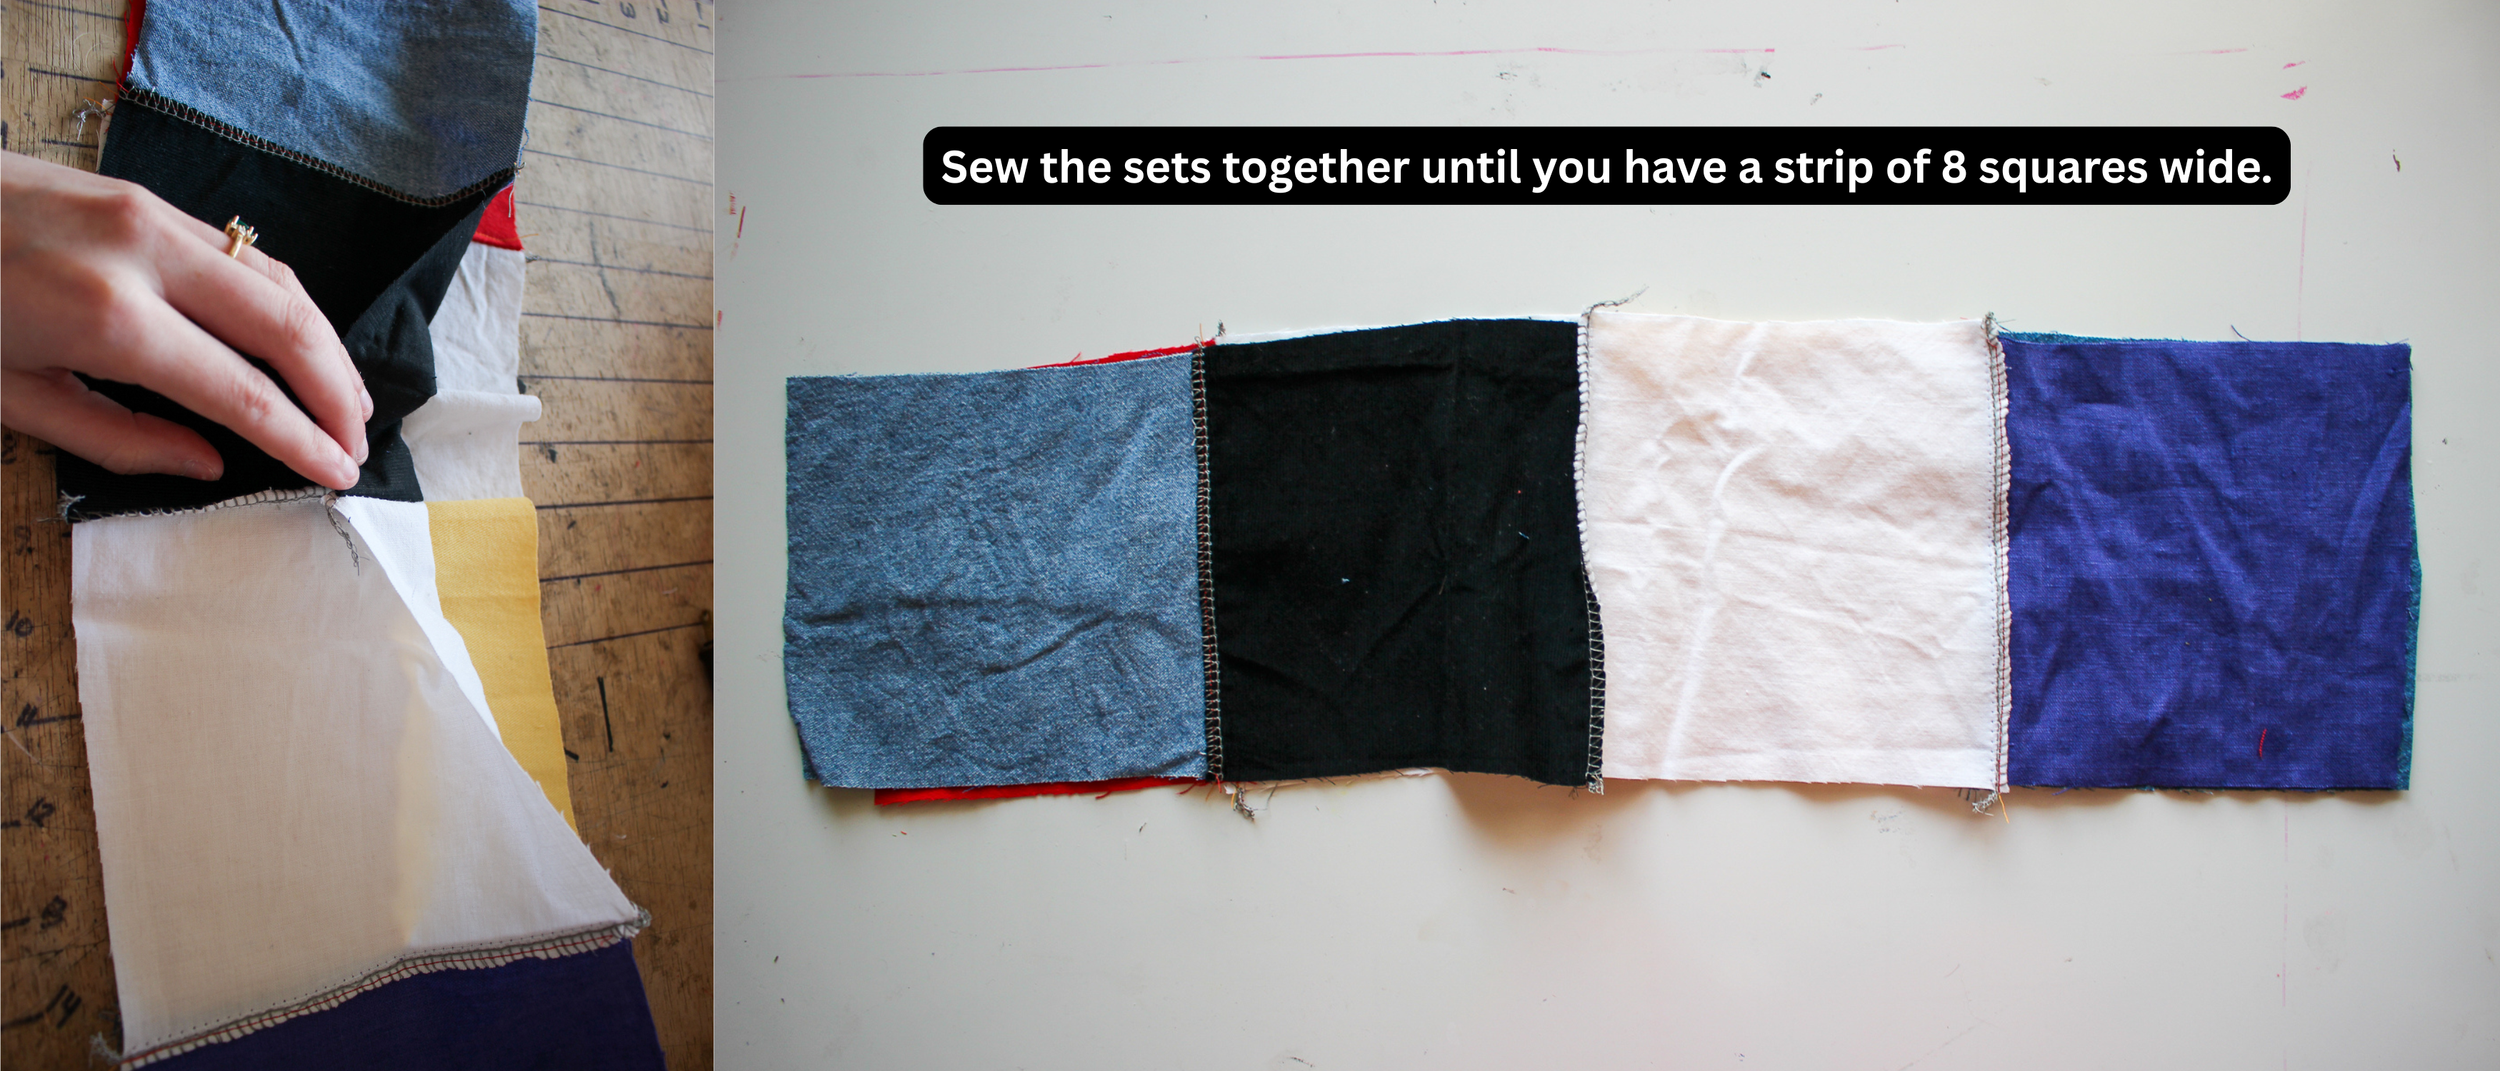
Image: Sew the sets together until you have strips of 8 squares wide.
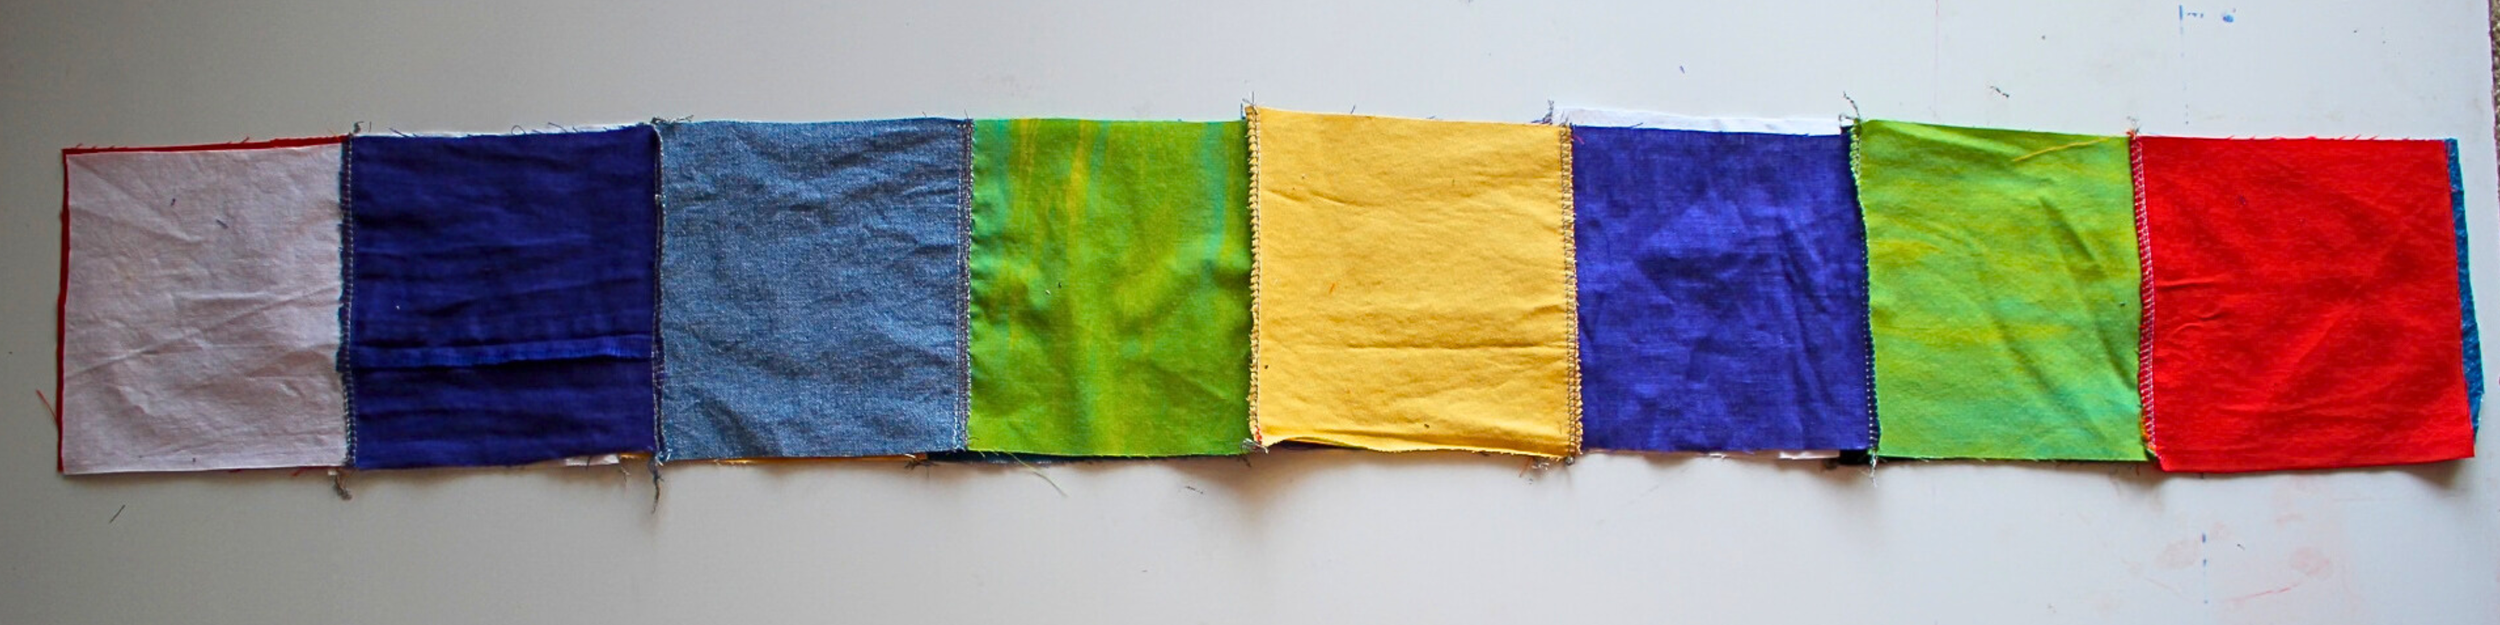
Image: Strip of 8 squares
Split these in half so you’ll have 2 piles of 7 strips each.
Time to joining the strips! Lay one down right side up.
Place another one above it, right side up first to compare colors. I wanted to make sure none of my colors directly touched each other. If you don’t care, you can skip this step.
Then flip the top strip over so both strips are right sides together.
Pin the edge along the top, sew them together with an overcast stitch/overlocker.
Press the seam down and sew with a straight stitch.
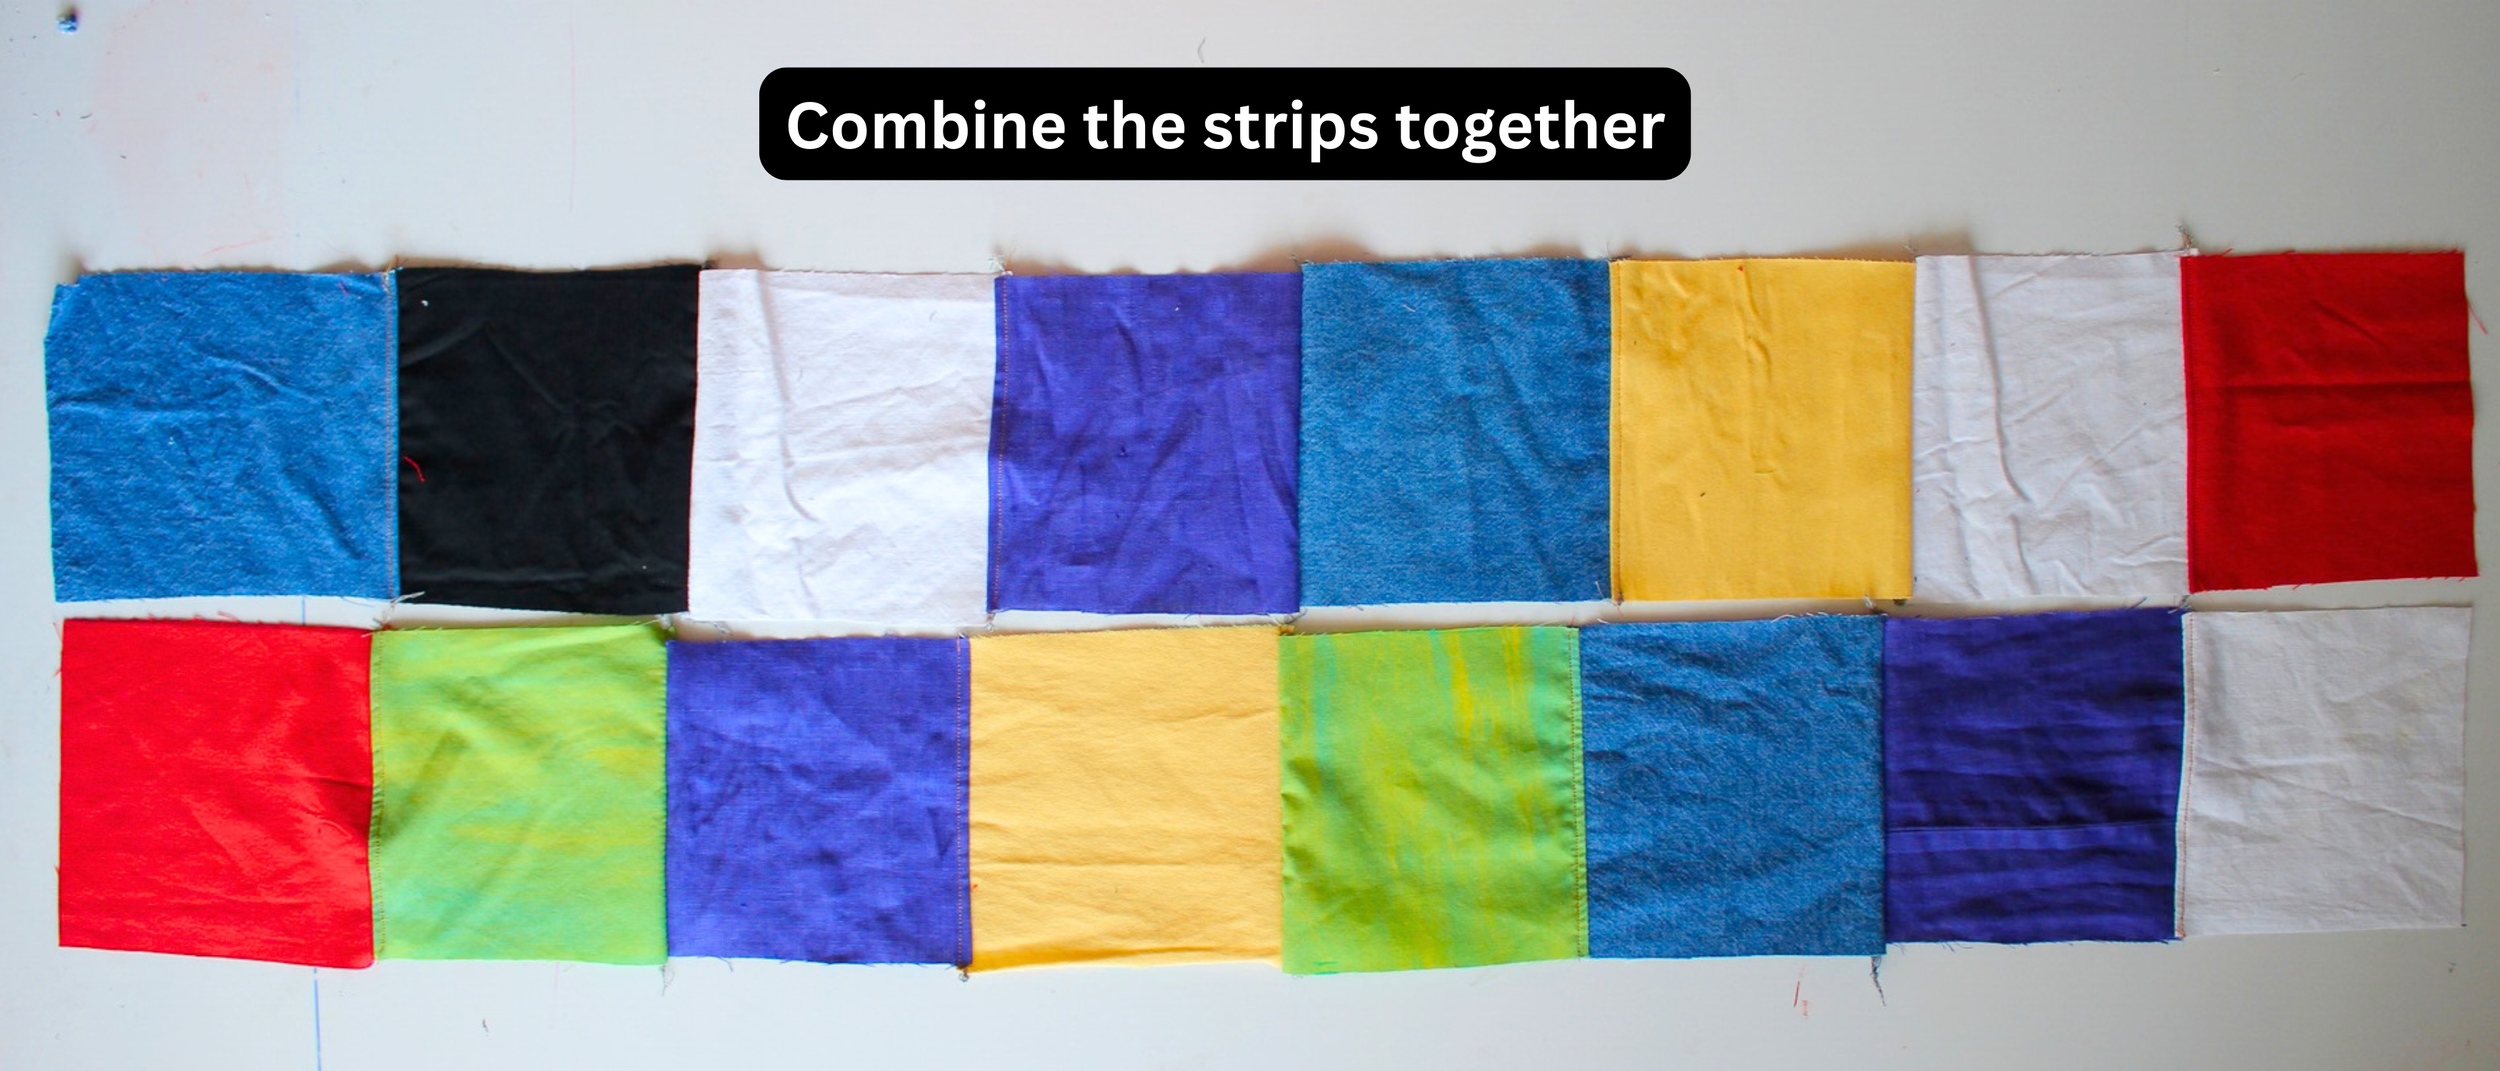
Image: Combine the strips together
Repeat this process until the first panel is complete. 7 total strips joined together.
(if you chose a smaller size this may vary)
Repeat this once again for the other leg panel.
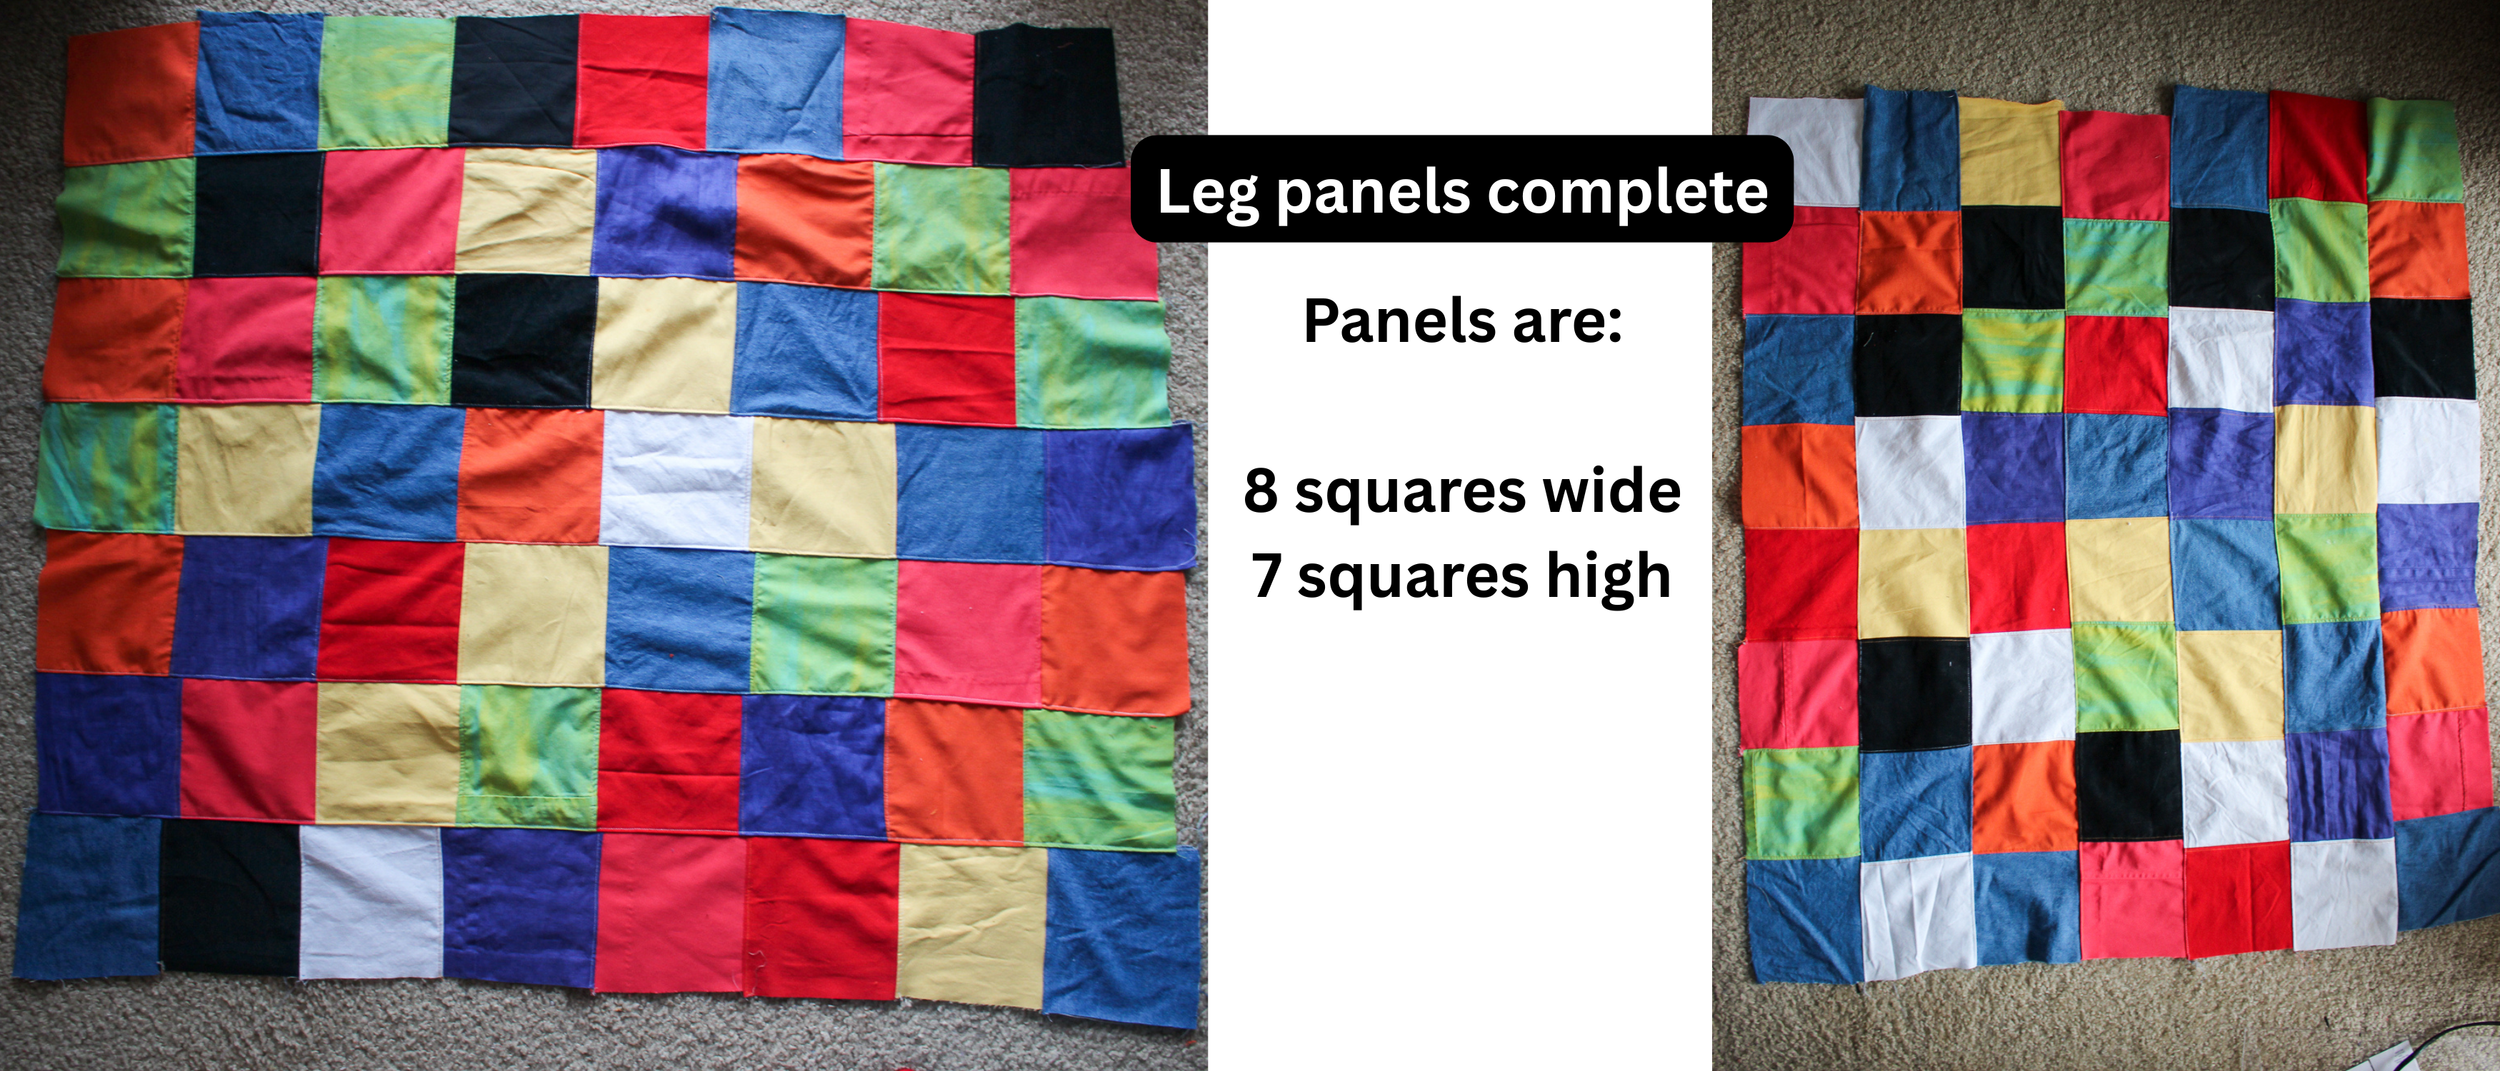
Image: Finished Leg Panels. 8 squares wide, 7 squares high.
Then repeat this similar process for the Front Bib: 2 Squares x 3 Squares
For the back bib: 2×2
For the strap: 1×4
Again make sure all seams are pressed and sewn down.
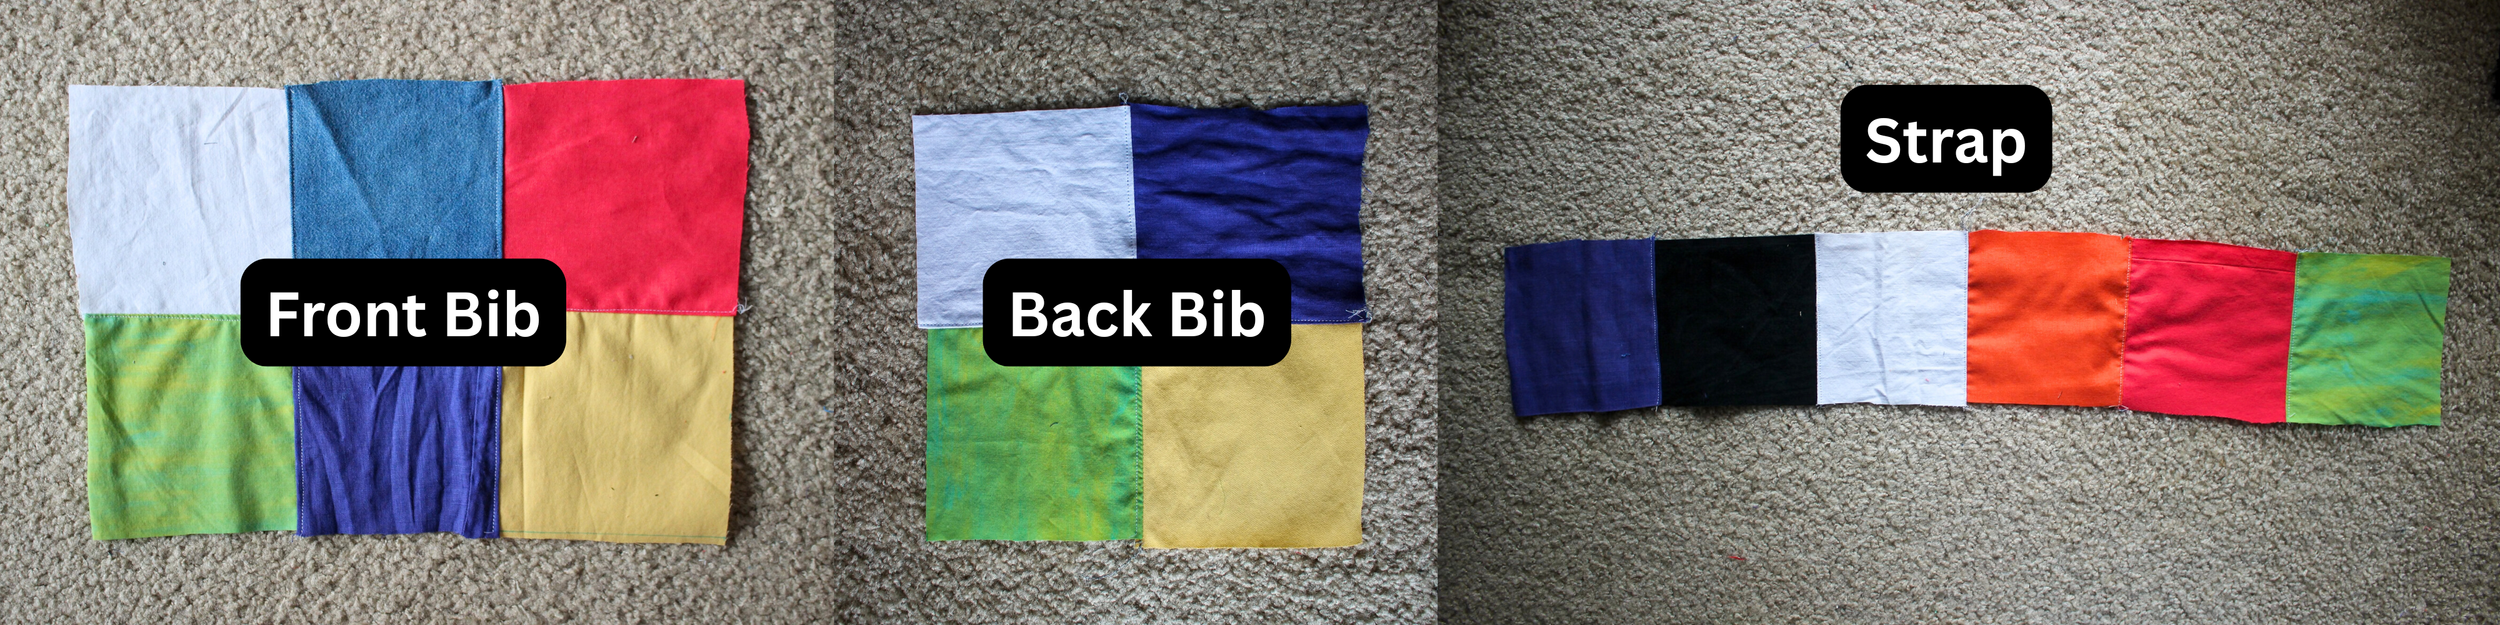
Image: Front bib, back bib, and strap.
Pant Construction
Again, I have another Pants Tutorial that goes over this construction in better detail with more personalization options.
I will copy some of that info here:
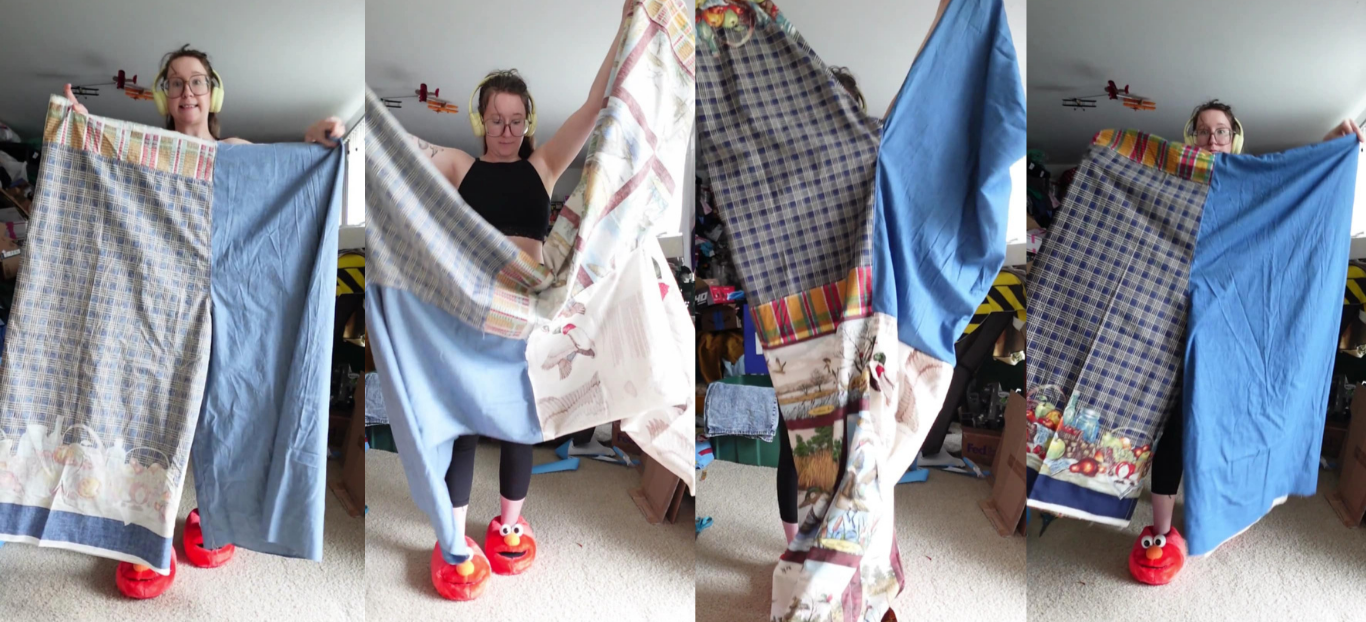
Fold the fabric in half, line up the pattern to the edge of the fold, and cut it out.
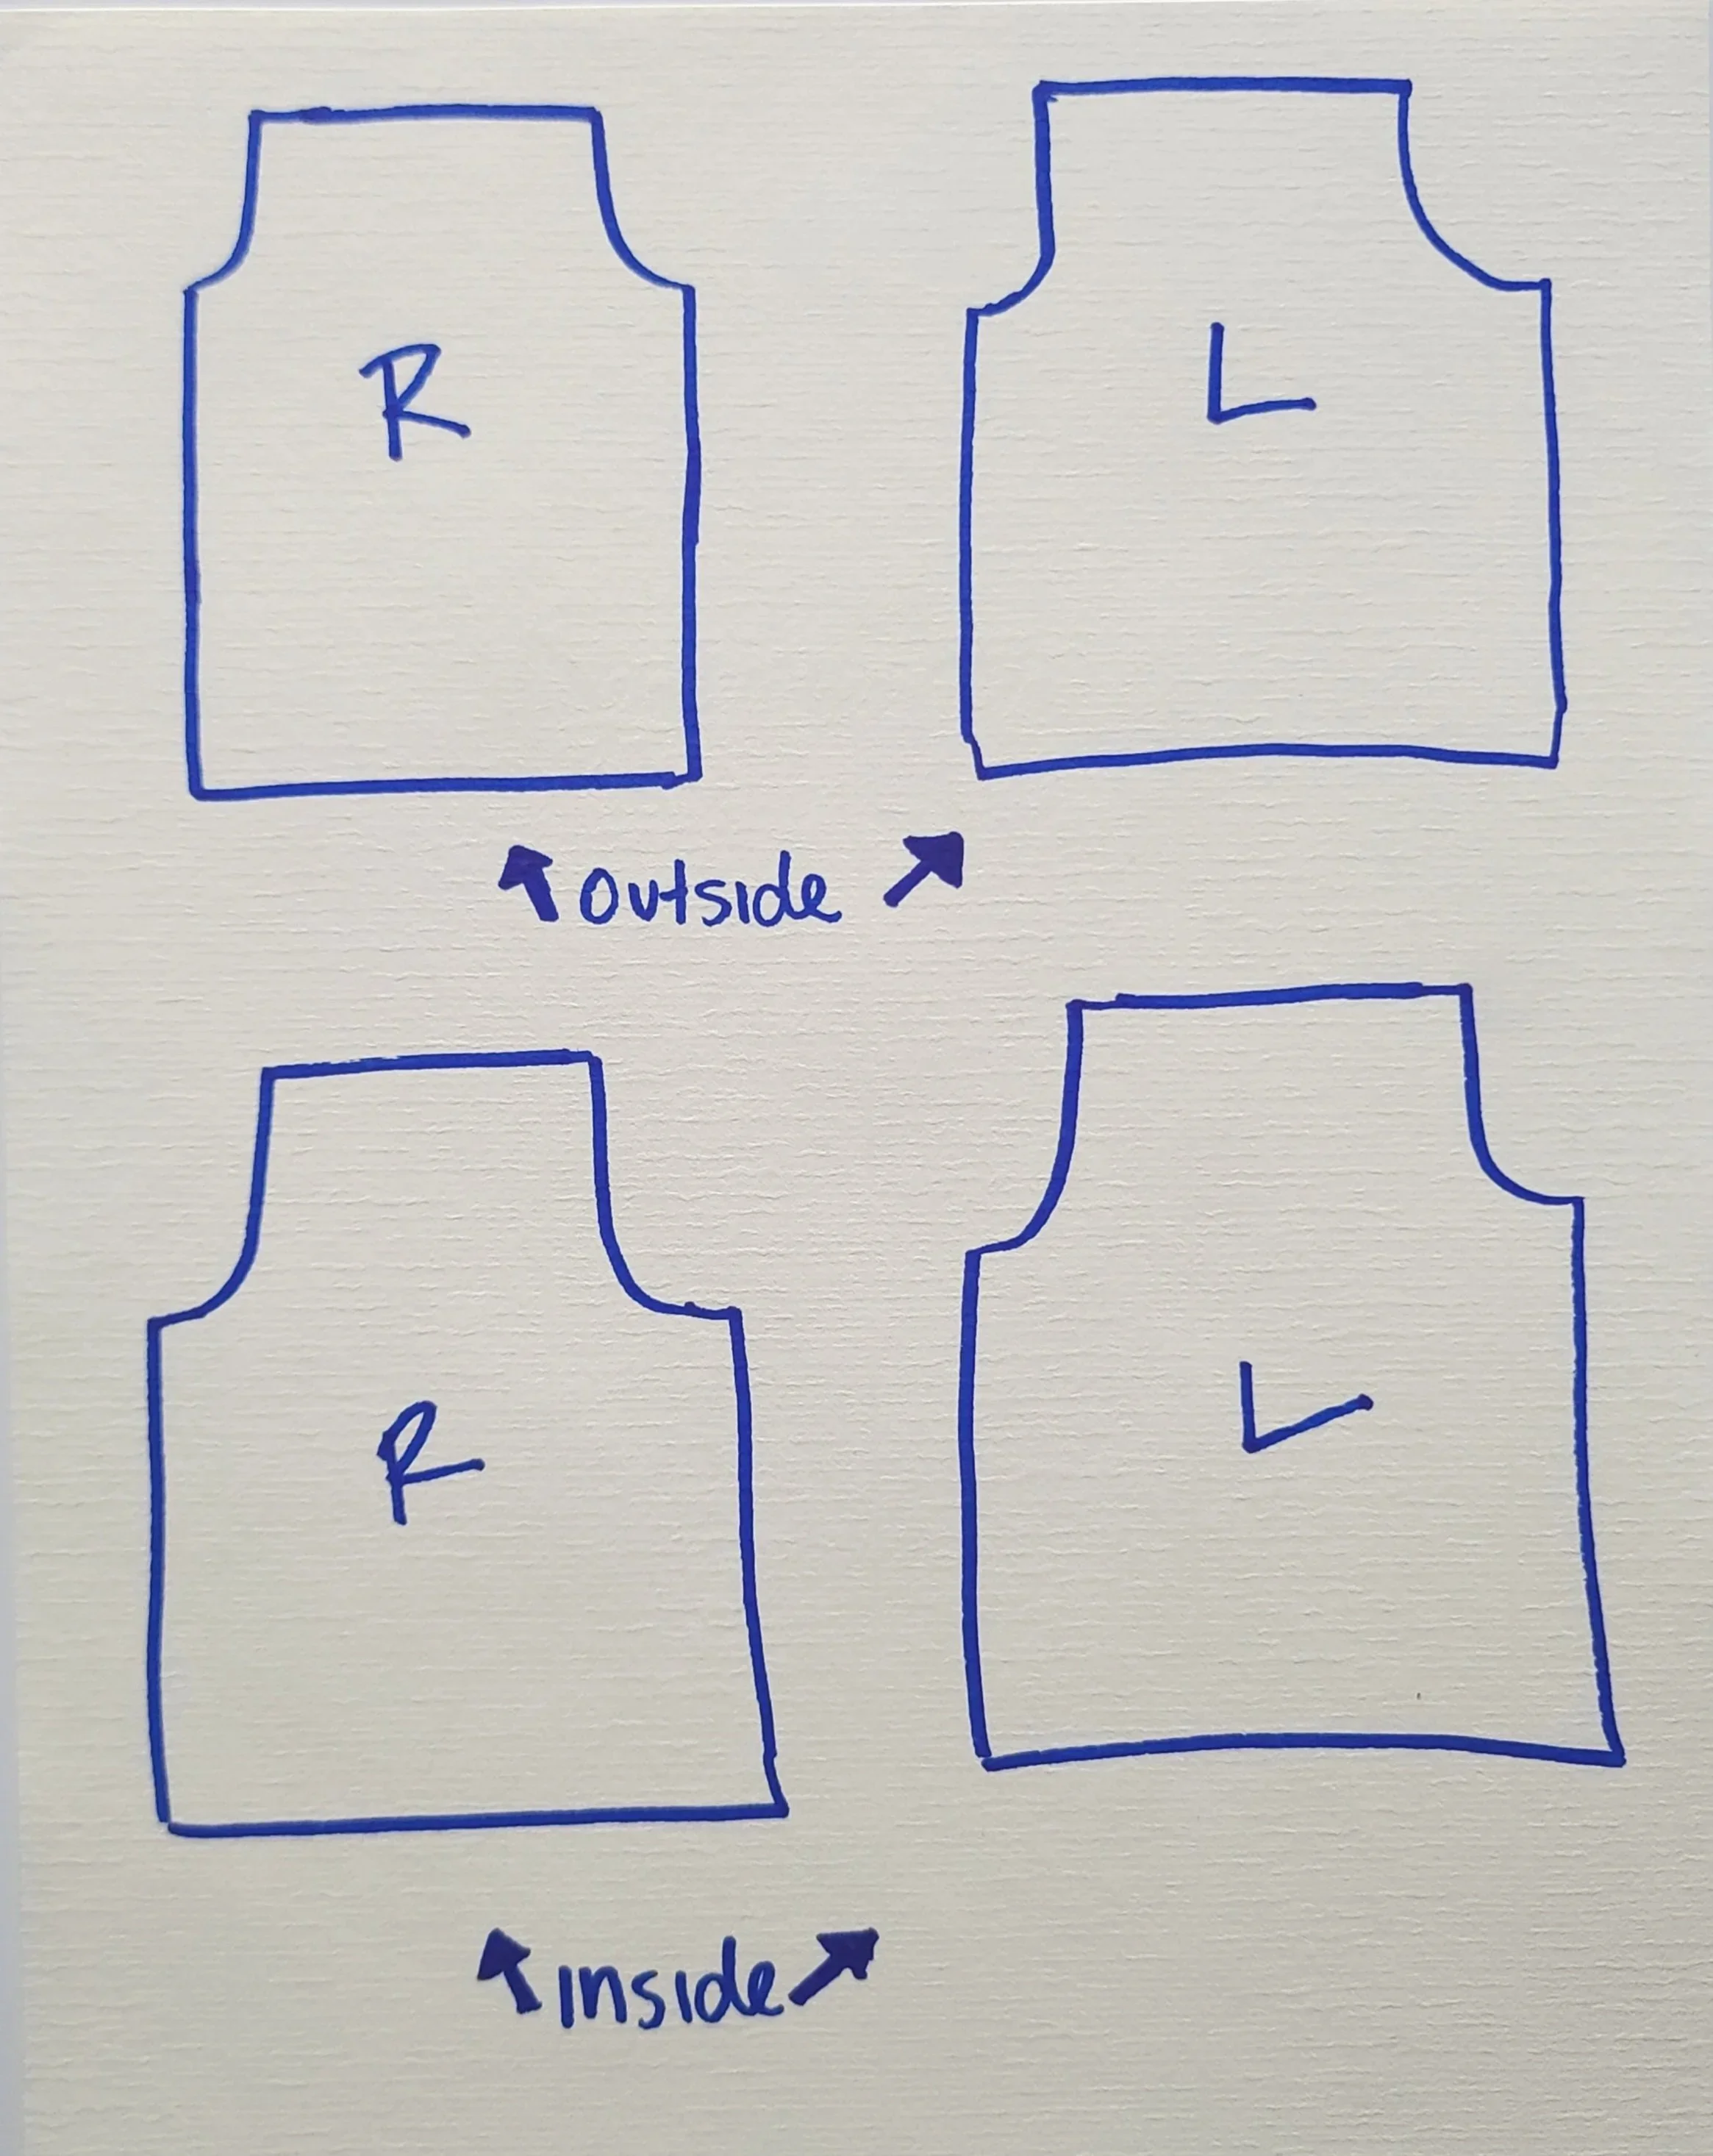
If you want a liner, cut 4 total panels.
2 Patchwork Panels and 2 other panels from regular non-stretchy fabric, like a sheet.
(This is what the fabric would look like opened, and not folded in half.)
Each panel makes up one leg.
*Make sure to cut and sew a test pair of pants with fabric you don’t care about first!
————————————
If you don’t want the extra inside fabric, just cut the 2 panels of patchwork instead. Though I recommend making a liner for this project for a neater look.
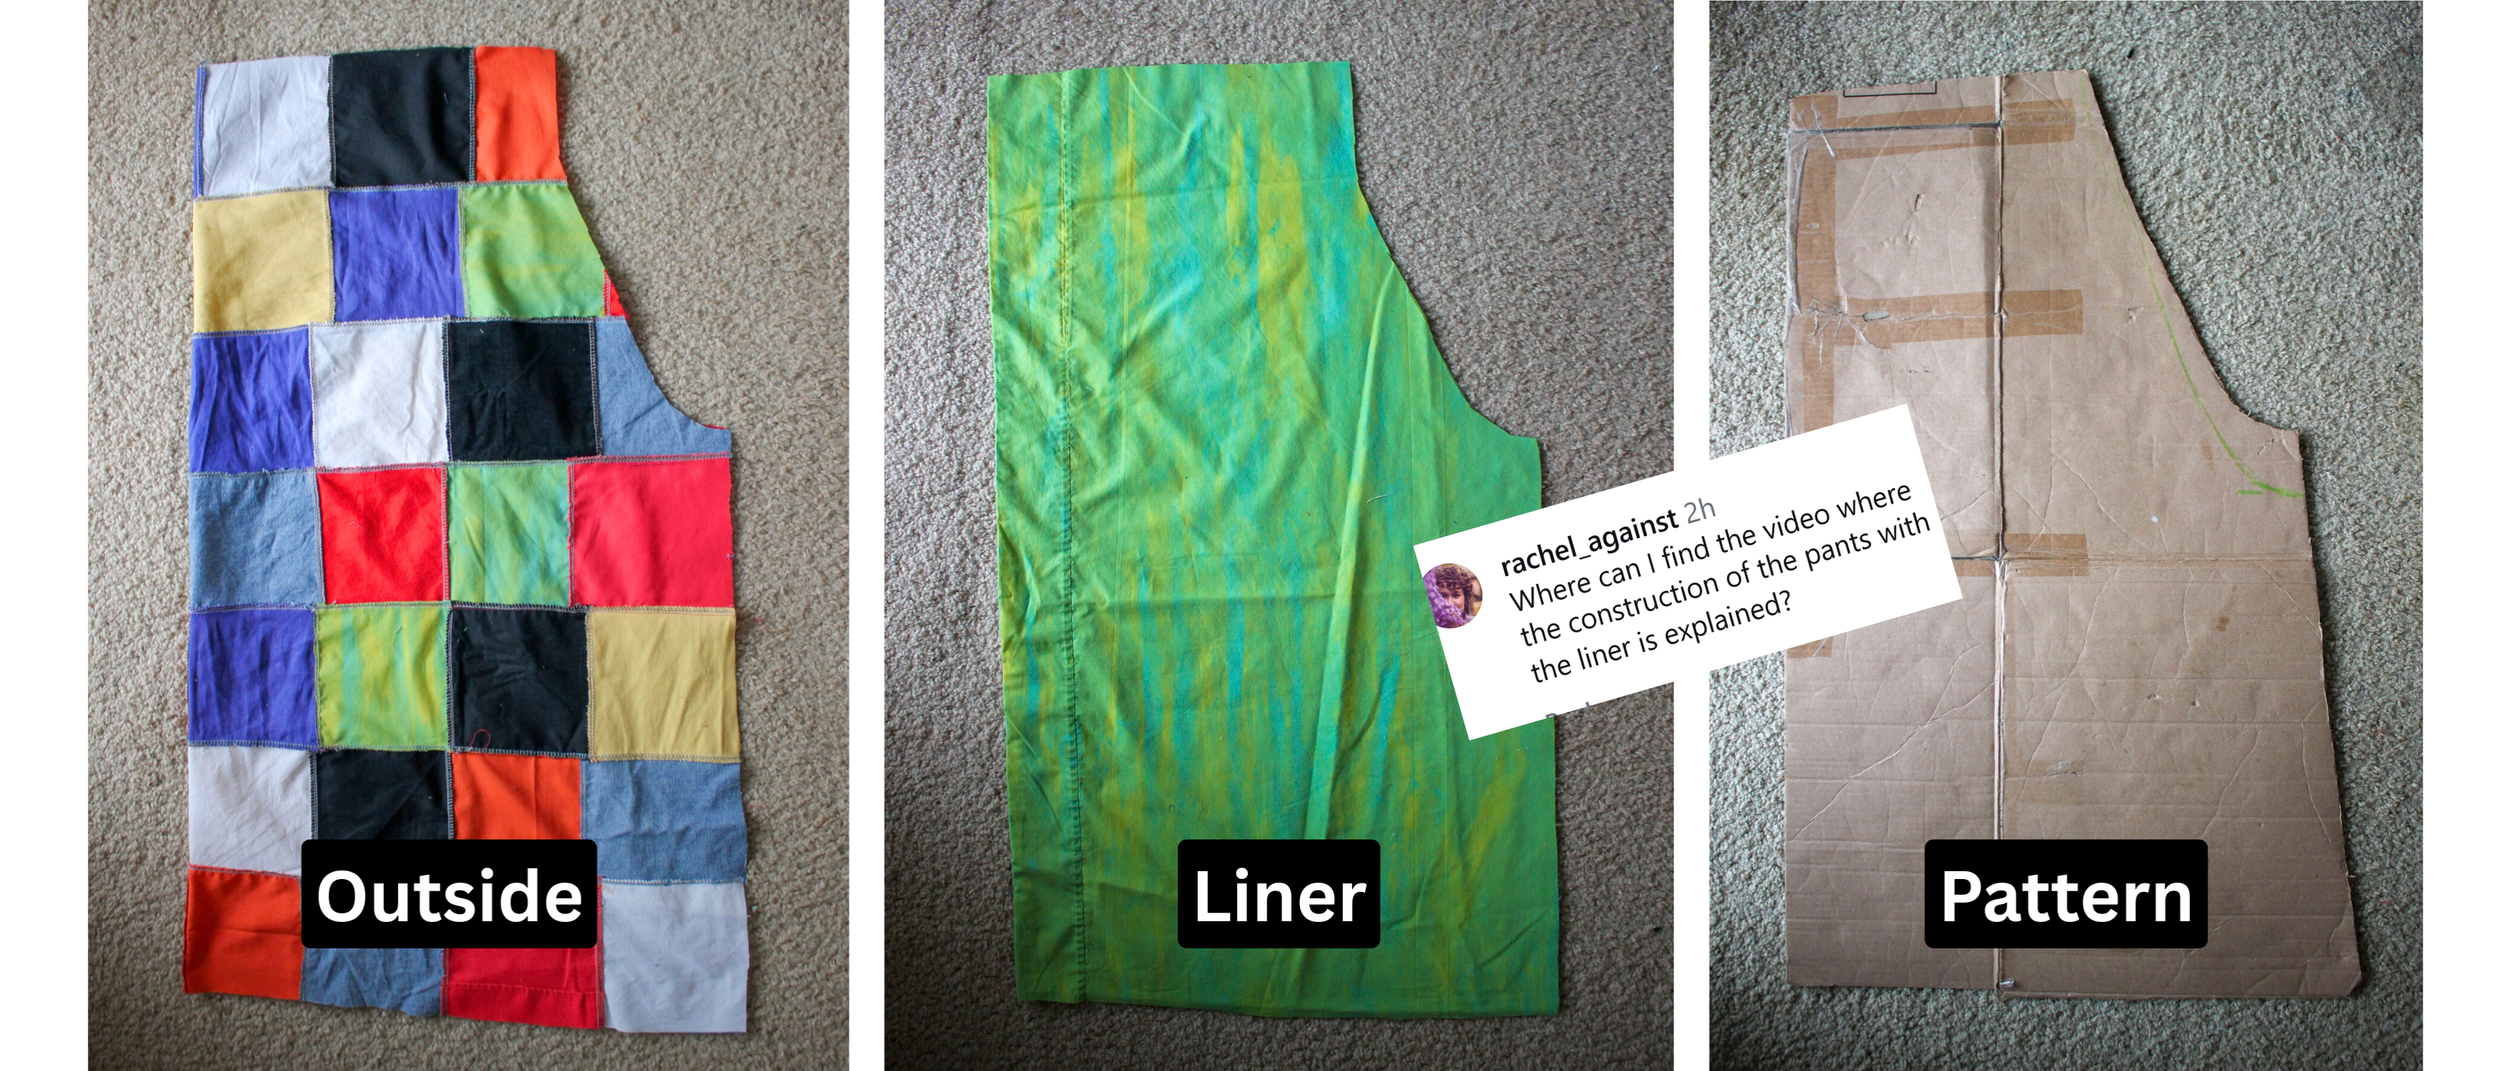
Image: Outside fabric, liner, and pattern
Sewing the Legs
Fold each individual panel in half, inside-out.
Sew from the crotch down, with a straight stitch.
Go over raw edges with an overcast stitch, or an overlocker, to prevent fraying.
Press the seams down and sew with a straight stitch.
Repeat these steps for the other leg, and for each liner panel.
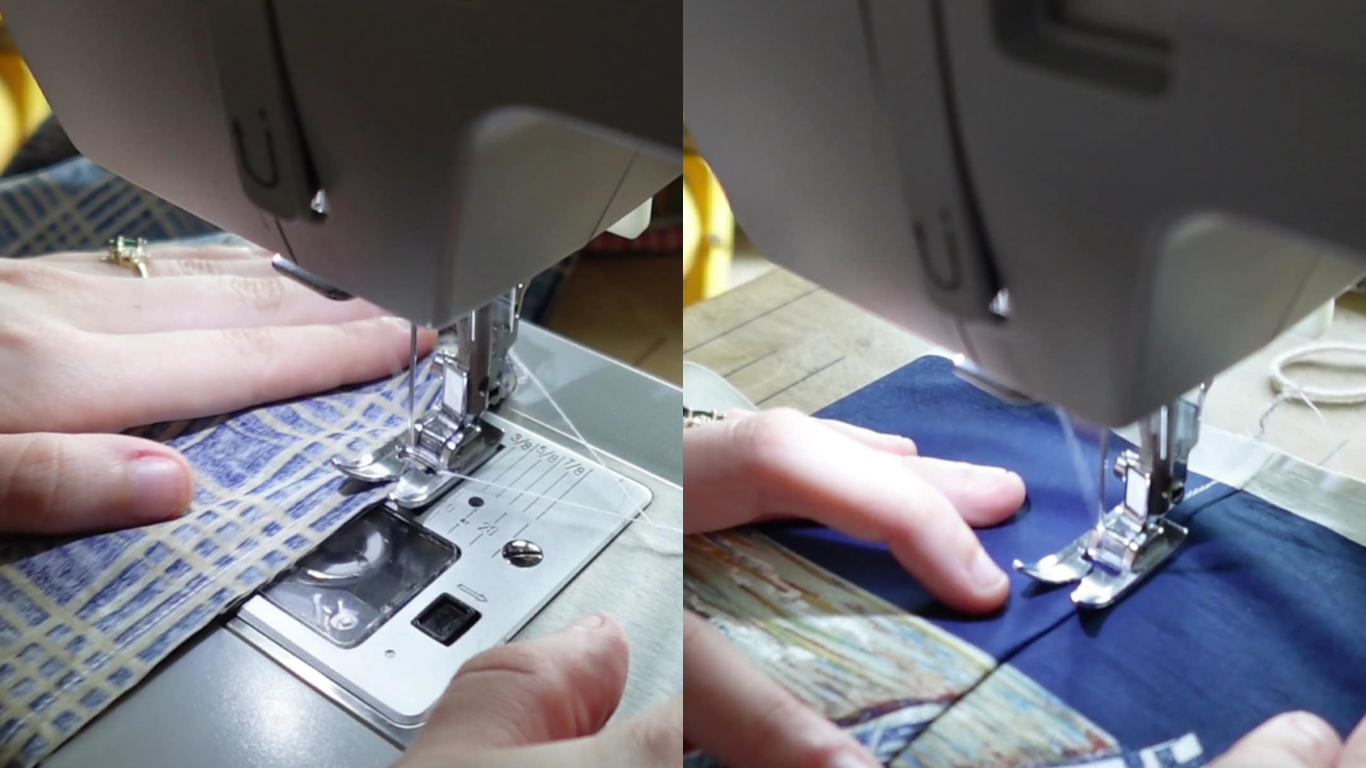
Pictures from Pants Tutorial, not of the overalls.
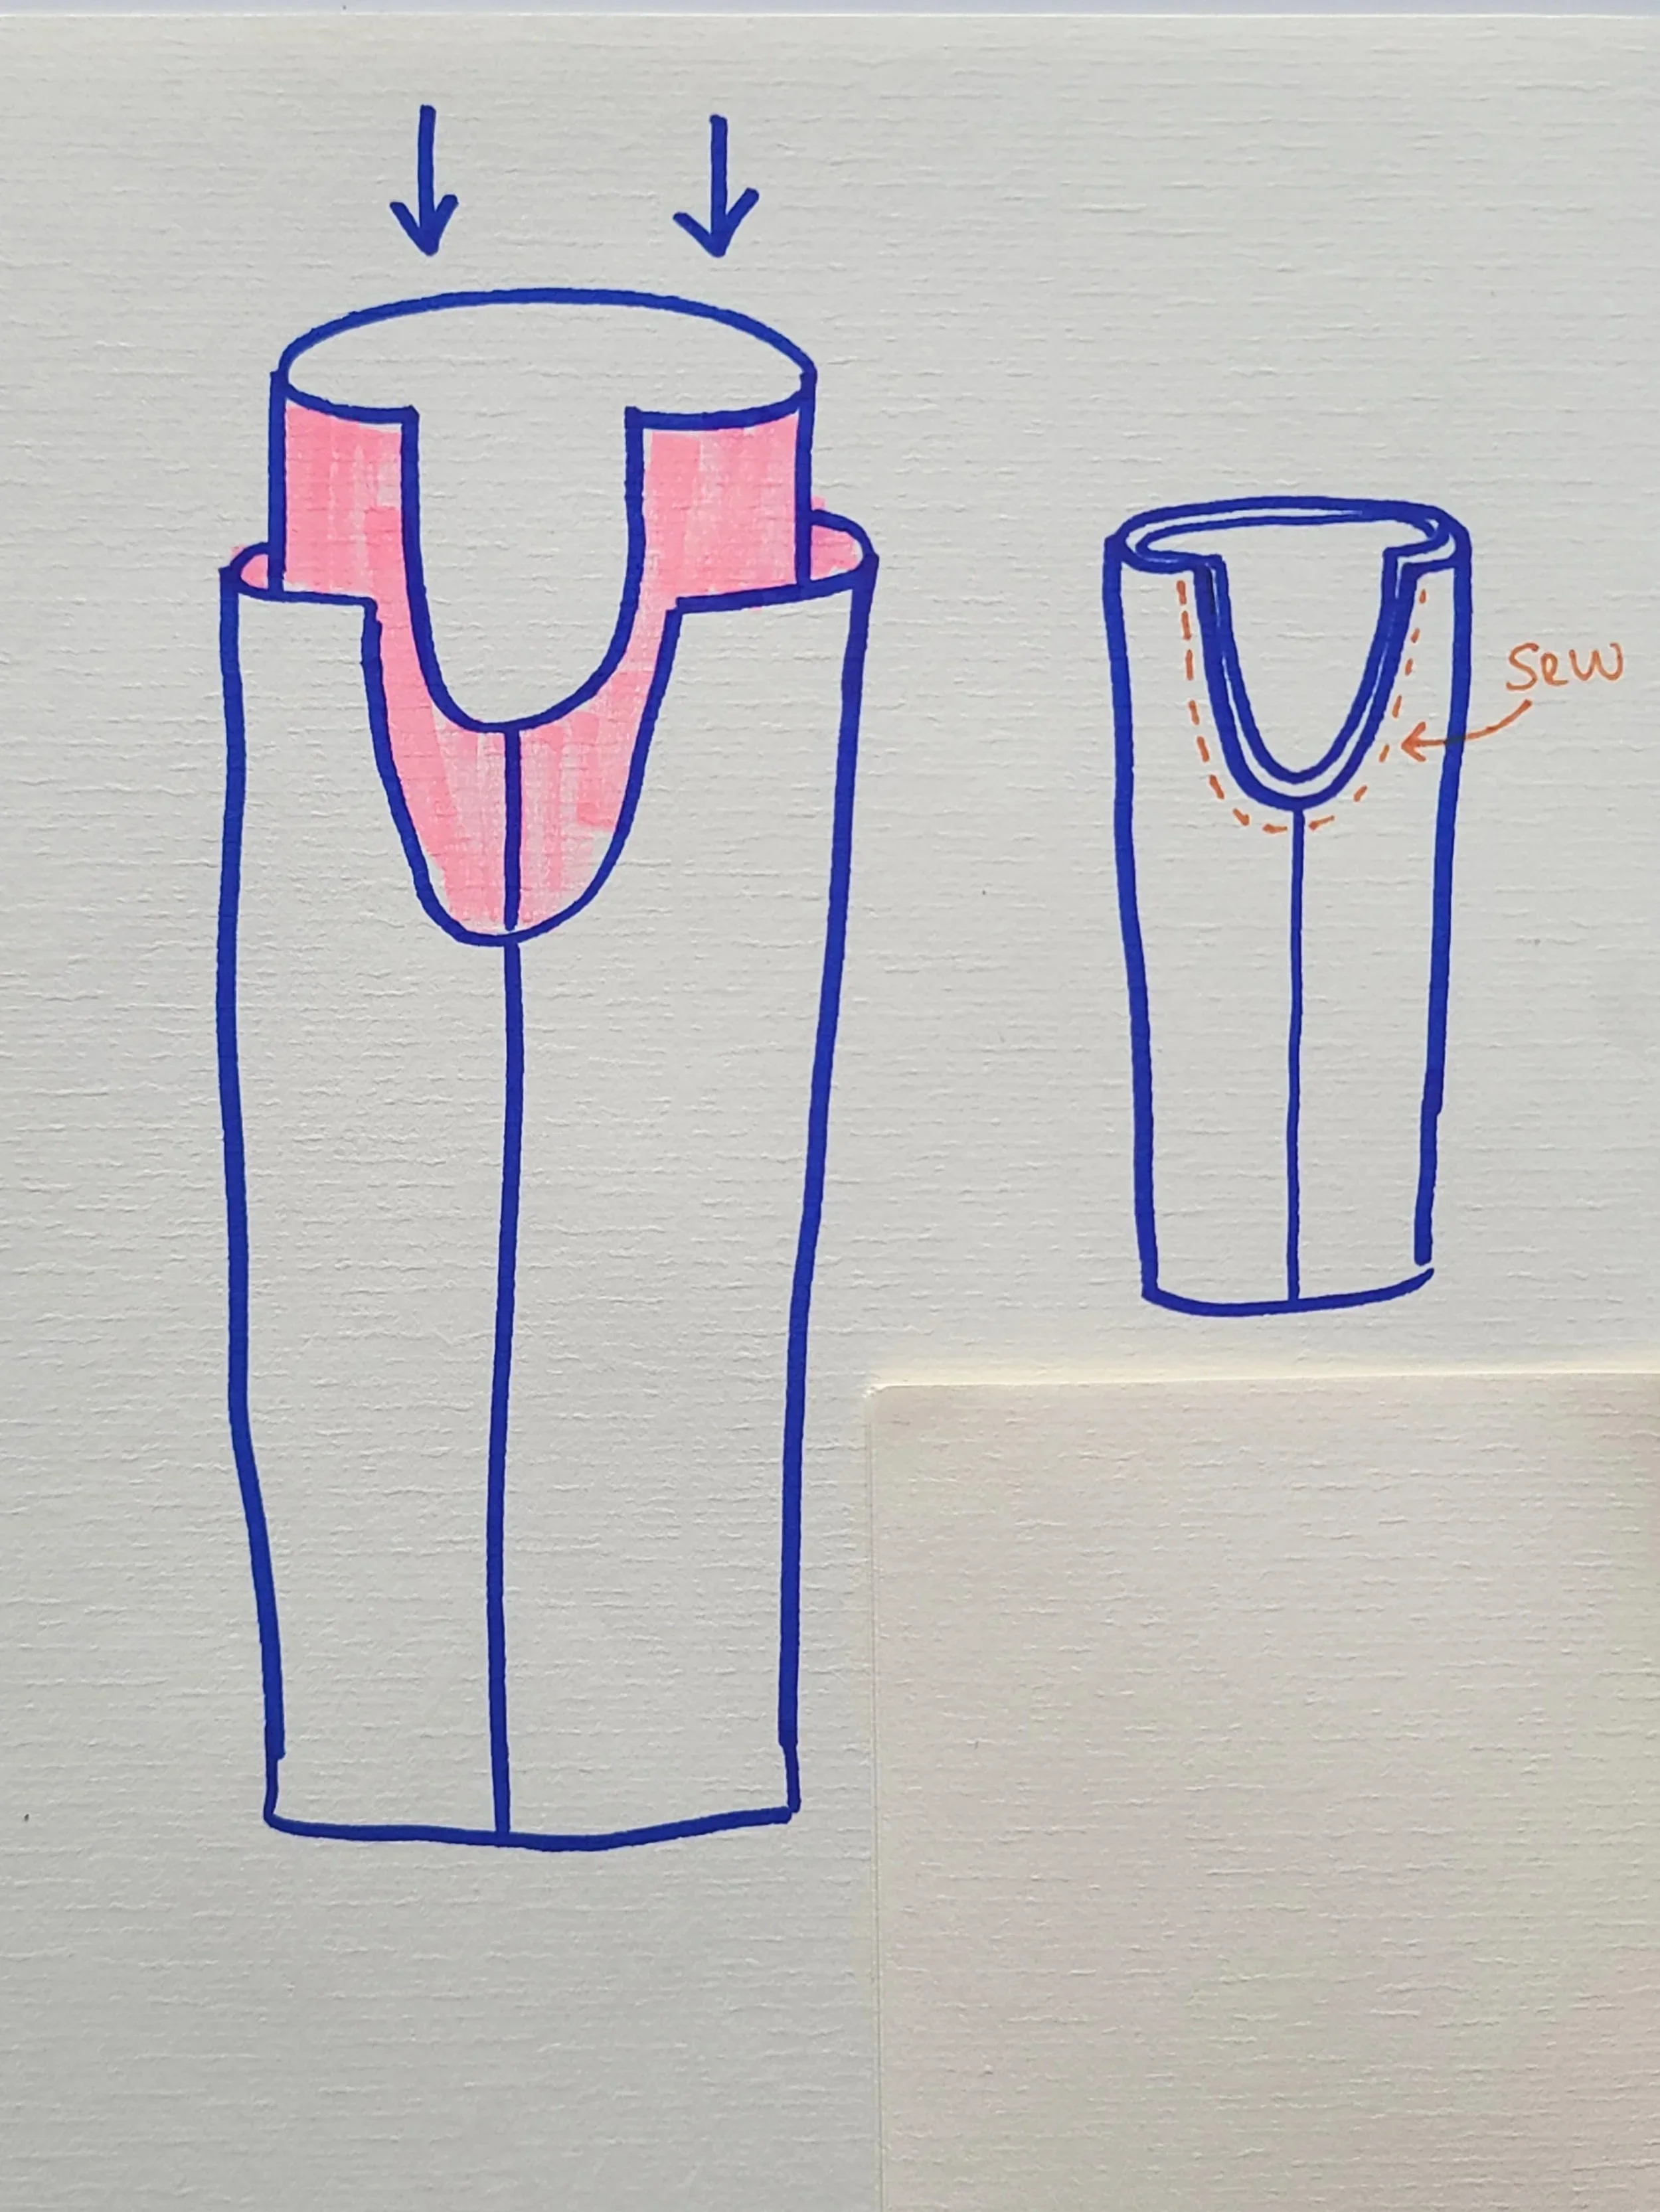
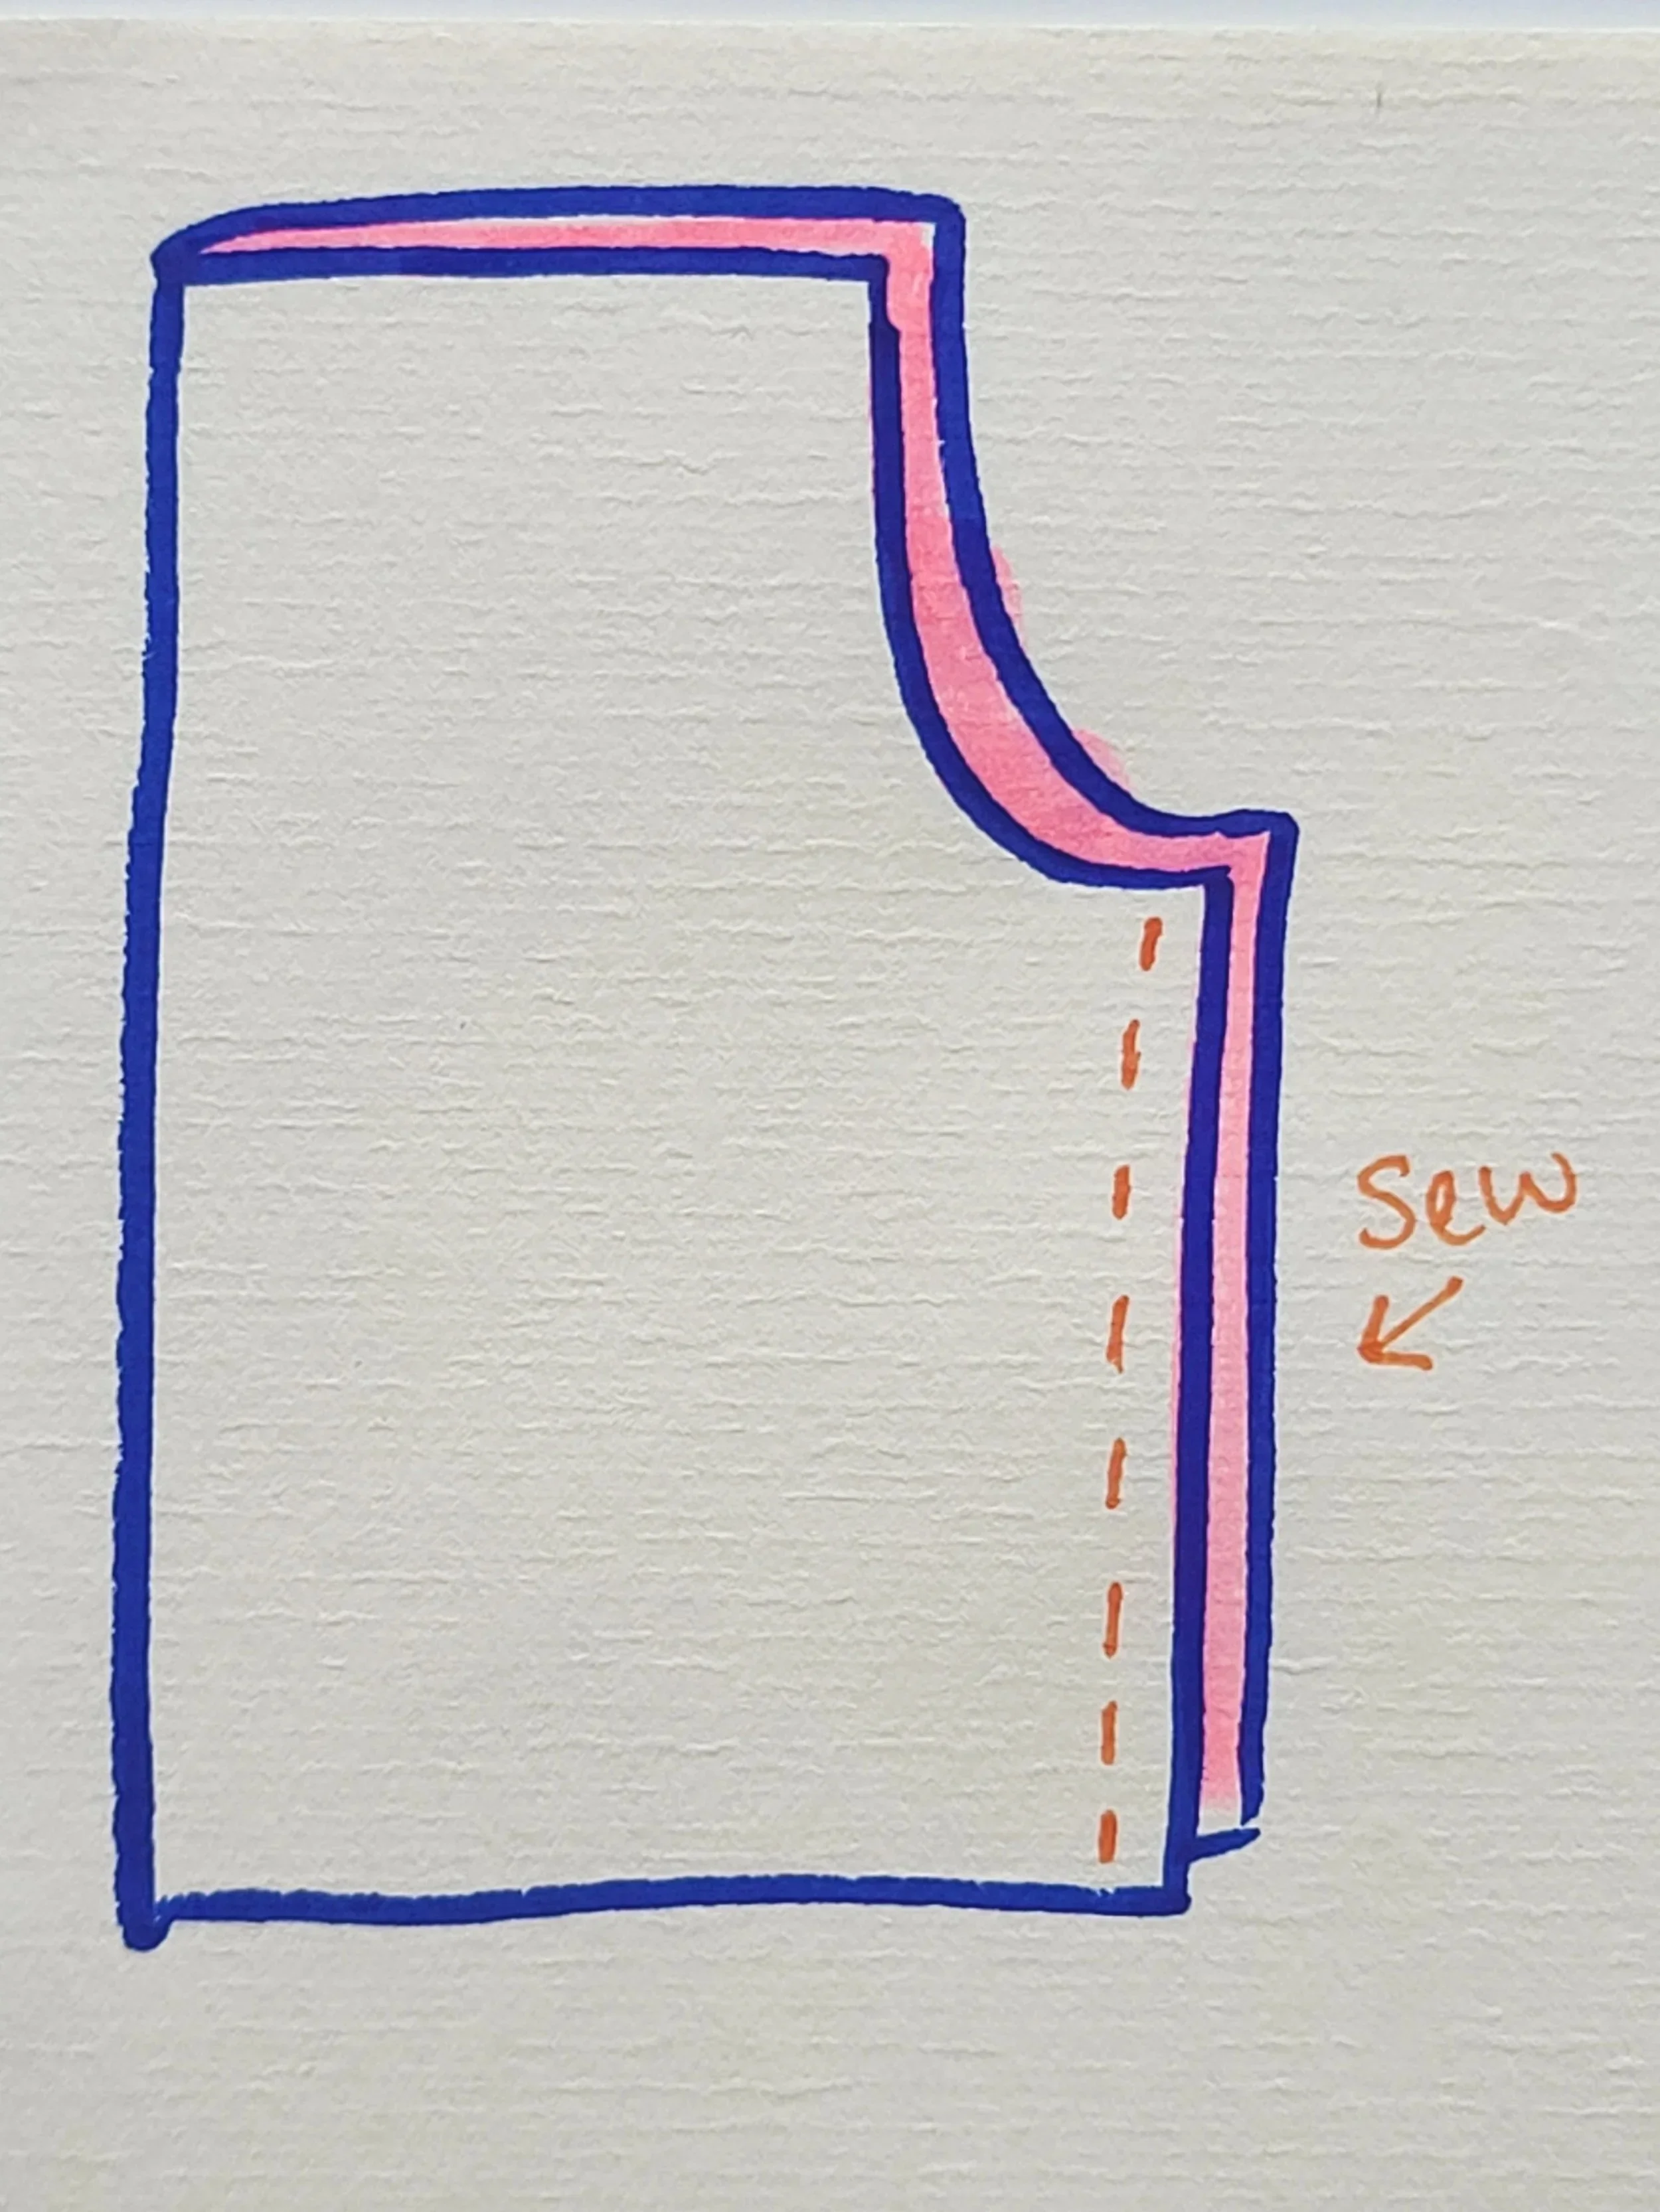
Once both of the outside legs are complete, turn one right-side-out. (the right side of the fabric is pictured in pink)
Tuck it into the inside-out one, lining up the crotch seams.
Double check that the right sides of the fabric are facing each other.
(Right-sides of fabric means the outside, or the correct side of the fabric.)
Pin and sew along the curve (orange dotted line).
I like to go over this 2 times with a straight stitch to make sure it’s strong.
Overlock the edges as well.
Repeat these steps for the inside liner.
Pictures from Pants Tutorial, not of the overalls.
Please note: For the below steps, I thought I was going to go a different route with the waist style of my overalls, so I did not do it quite like this, and ended up having to use bias tape to finish the top edge.
I recommend following these steps instead, for a better finish.
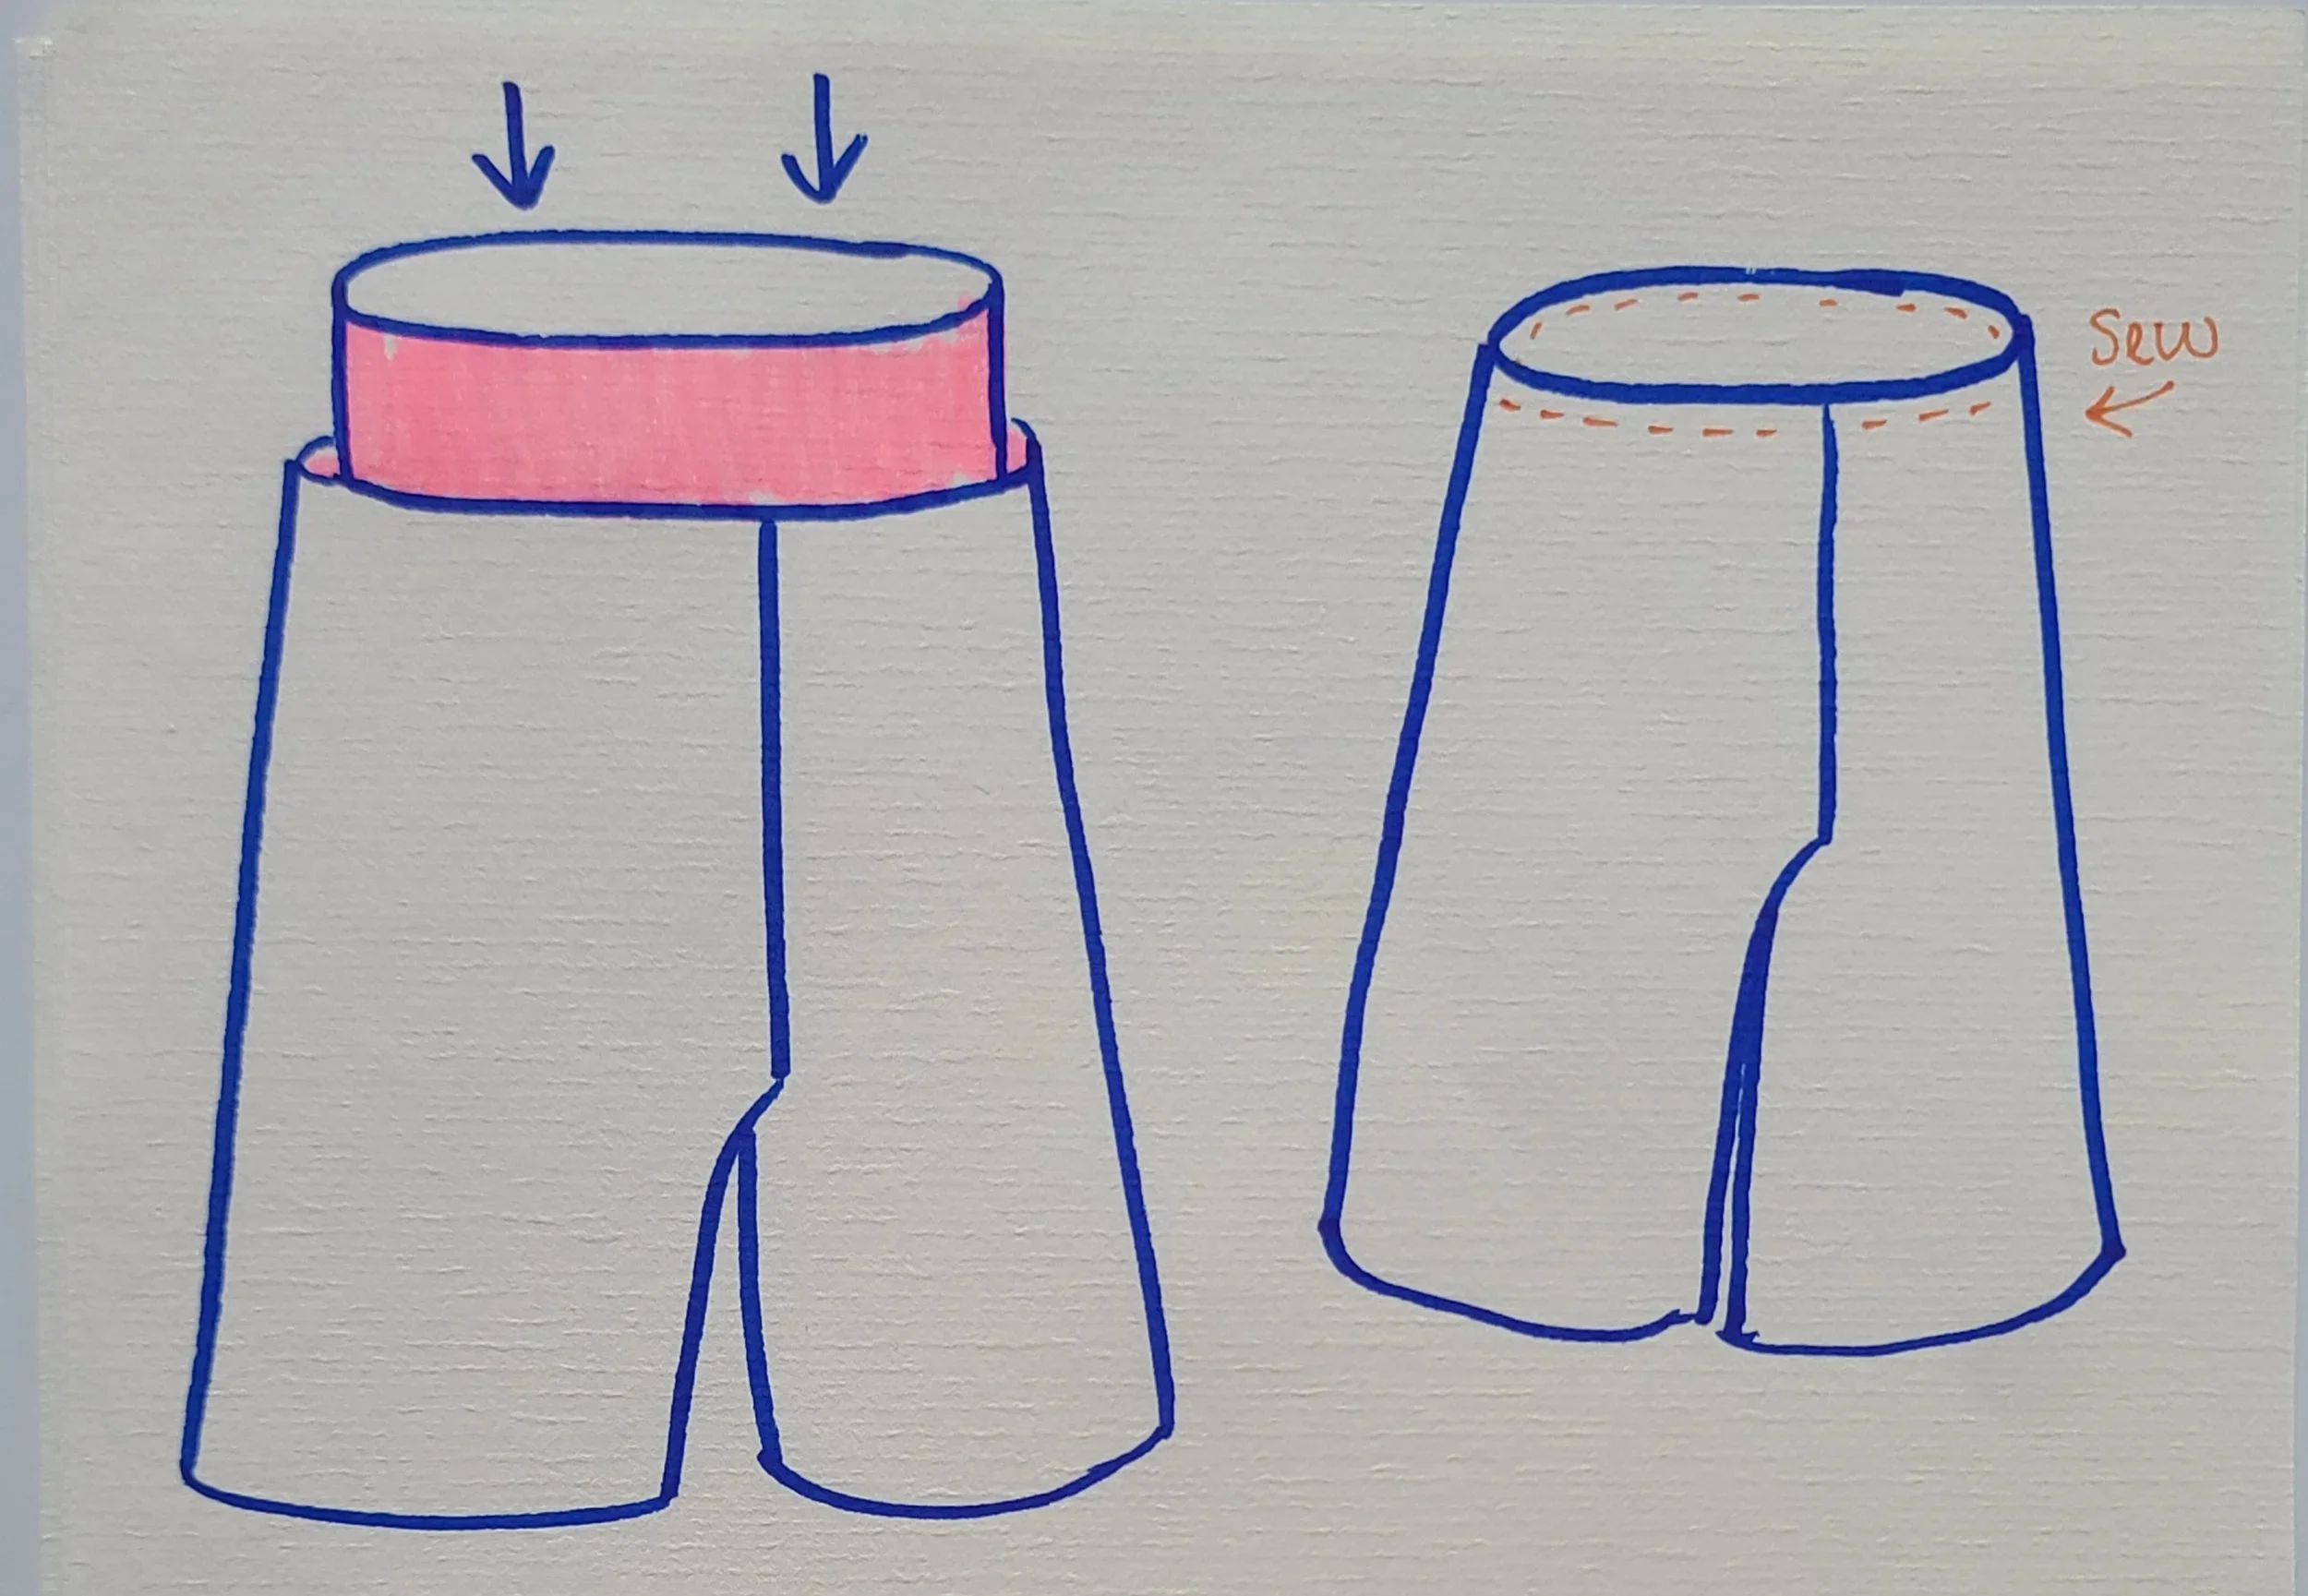
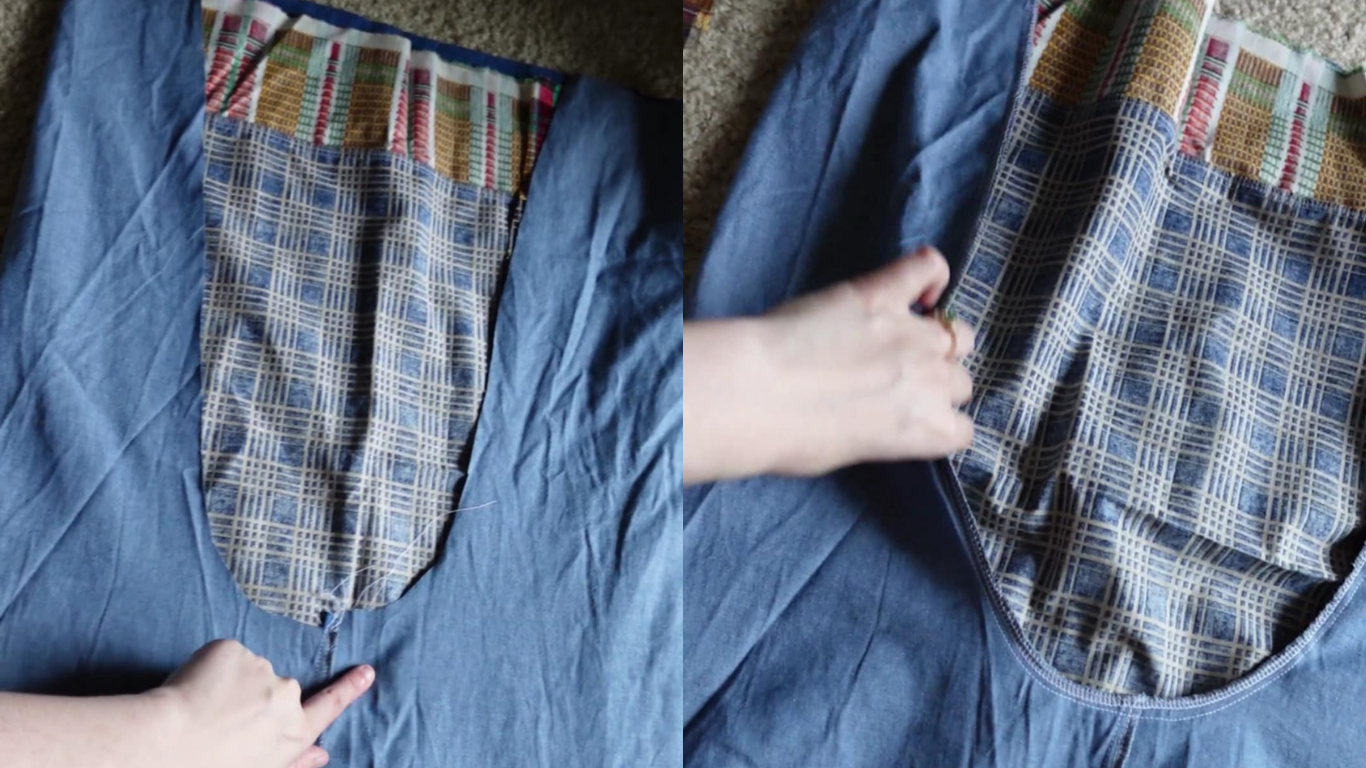
Once both the liner and outside pants are sewn, turn one right-side out, and tuck it into the inside-out one.
(Right side of the fabric is shown in pink highlighter)
Right sides of fabric should be facing each other.
Line up the top waist, pin and sew. (Orange dotted line)
Overlock the edges once again.
Pictures from Pants Tutorial, not of the overalls.
Turn the pants right-side out.
This may be a little tricky. Pull the pants out from inside.
Turn the entire piece right side out.
Tuck the liner into the pants.
The wrong side of the fabric should now be hidden, with right sides of fabric visible outside, and inside.
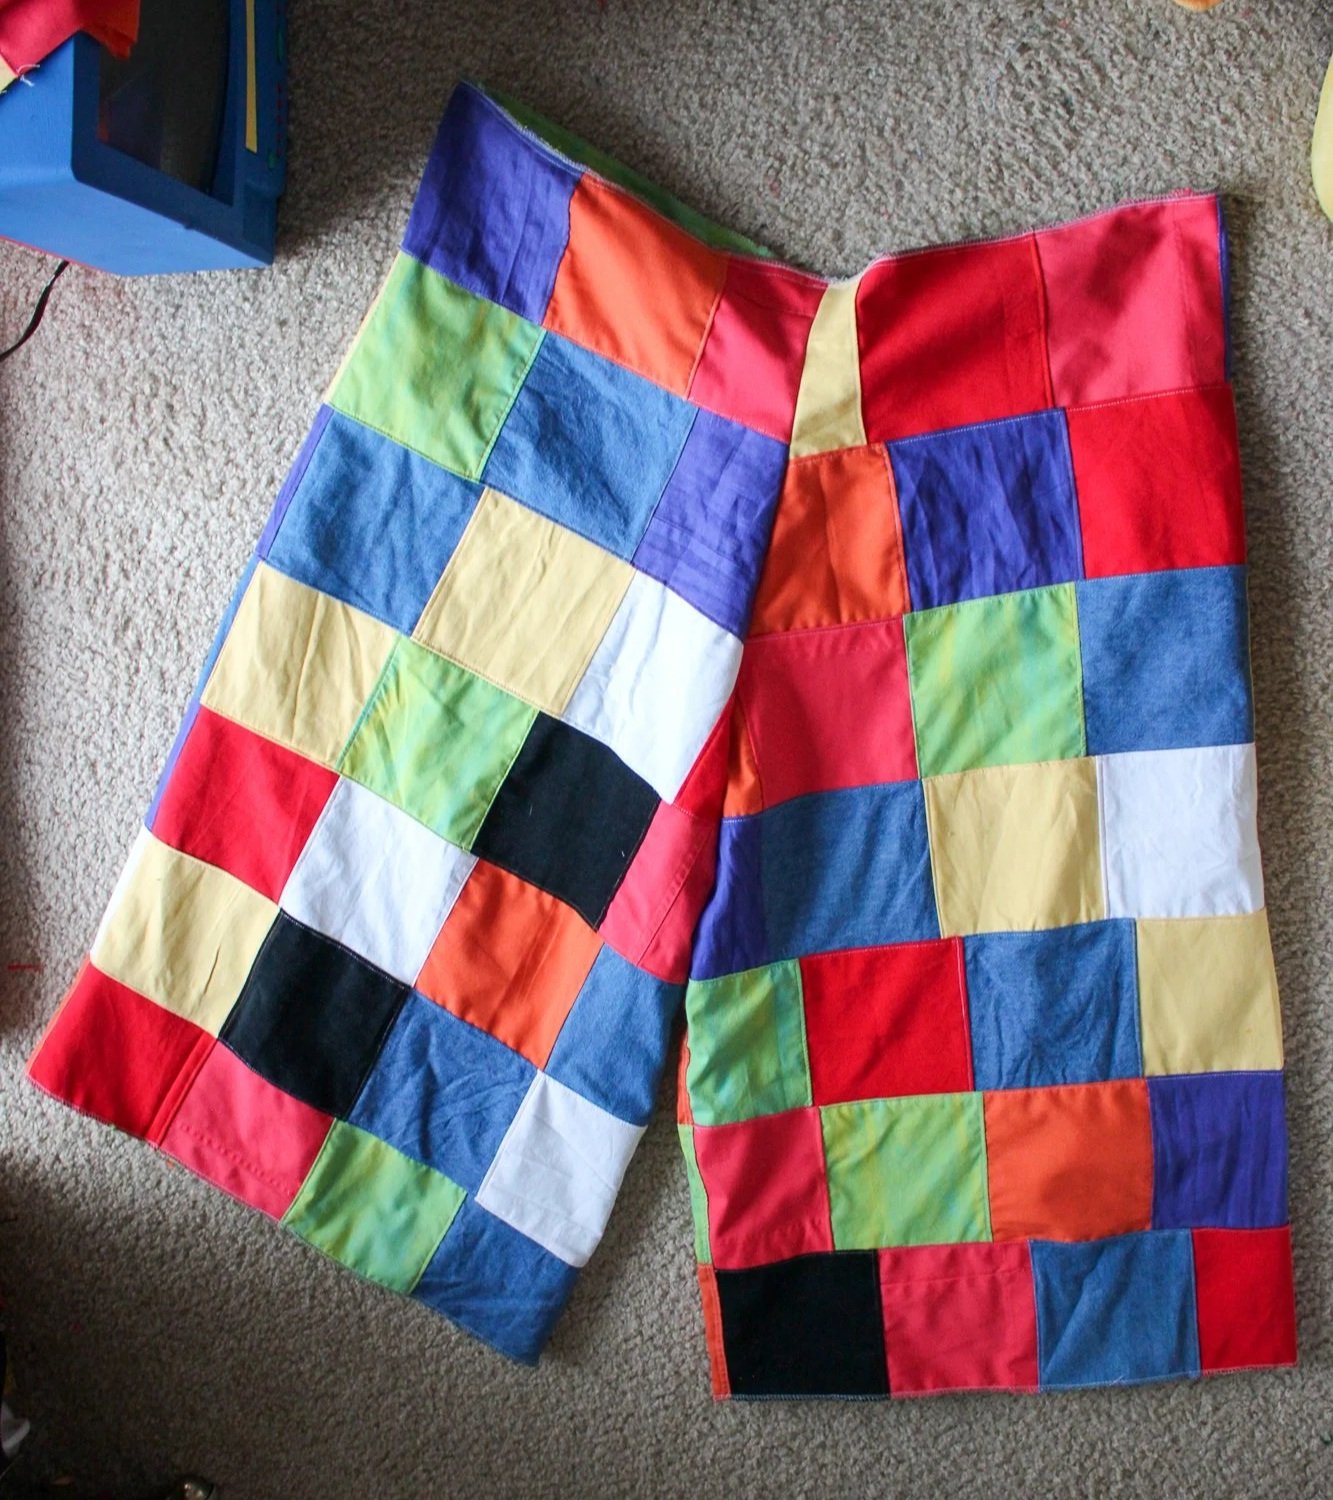
Image: Finished pants
Finish the Top
Iron the top of the waist flat, and sew it down with a straight stitch.
Serge the Bottom Legs
Pin the bottom legs to the liner.
Sew and overlock the edges.
Back, Front, and Straps
Front Bib
Cut the front bib and liner fabric.
I cut it at a slight angle like pictured. You can choose to make this a curve, etc.
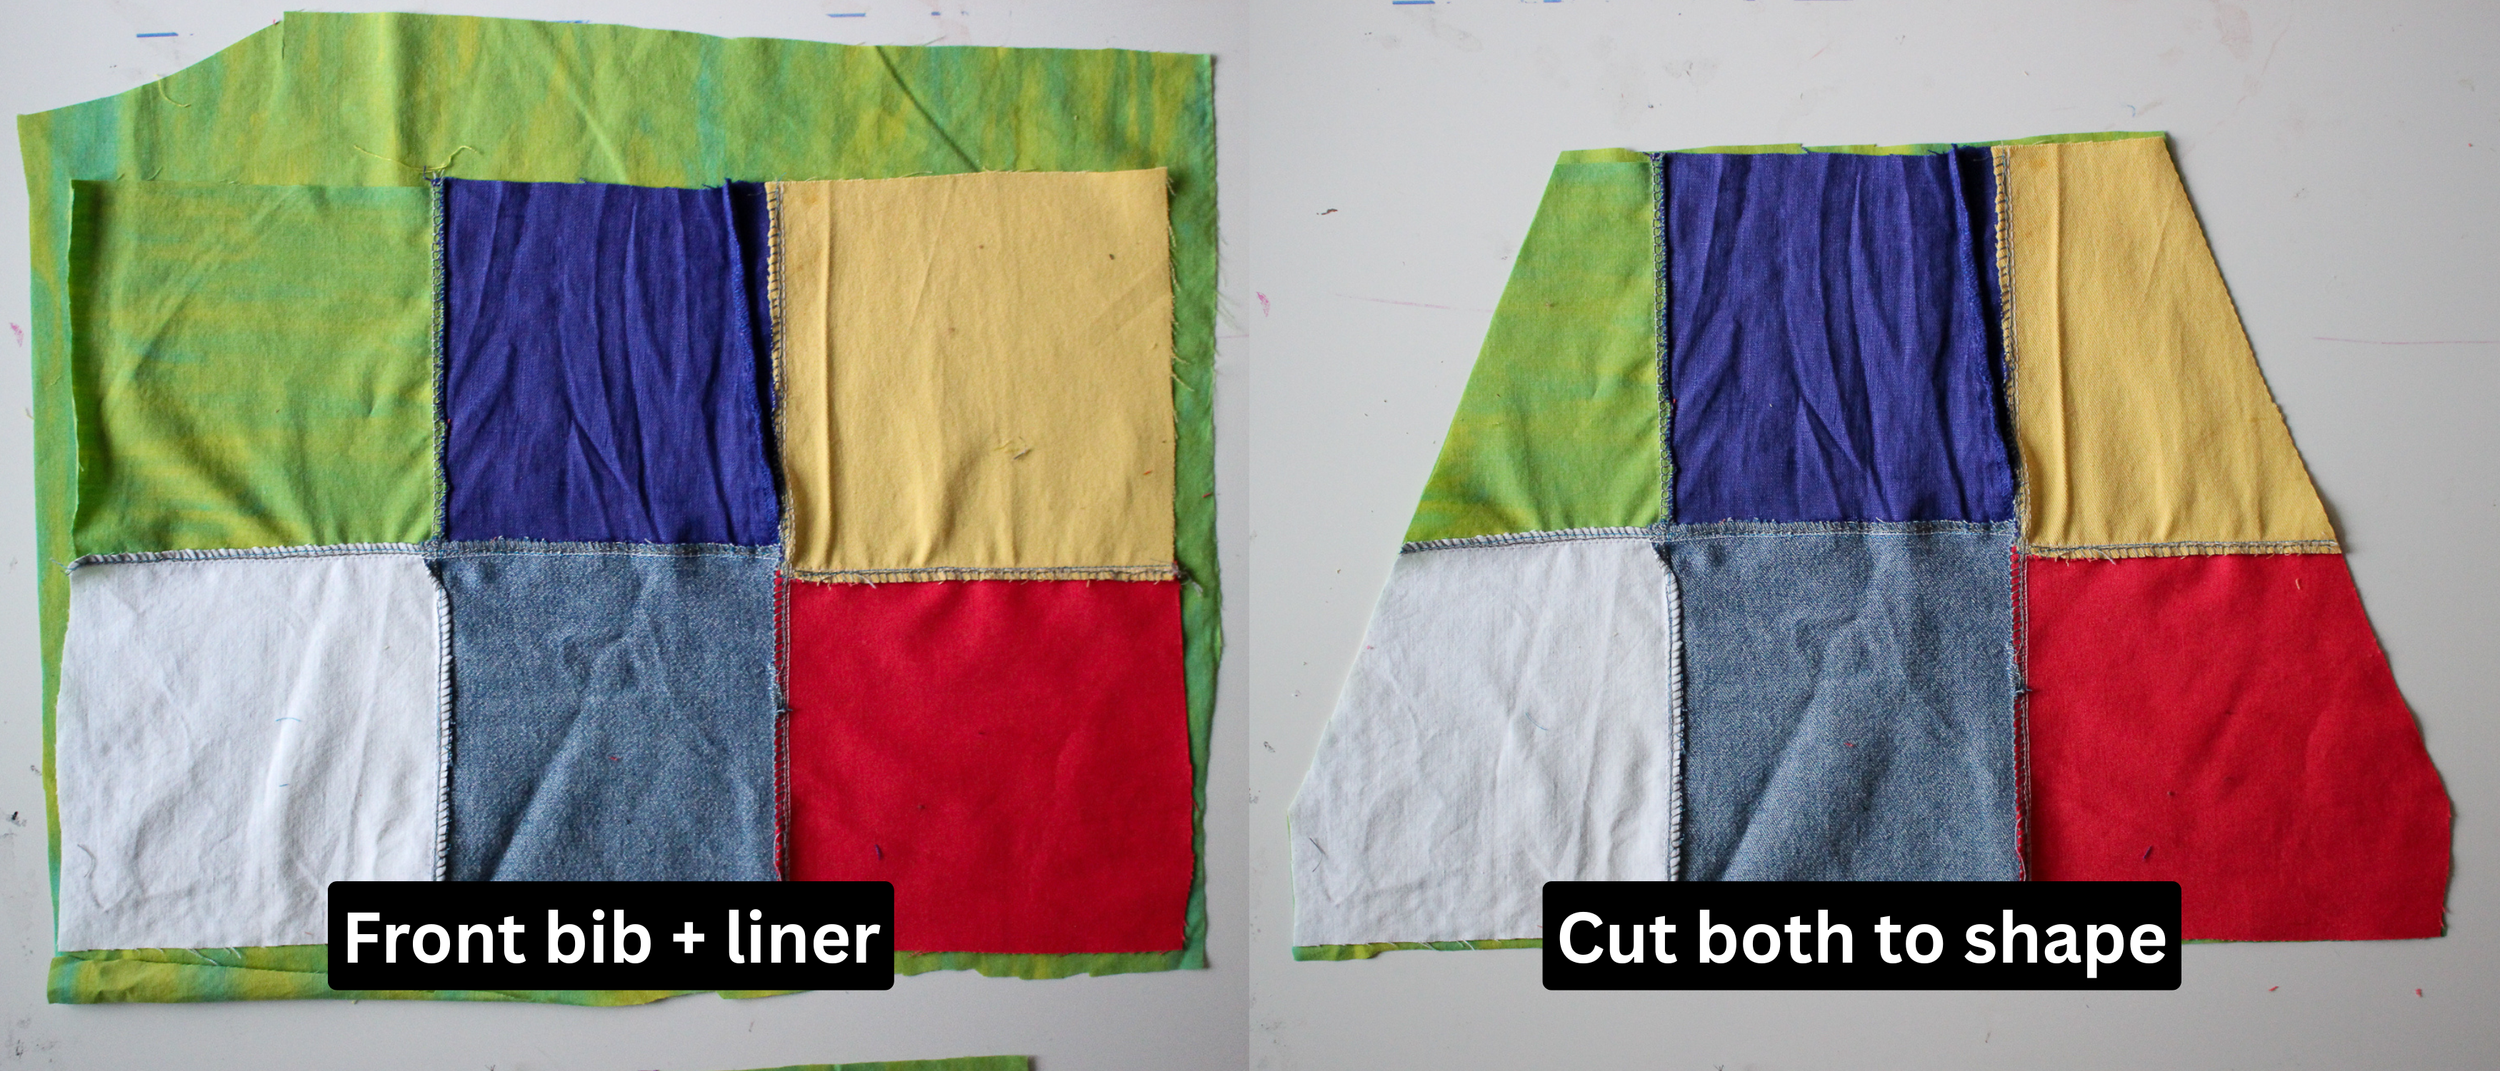
Image: Cut front bib and liner
Pin the edges together.
Sew along this edge, leaving a gap at the bottom large enough to turn it right side out.
Cut the corners of all of these pieces before turning right side out to reduce corner bulk.
Make sure not to cut the stitch!
Turn right side out.
Iron the edges flat, and sew along the edge with a straight stitch.
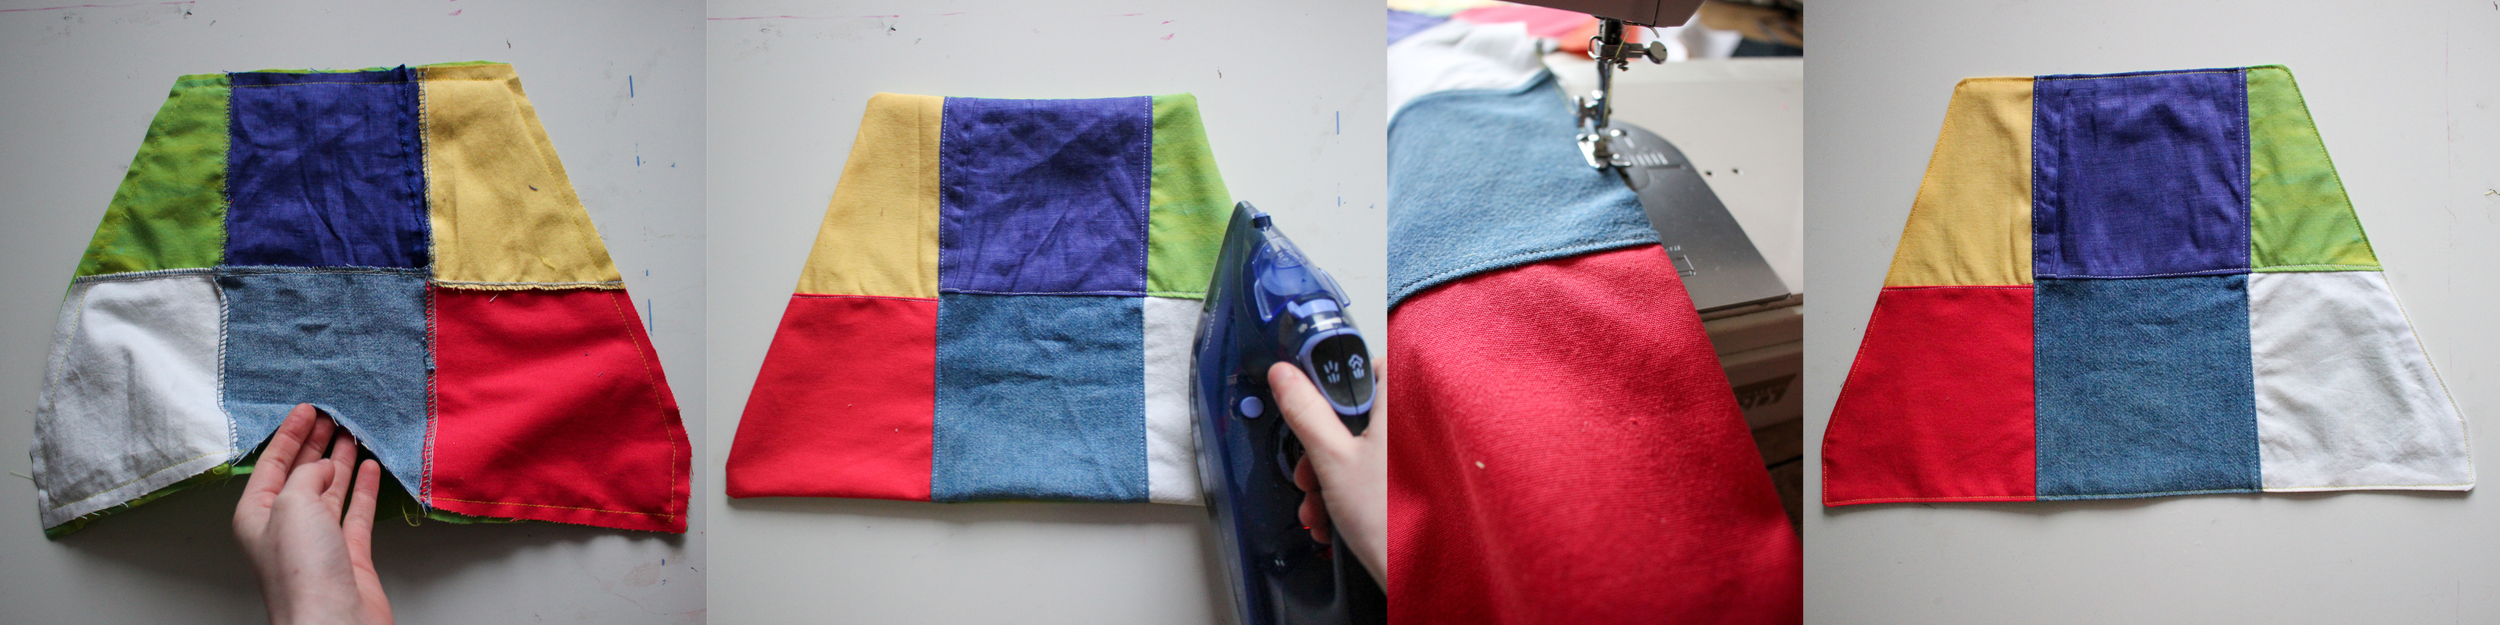
Image: Sew the bib, turn right-side-out, iron flat,
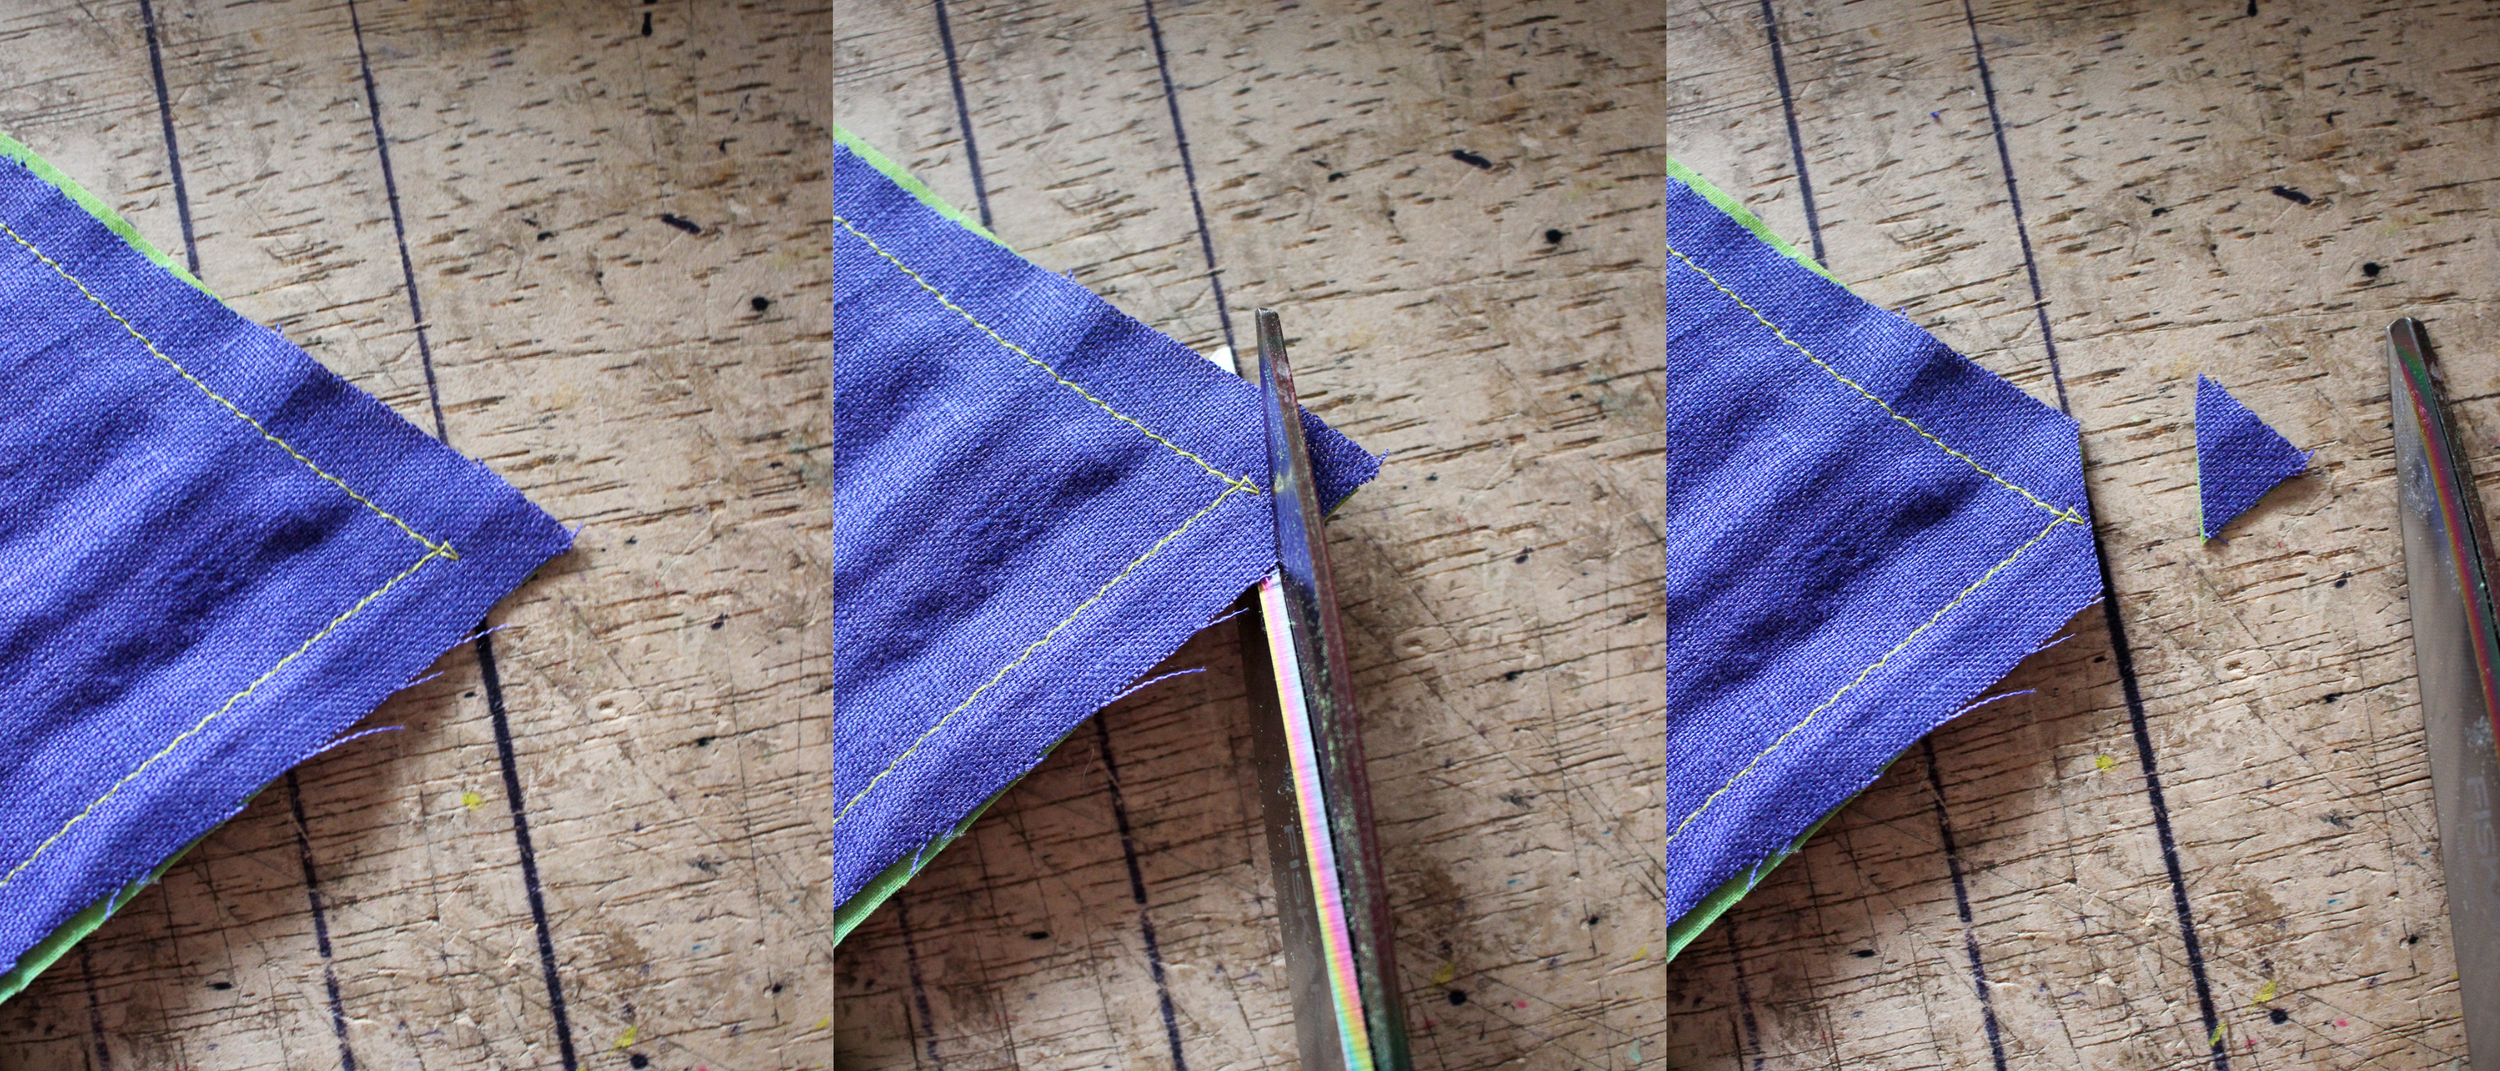
Image: Cut off corners to reduce bulk
Straps
Take the 1×4 square strip you made earlier.
Double check this is the proper length for the strap you want. Include overlap for button holes.
I ended up cutting it a little shorter, to around 24” (60.96cm) long. But you might need yours even shorter. Try the overalls on for best accuracy.
Cut a liner/back fabric as well.
Cut these in half the long way. This will give you both of the straps.
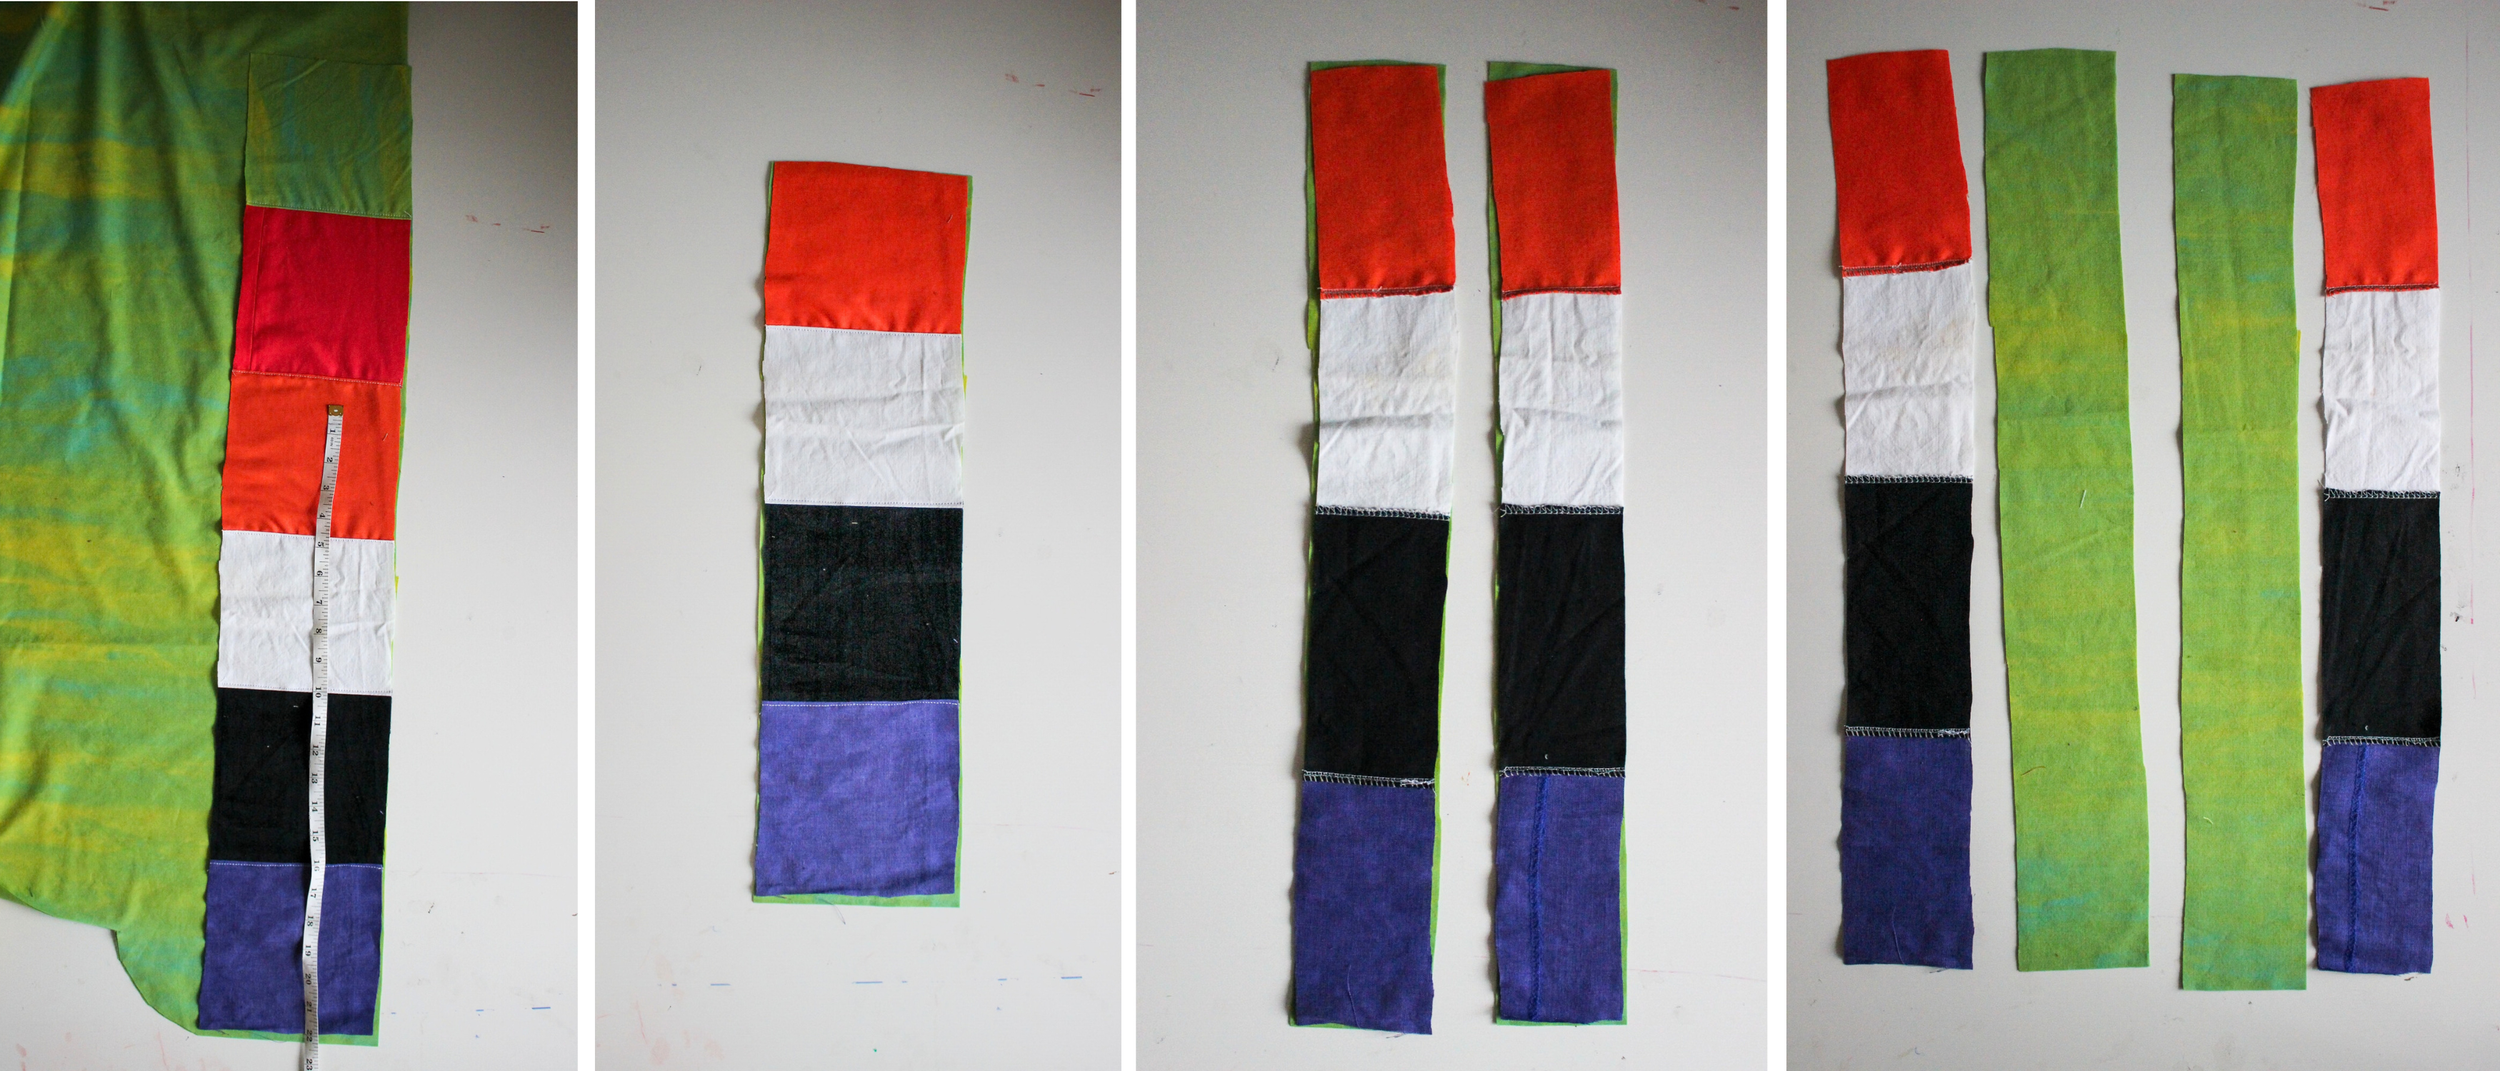
Image: cut the strap and liner, then cut in half to make two straps
Sew the straps to the liners right sides together. Around the 3 edges. Leaving the bottom open to turn right side out.
Iron the edges flat and sew them down.
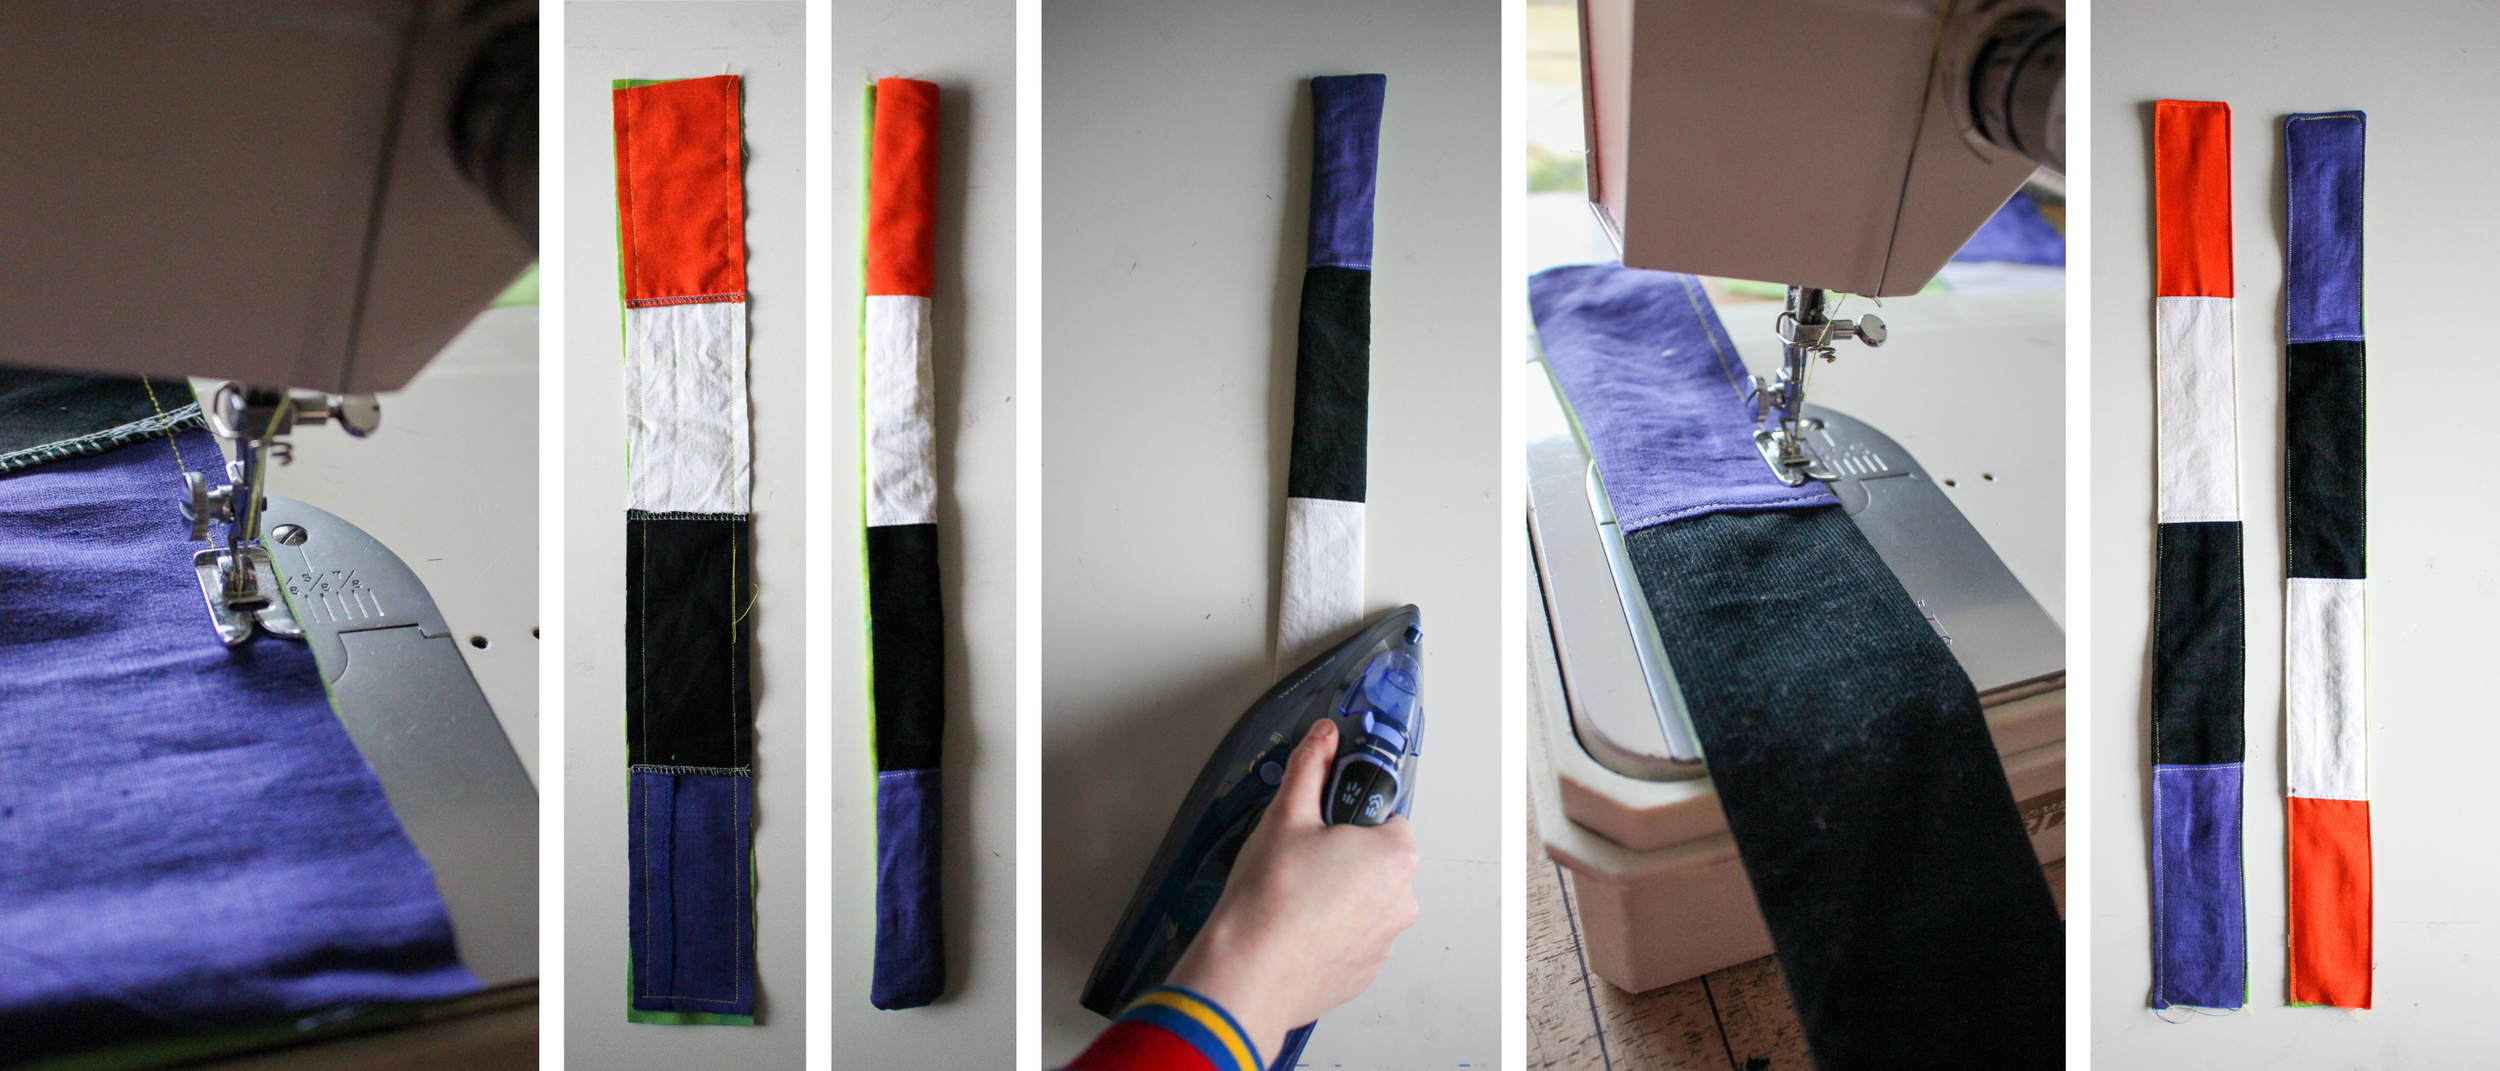
Image: Sew the straps, turn right side out, iron and sew flat.
Back Panel
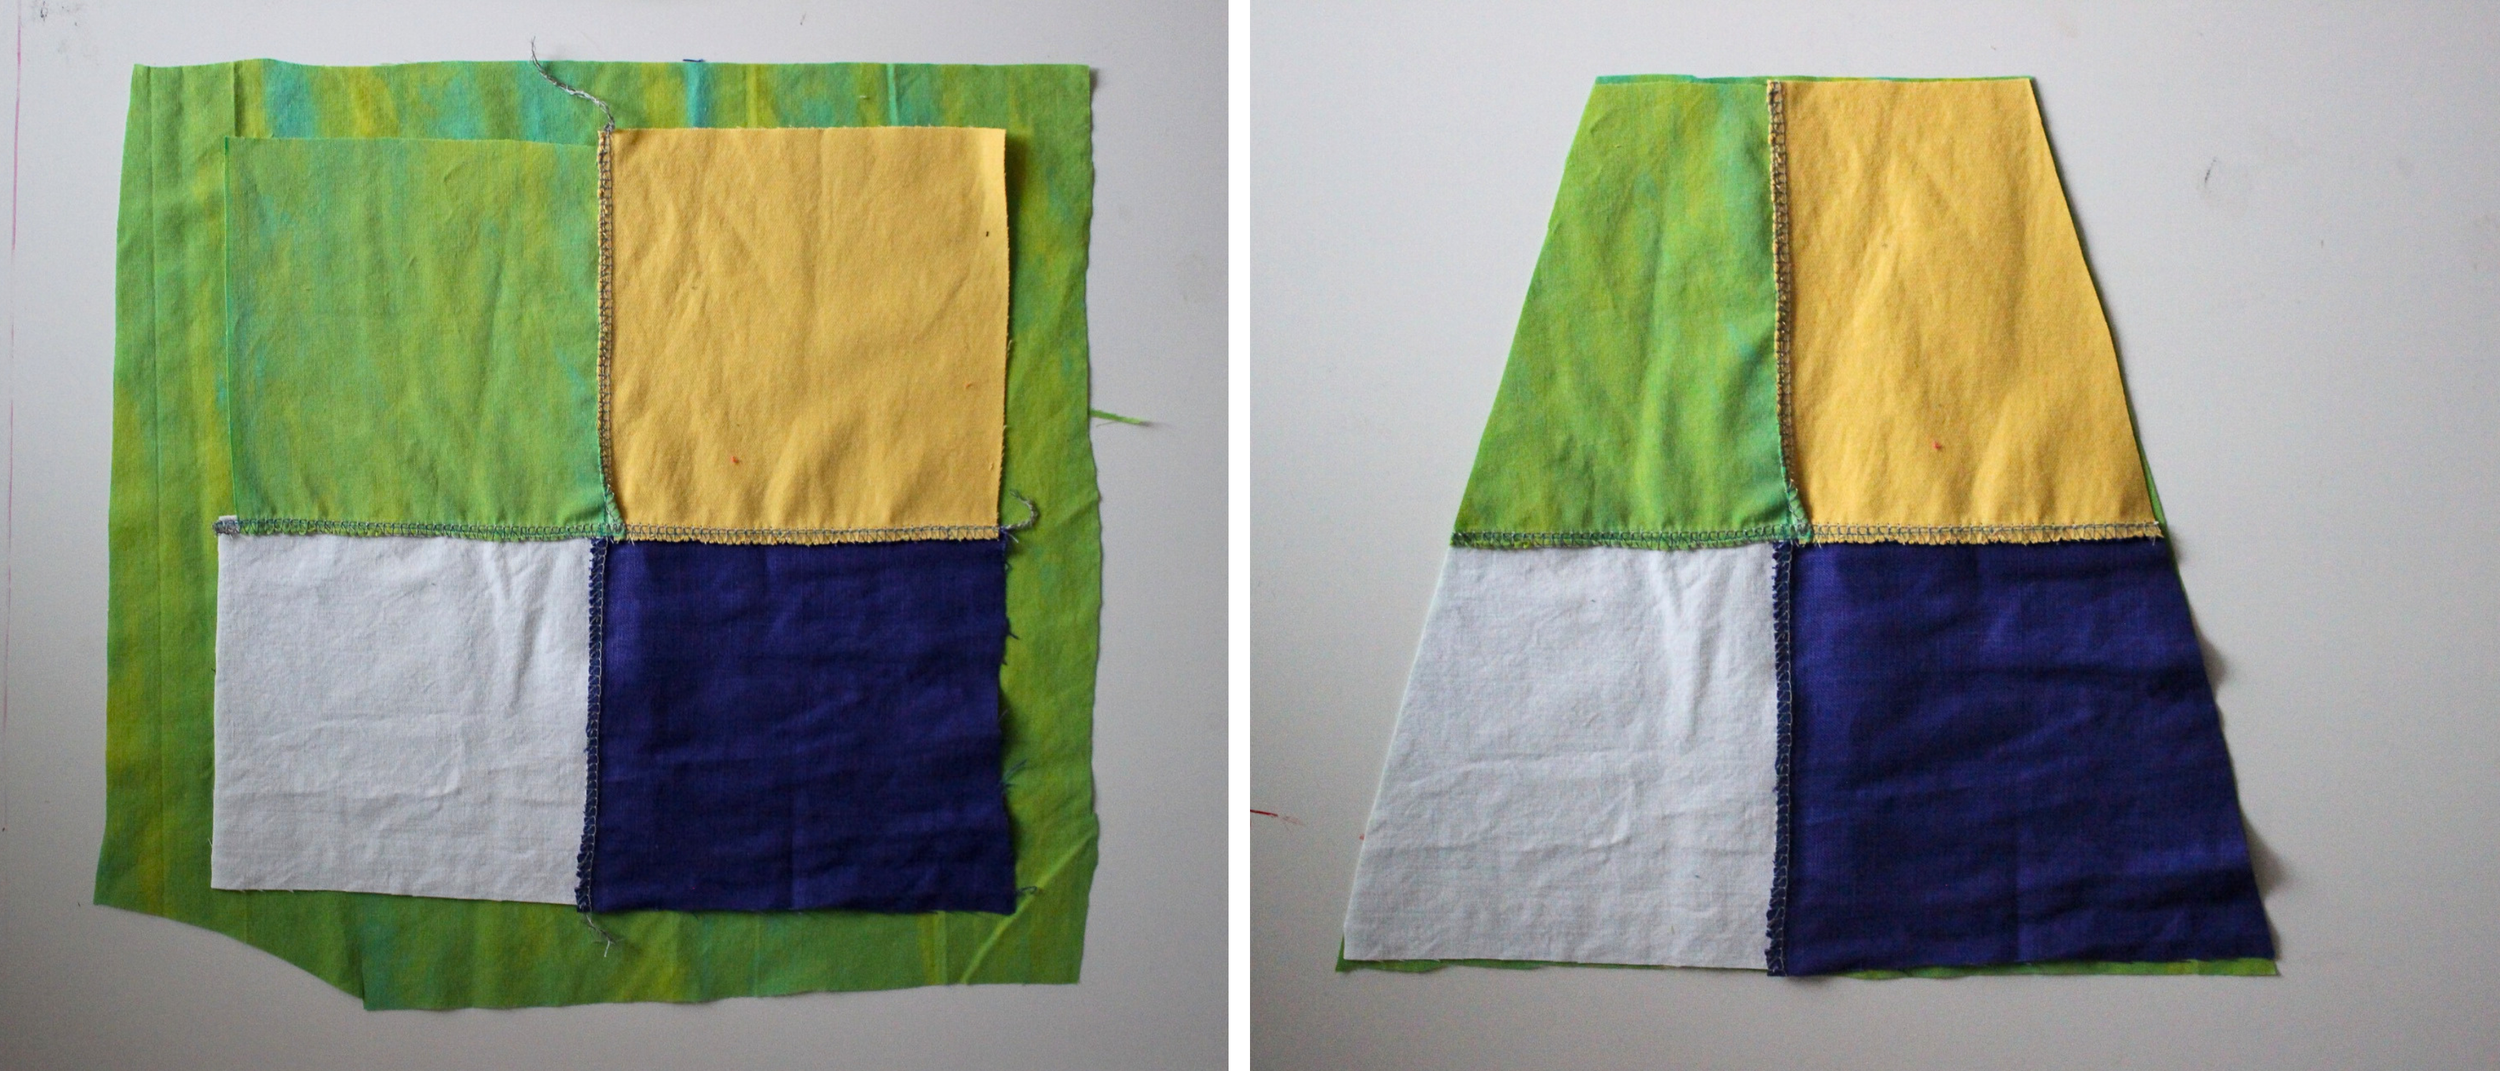
Image: Cut the back panel and liner
Cut the back panel and liner.
Place right sides together.
Place the straps between these two fabrics. Making sure the unfinished edge will be pinned to the top edge of the panel.
Also make sure the patchwork side of the strap is facing the patchwork side of the bib.
Pin the edges together, and sew all the way around, leaving a gap at the bottom. The gap is also where the other end of the strap will hang out. Don’t sew this.
Turn right side out,
and once again iron flat, and sew.
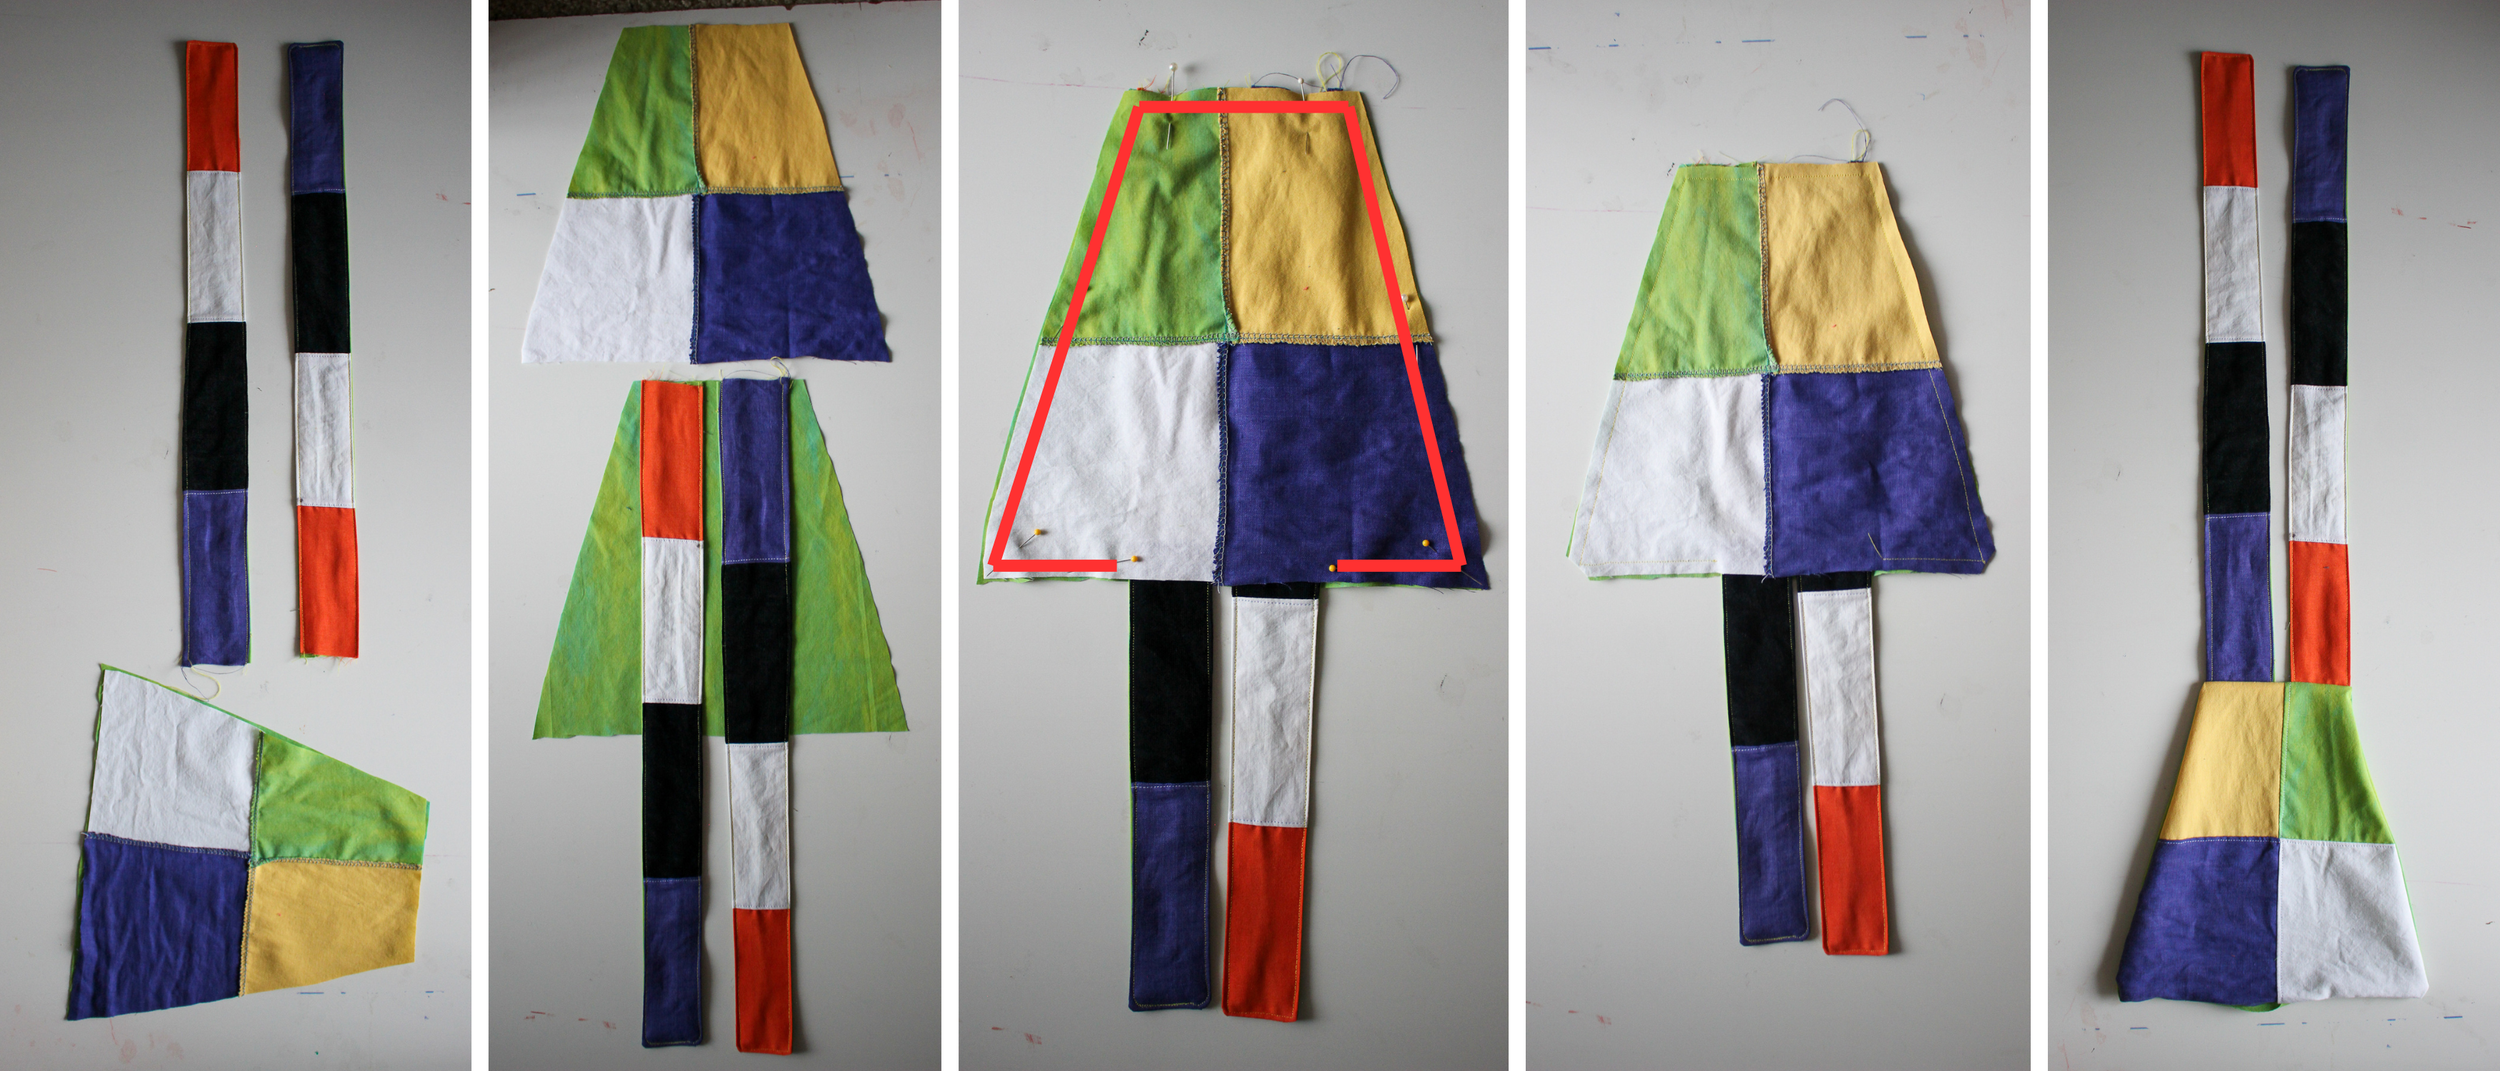
Image: Pin the straps in between the fabric, sew, turn right-side-out, iron flat, sew seam down.
Sew to Pants
Pin the front and back panels to the waist.
Sew them down.
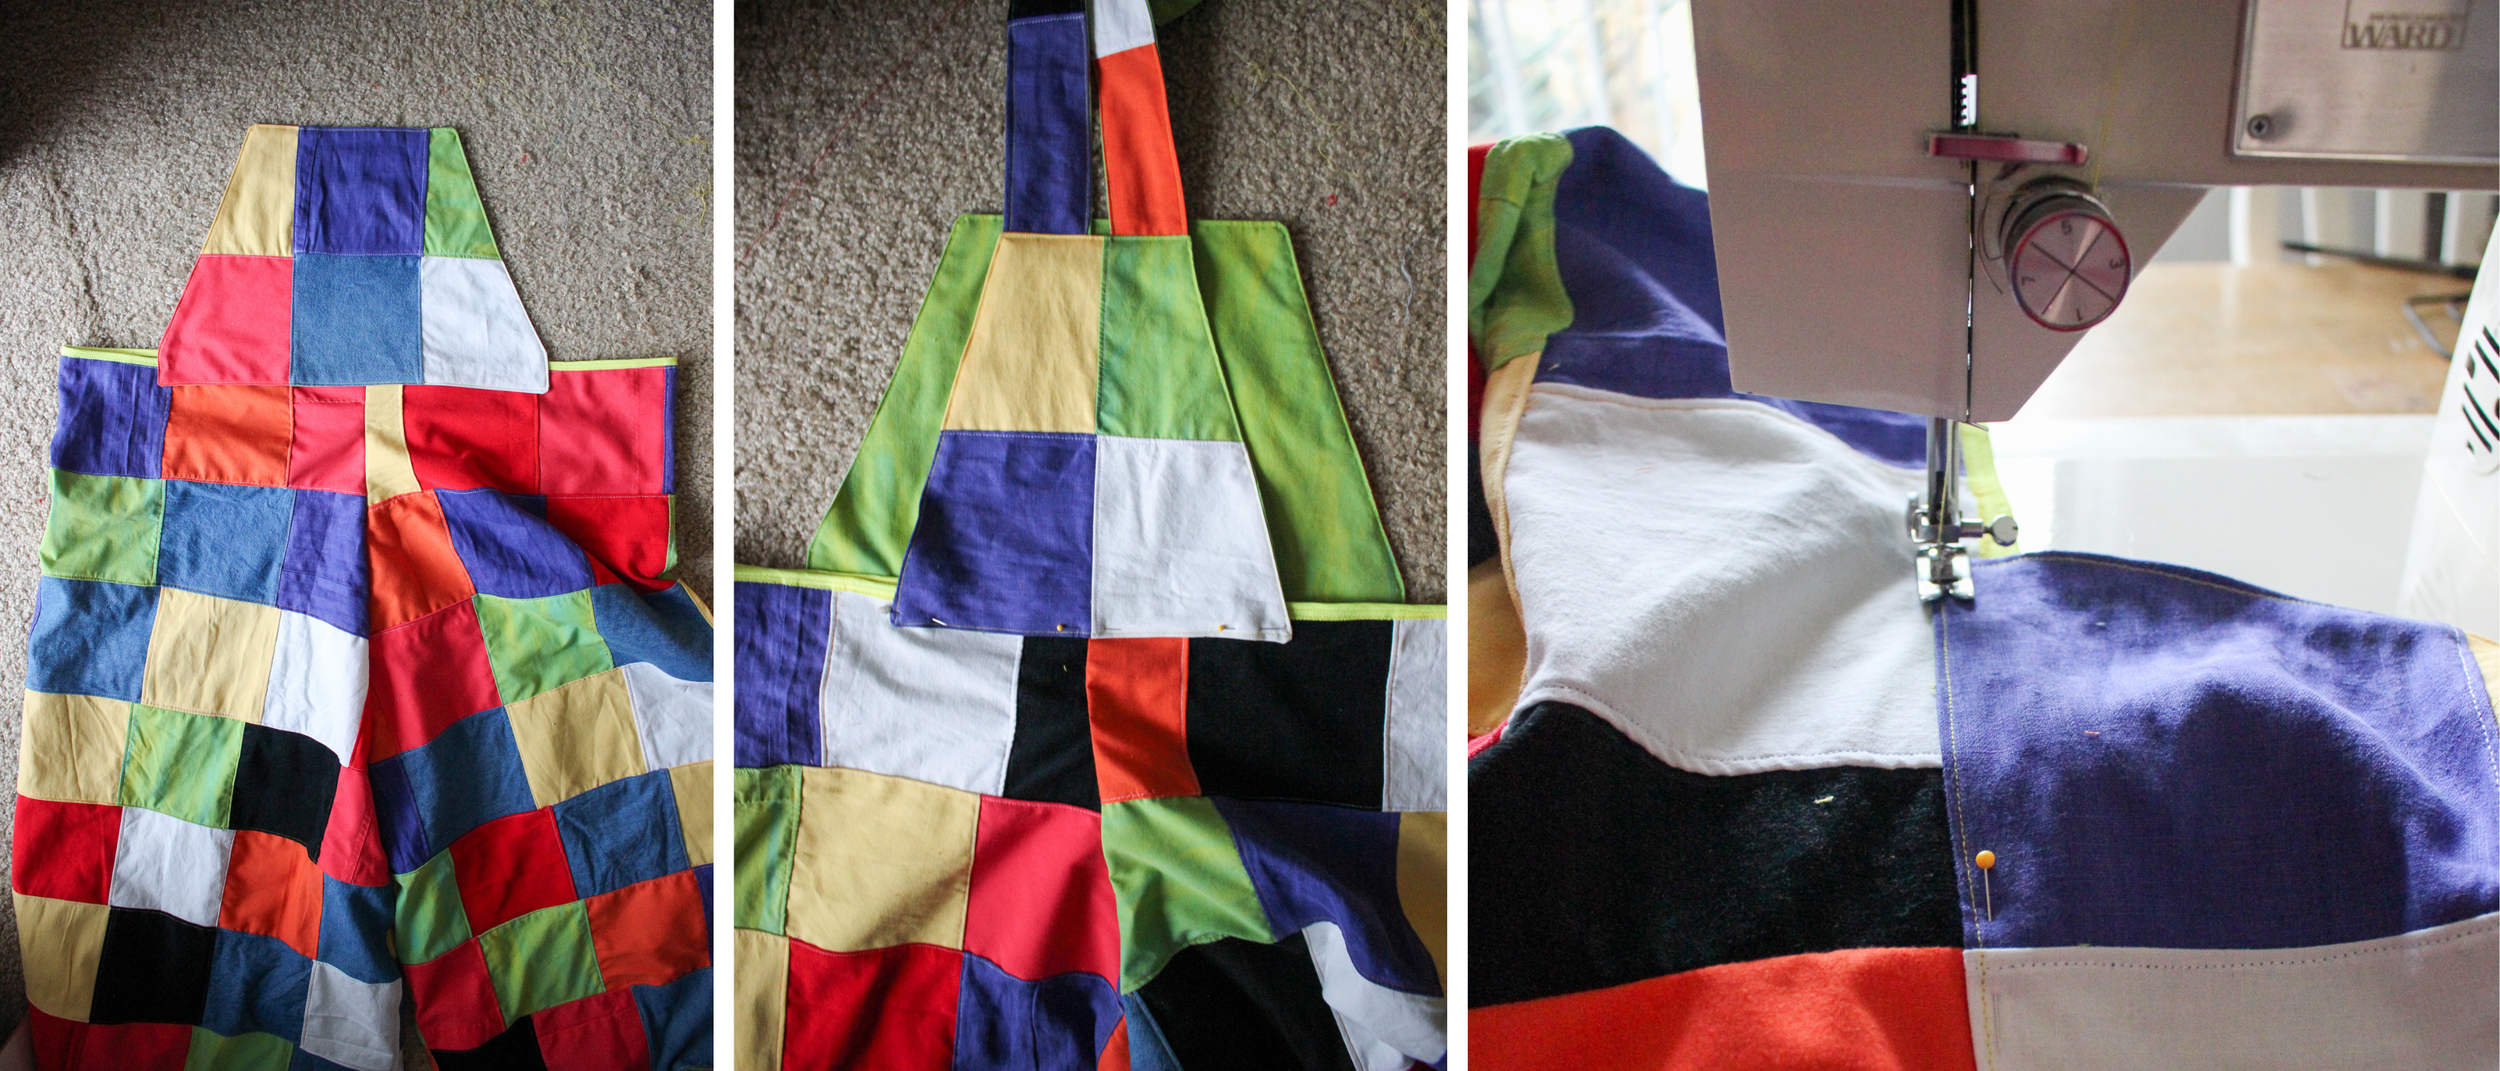
Image: Pin and sew the front and back bibs
Buttons
Add the large buttons to the front bib.
I typically hand sew these on.
Trace your button holes on the straps with washable marker. I chose to do 2 different length options.
Use your button to measure the width of the hole.
Cut them open and sew a narrow short length zigzag stitch around the edge.
If you use large buttons, you probably can’t use a buttonhole foot anyways.
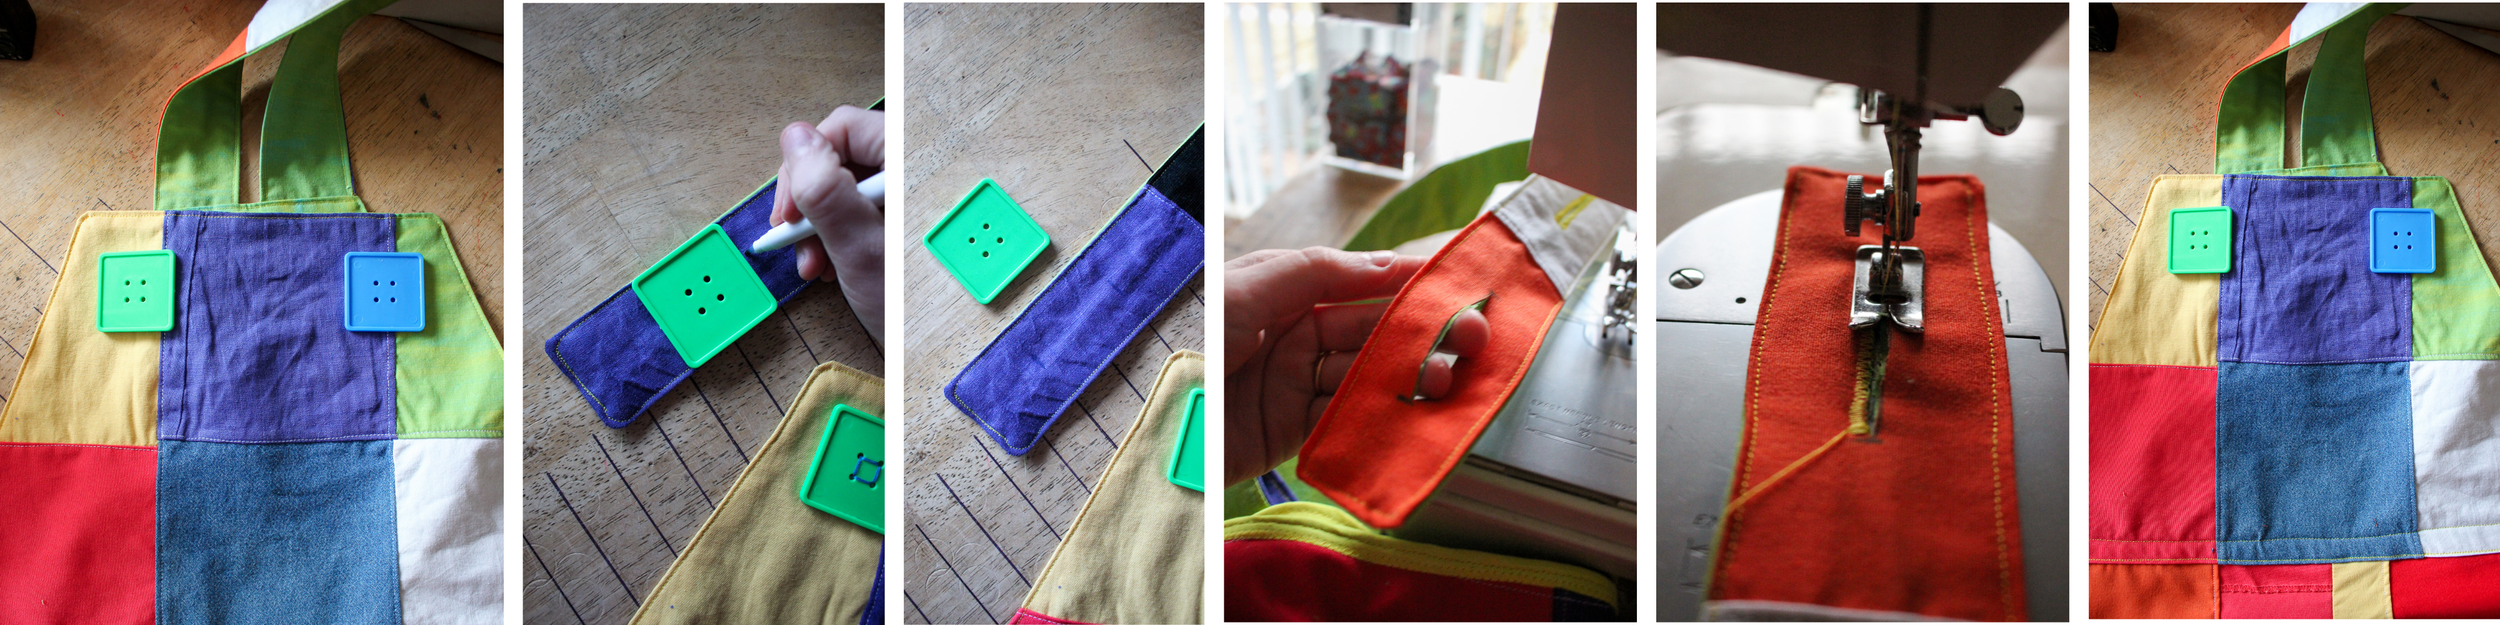
Image: Sew the front buttons and buttonholes
This is kind of self explanatory. Using the final square, make a pocket and sew it to the front bib.
Or you’re more then welcome to play around with pocket shape etc.
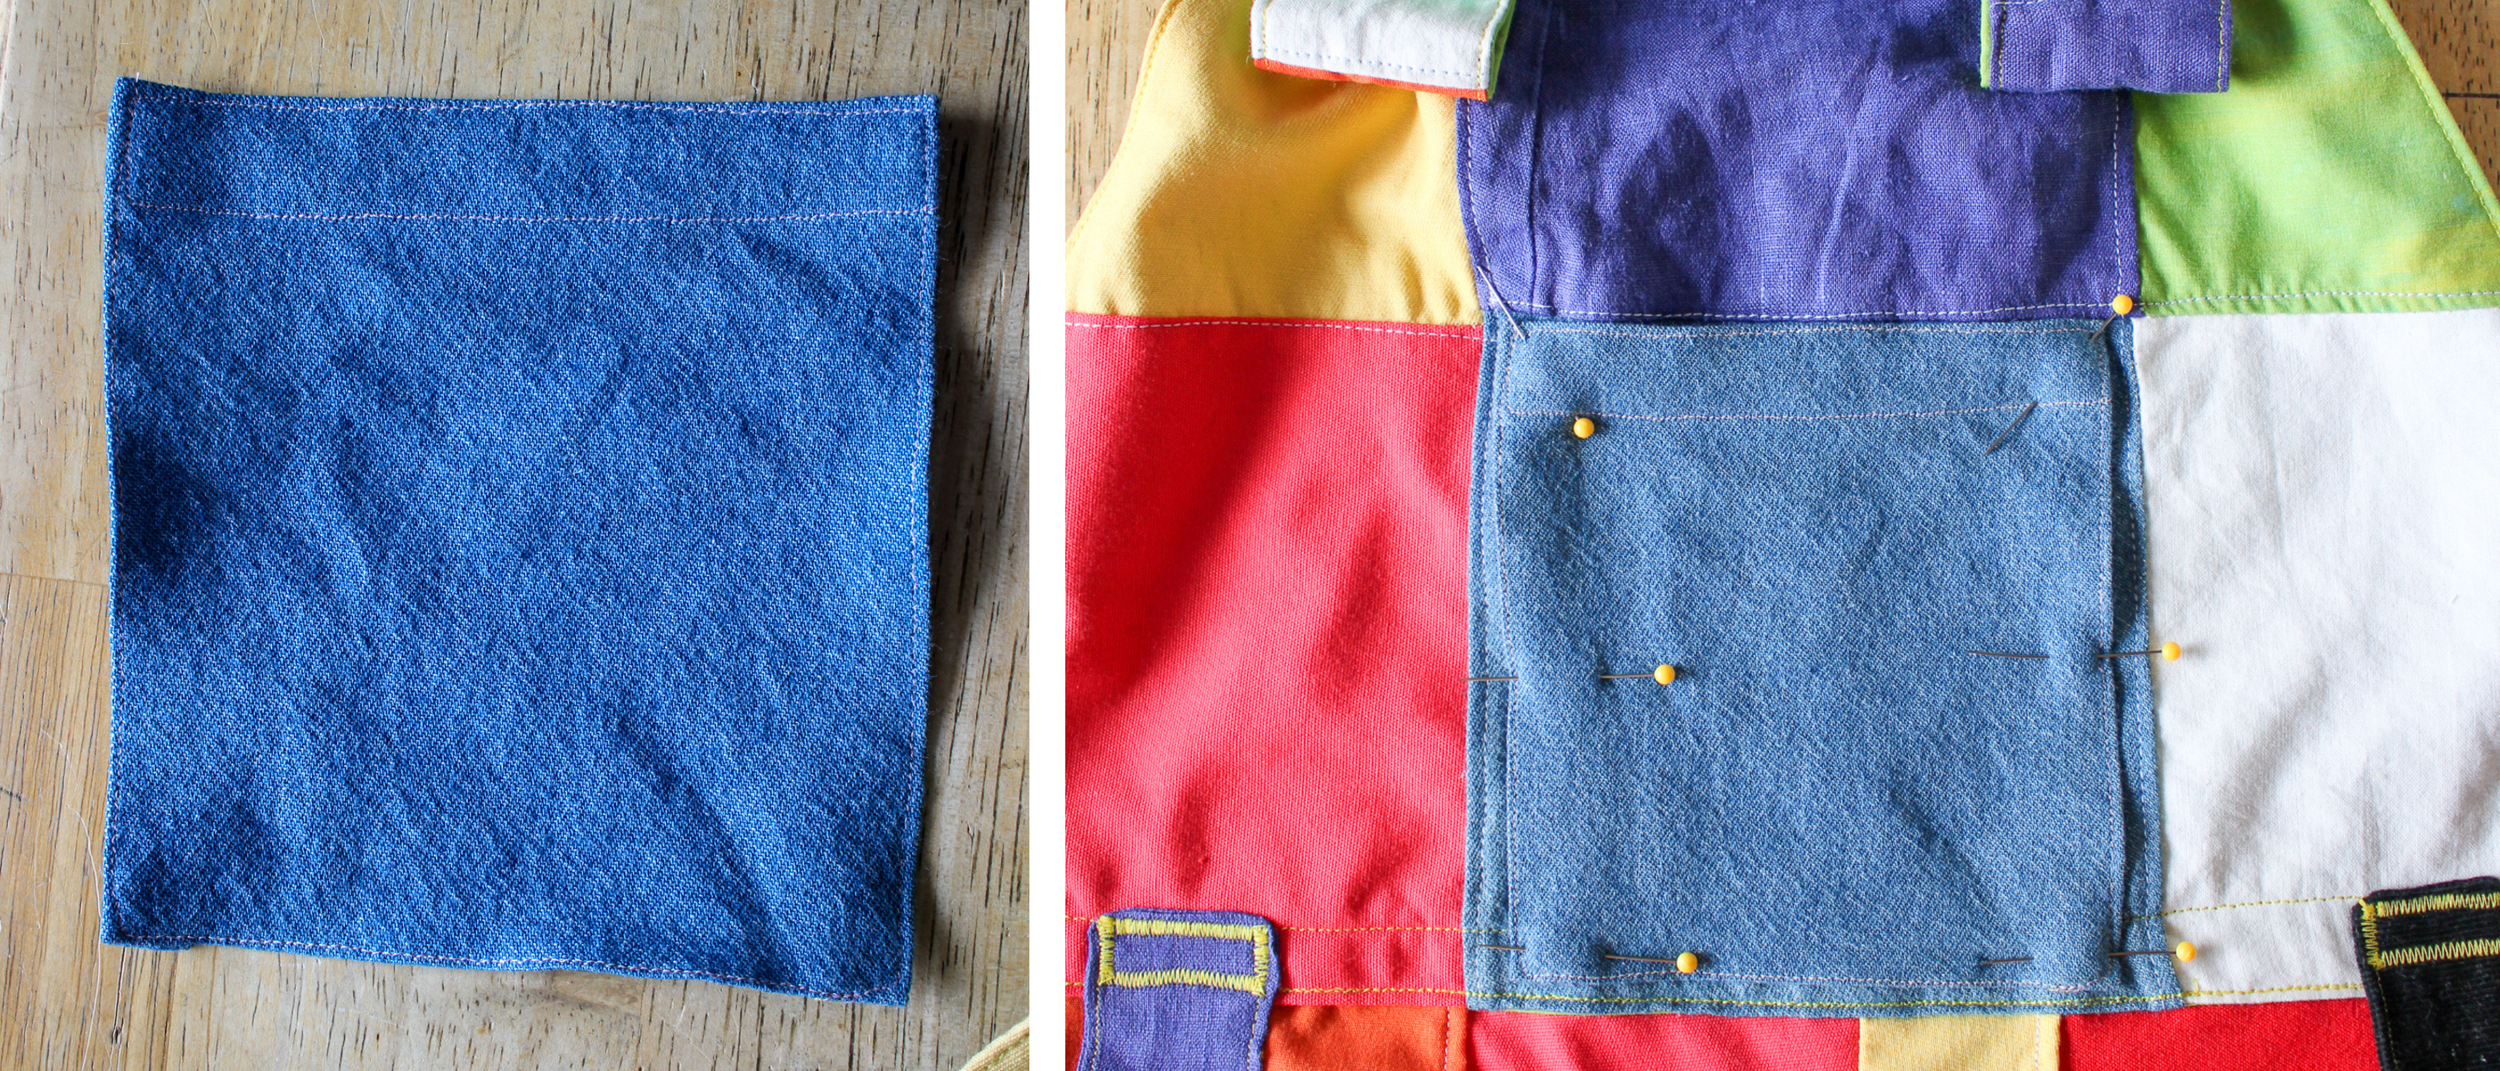
Image: Add pocket to the front
Ankle Cuffs
Cut two pieces of fabric, 8” x 6” (20.32cm x 15.24cm)
Fold in half, and sew along the edge.
Fold the top half right side out.
Sew a stitch along the bottom 1” (2.54cm) from the edge.
(The bottom is the edge with the fold.)
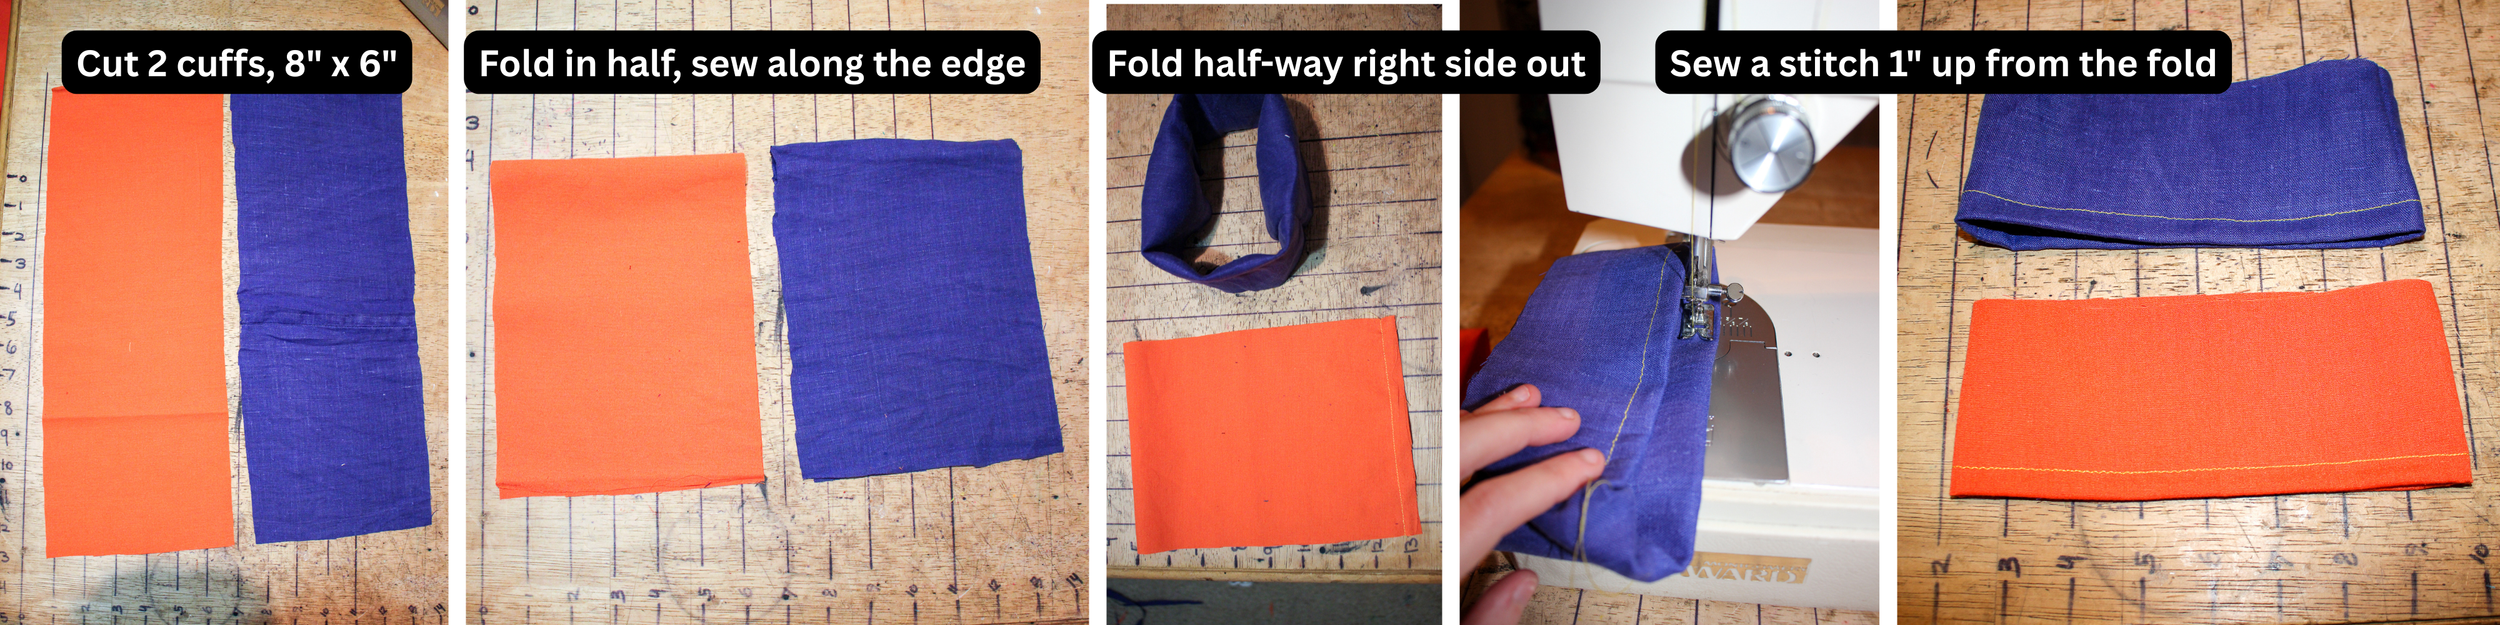
Image: Cut and sew the cuffs
Cut 2 strips of elastic 21” (53.34cm) long. (if you dont want the elastic as wide, you can just do 2 strips at 10.5” (26.67cm) long and skip the next step.)
Sew the two edges together with a zig zag stitch to join them together.
Cut it in half to make two strips of elastic 10.5 (26.67cm) inches long.
Overlap and sew the edges to make loops.

Image: Join the elastic, cut in half, overlap the edges and sew.
Tuck the elastic loop into the cuff,
Stretch the elastic until it’s flush with the cuff fabric, pin, and carefully sew.
I like to sew three lines. One on each edge and the middle.
Overlock the raw edge with a serger or an overcast foot.
Repeat this process with the other cuff.

Image: Insert elastic into the cuff, stretch as you sew, overlock the raw edge.
Please note: this part might be a little difficult. If you have a machine that has a pull out section under the bobbin, you’re in luck! This makes sewing so much easier.
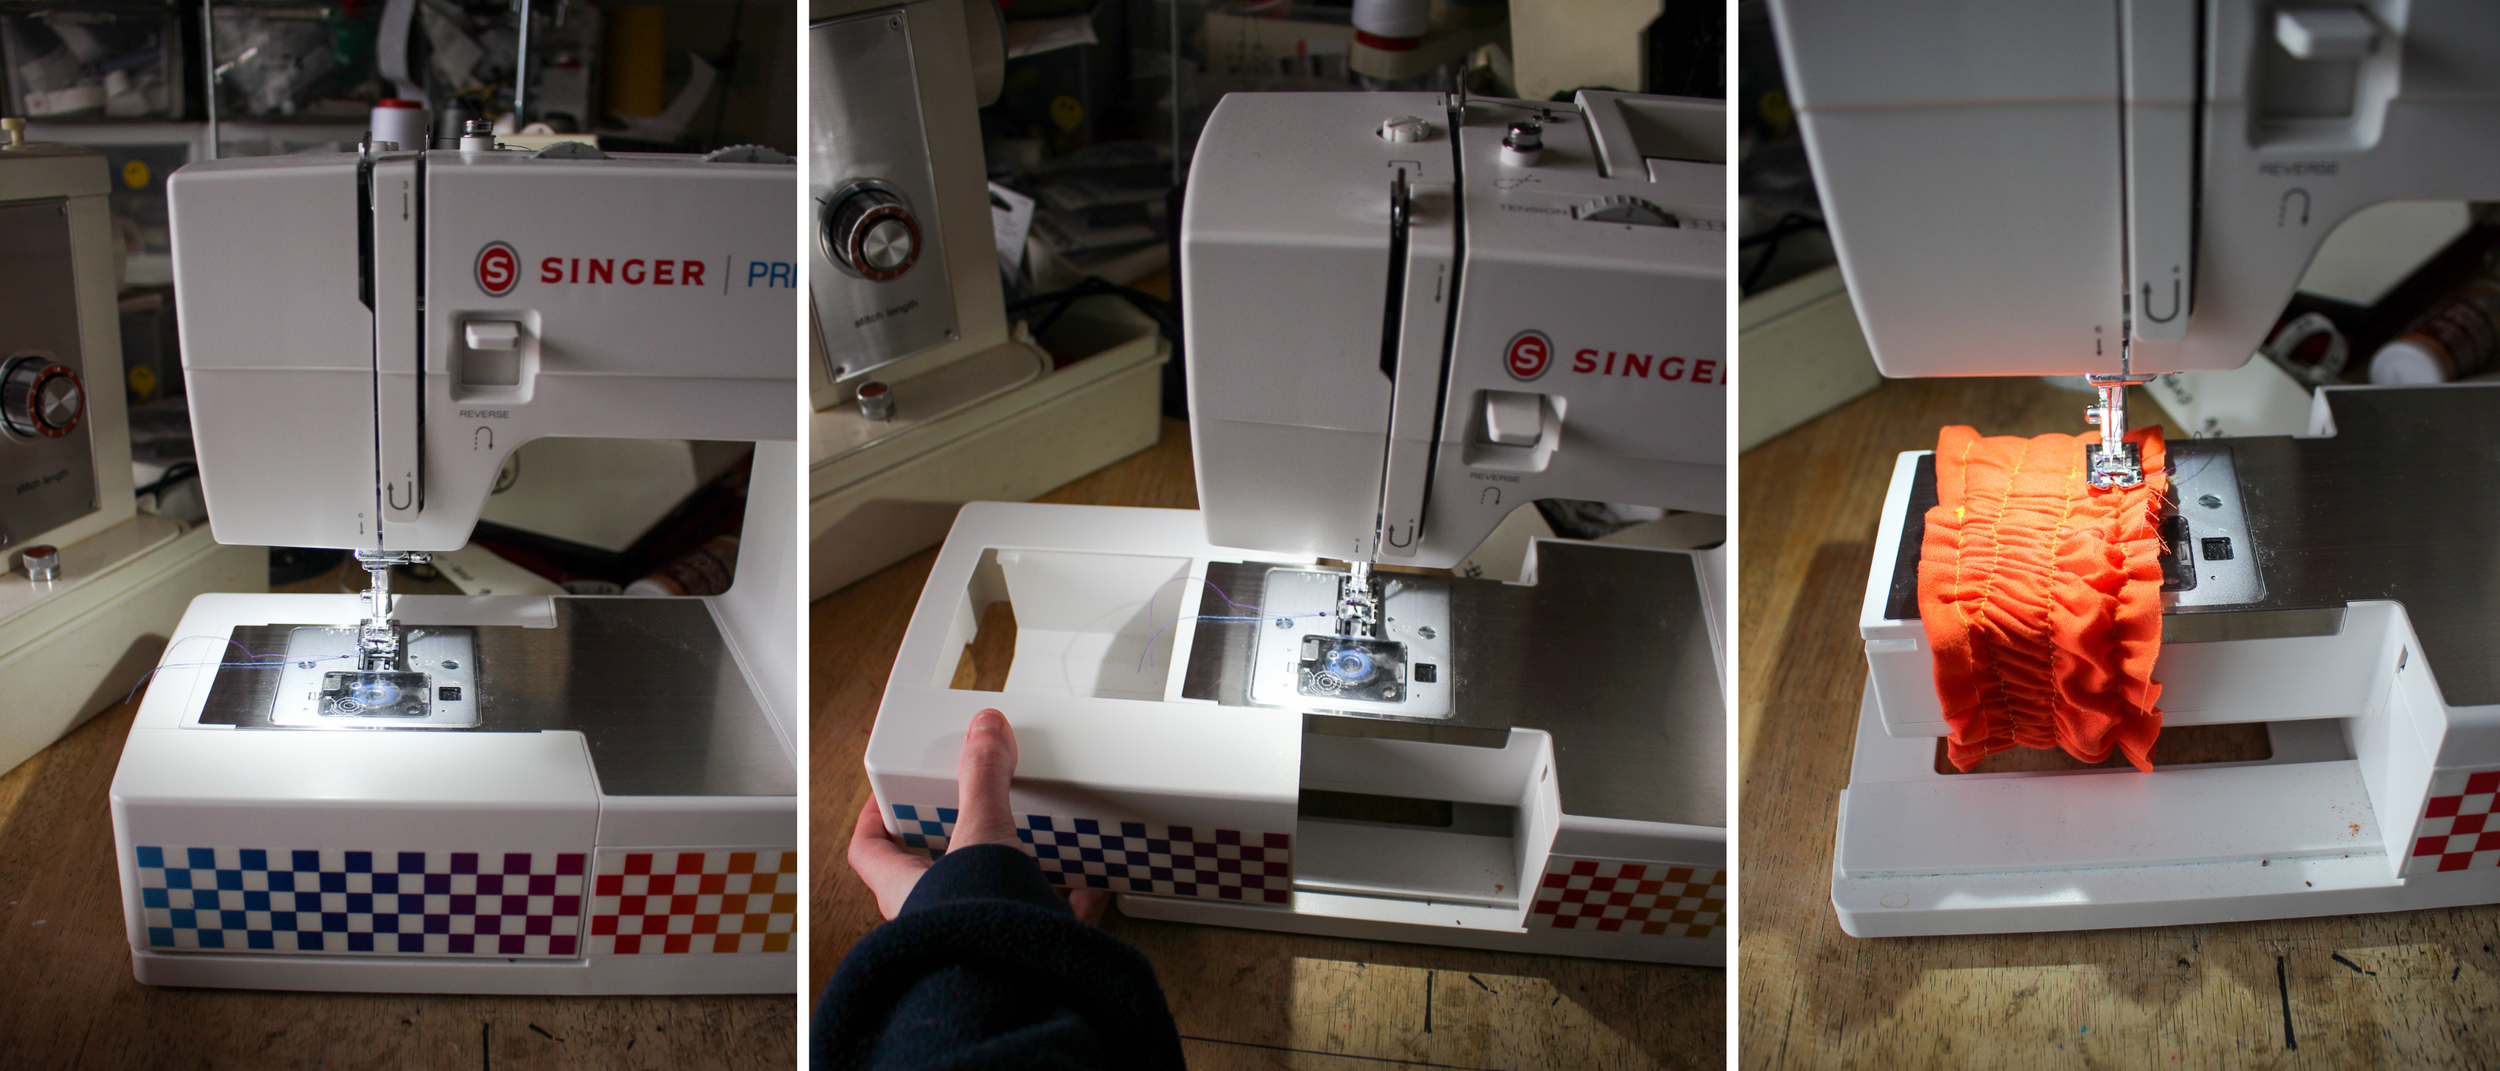
Image: Some machines may have a pull-out section to make sewing easier
Attaching to the Pants
Measure the width of the cuff when stretched fully.
Mine was approximately 7.5 inches (19.05cm)
Pleat the bottom of the legs to this measurement. You can pin and measure first, before sewing.
Turn the overalls inside out.
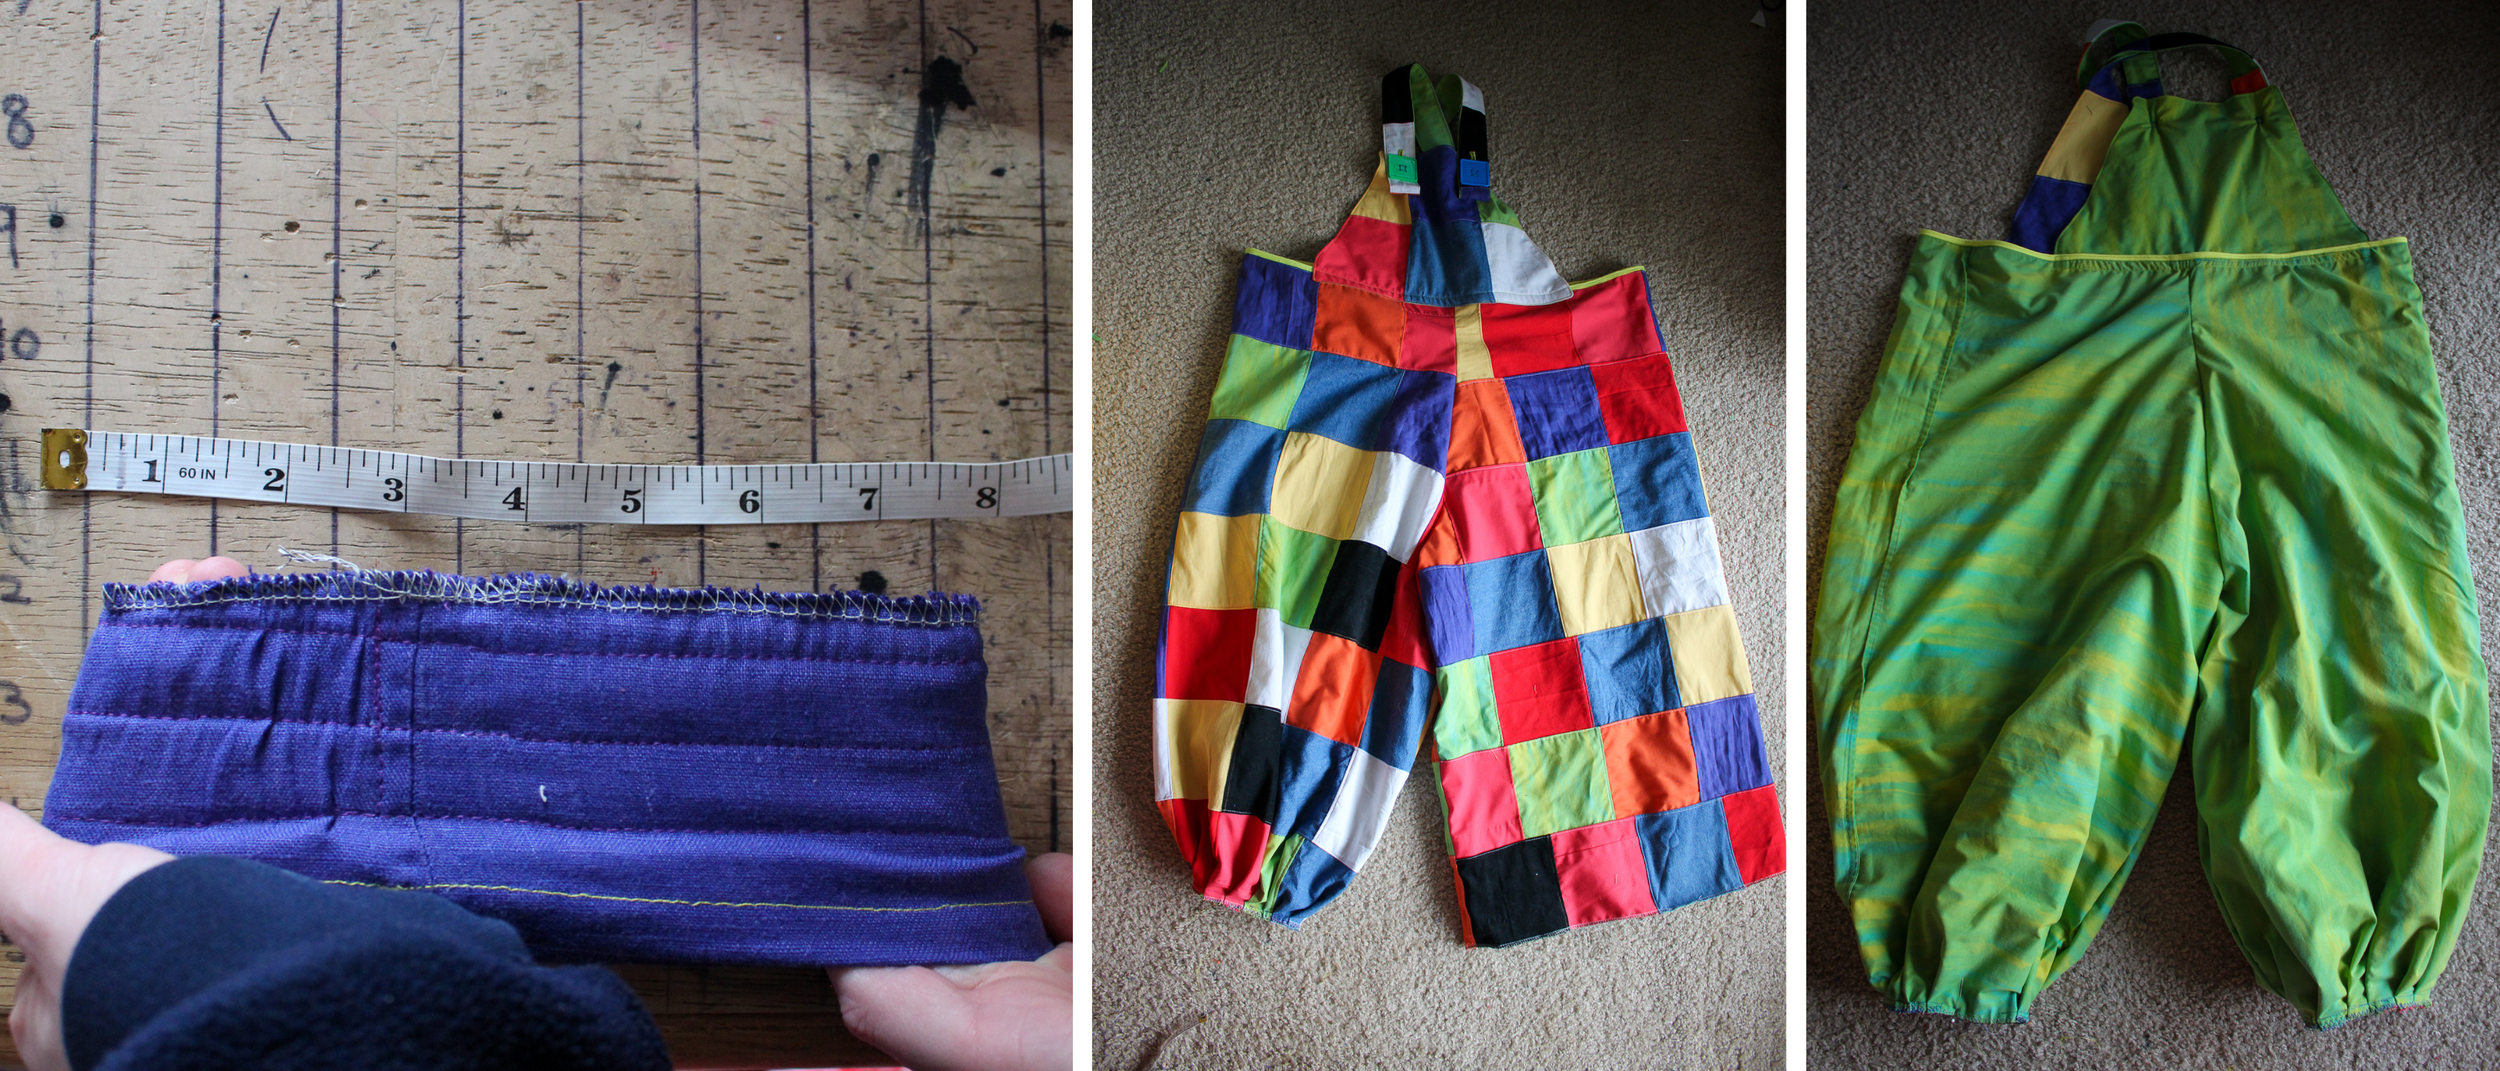
Image: Stretch the elastic to check width, pleat the legs to the same size, turn inside out.
Take the cuff, and insert it into the leg, aligning overcasted edges together.
Pin, and stretch the elastic as you sew.
I like to do a straight stitch, and a zigzag/overcast stitch along the edge.
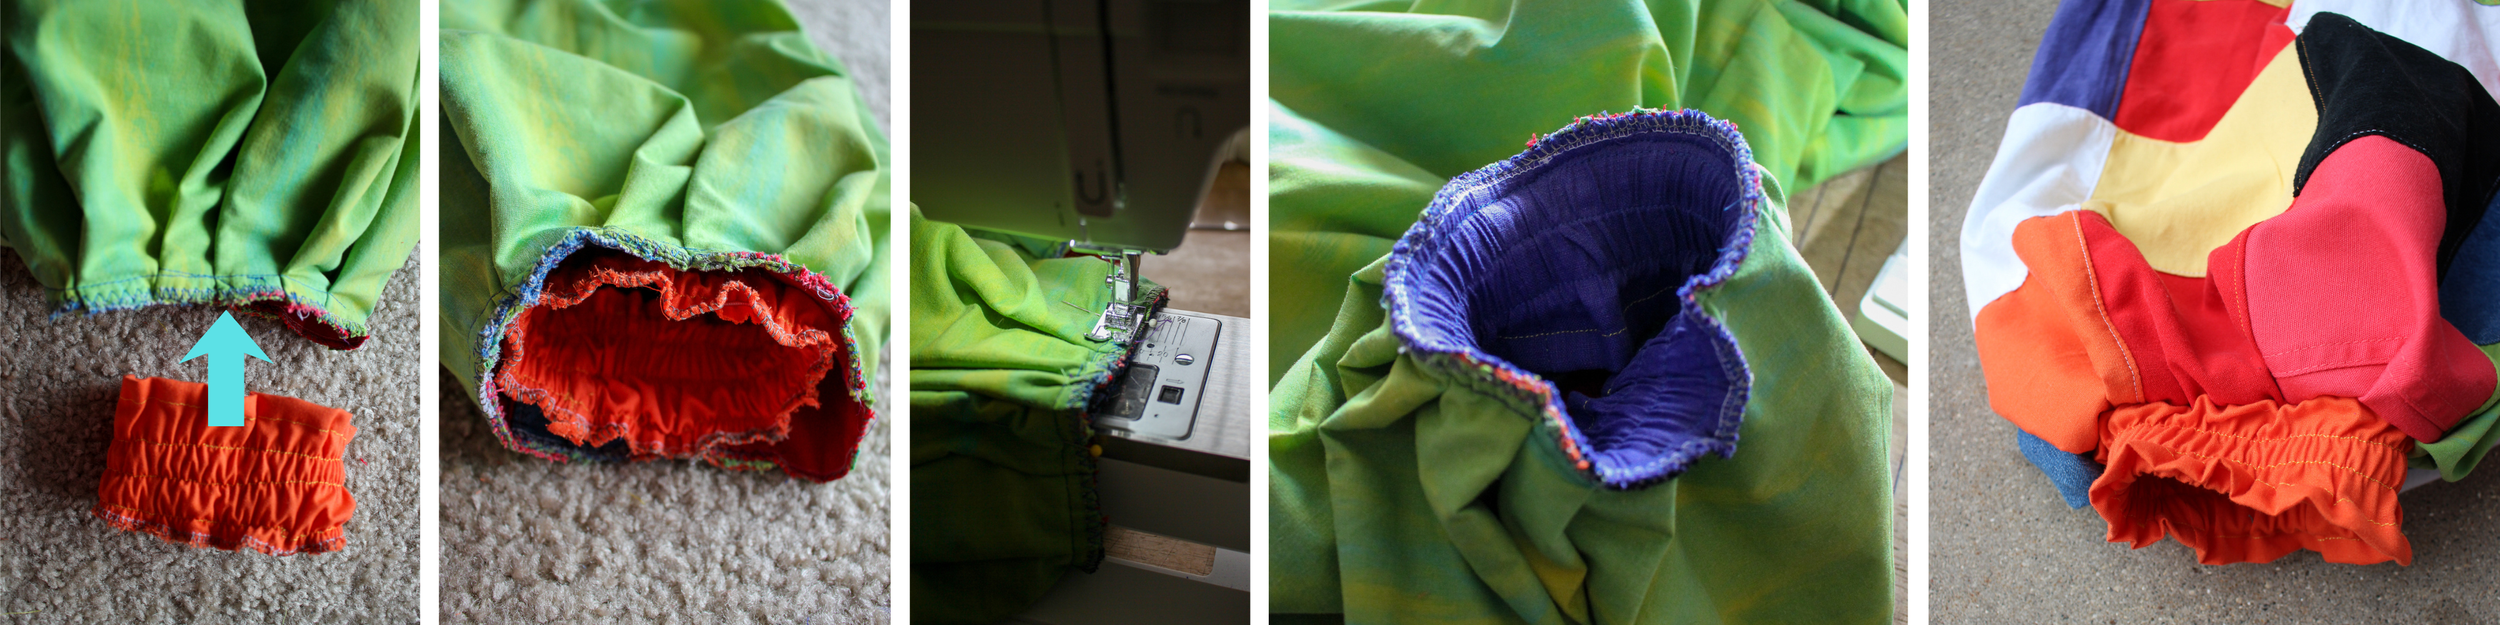
Image: Insert cuff into pant legs, stretch while sewing together, overlock edges.
Belt Loops
Cut 5 belt loops, (or however many you want)
Mine were 5” x 4” (12.7cm x 10.16cm)
Fold in half, iron flat.
Sew around the indicated area, leaving a gap to turn inside out.
Iron flat and sew the entire edge down.
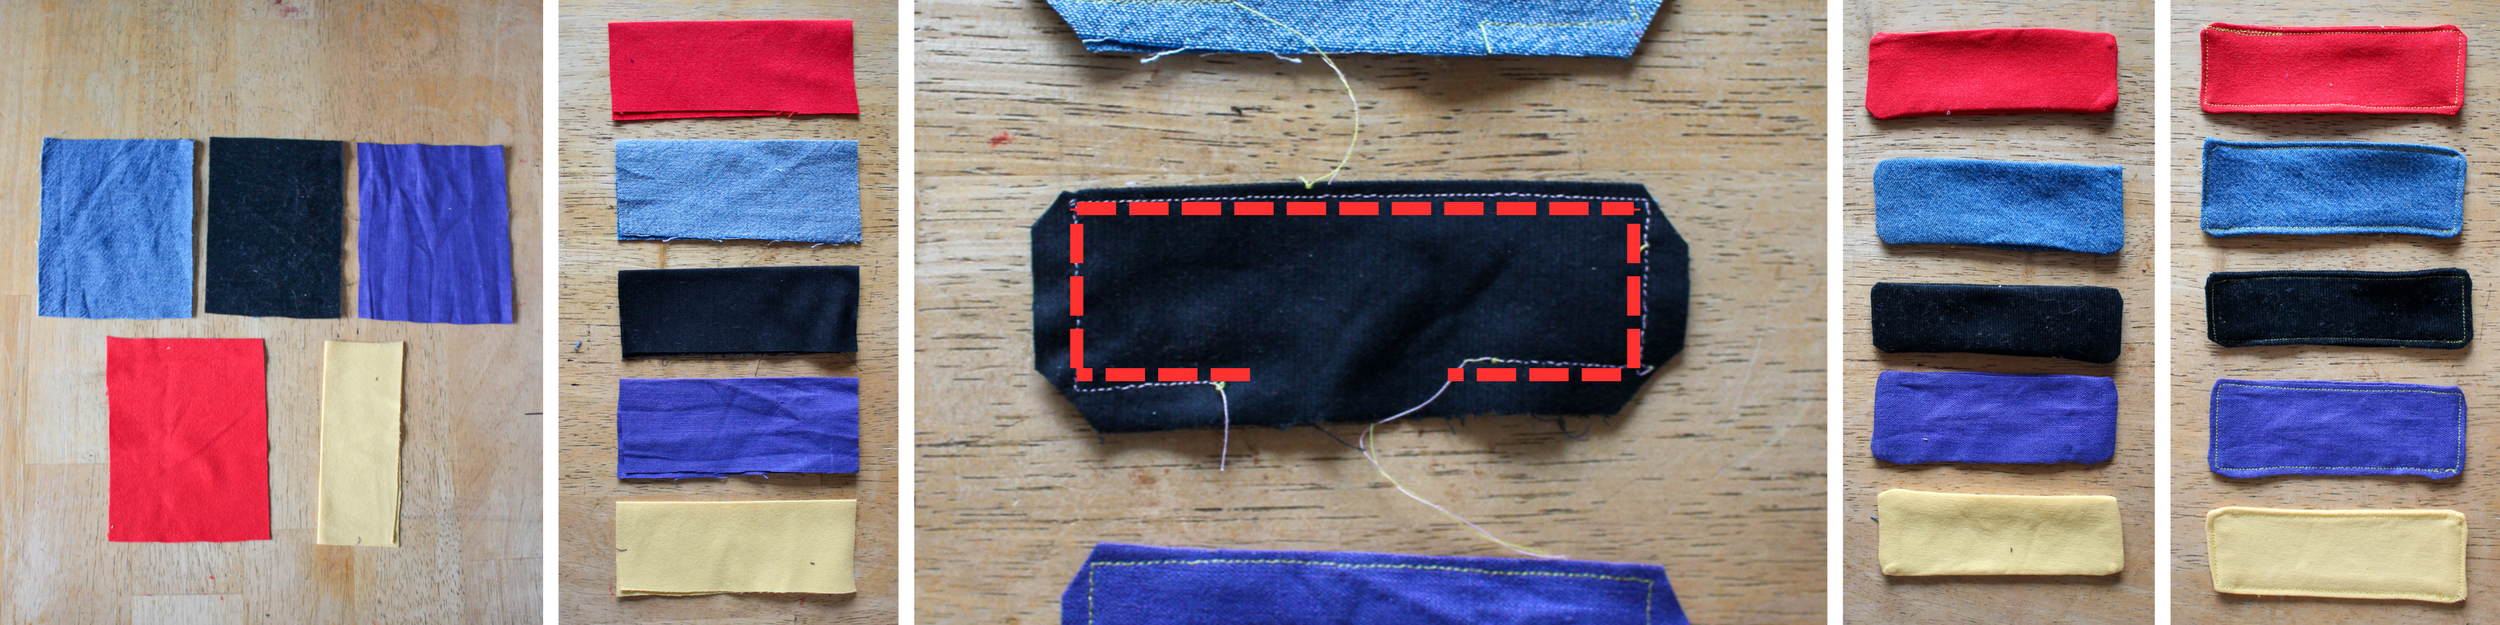
Image: Cut belt loops, fold in half, sew along dotted line, turn inside out, iron flat, sew around entire edge.
Pin to the waistband,
Sew the top and bottom of the loops.
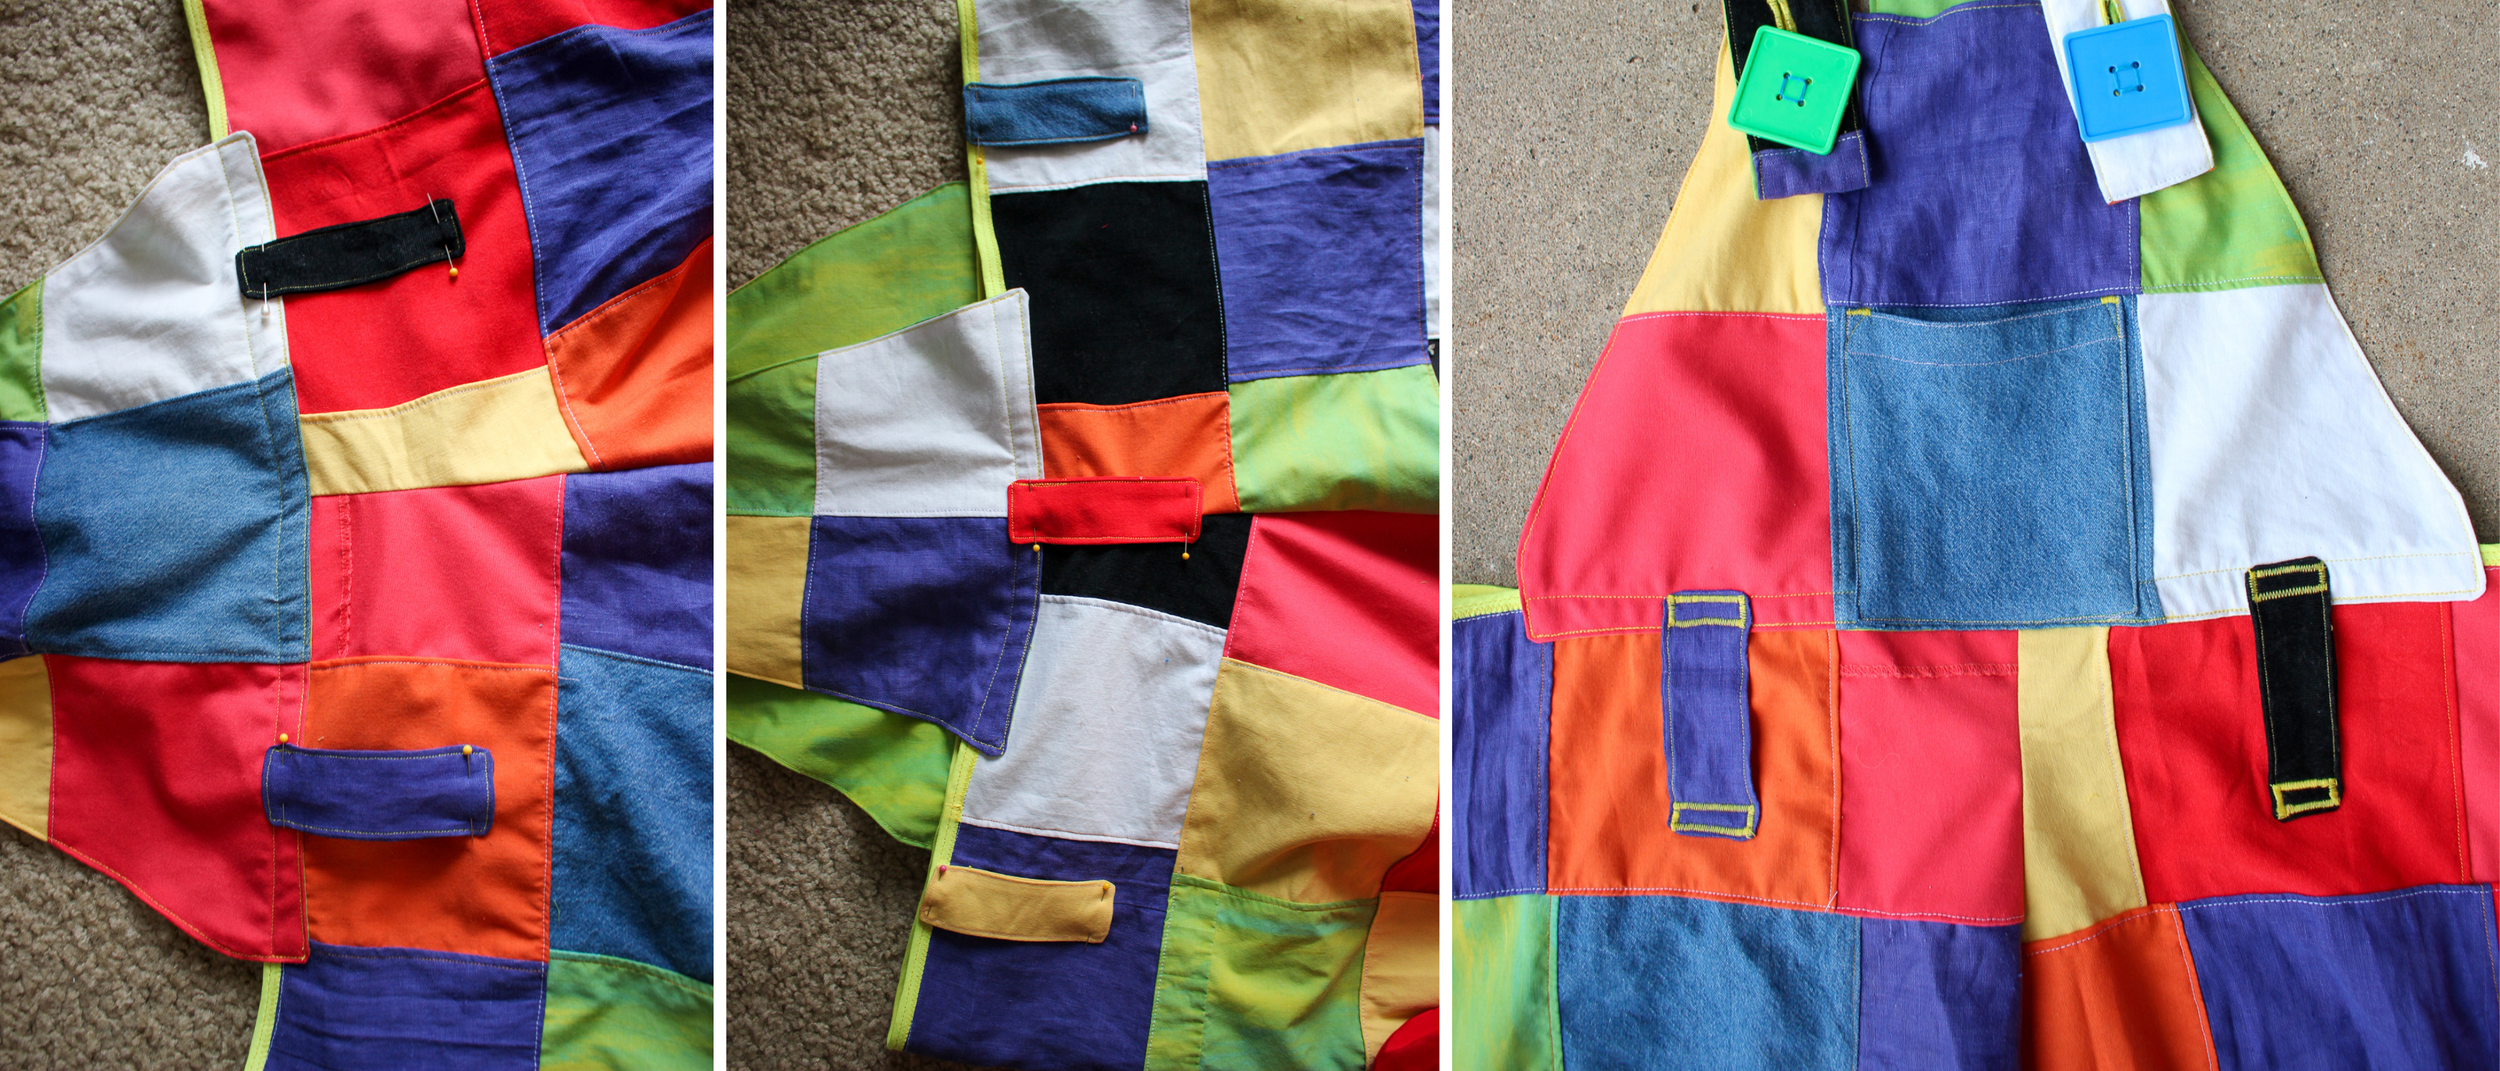
Image: Pin belt loops, sew the top and bottom.
All Done!
Hopefully you had a relatively easy time following this tutorial!
Please share all the pics of your projects, it truly brings me so much joy to see what you guys create!
XOXO Brit